
Shifting the methods by which users generate content, whether through articles, blogs, or websites, the Gutenberg Block Editor has significantly simplified the process of crafting compelling content. Introduced in the 5.0 update, it has taken over from the classic editor as the default WordPress editor.
Gutenberg is a block-based editor introduced by WordPress that revolutionizes the way content is created and managed within the platform. Unlike the old classic editor, which primarily relied on a single large text field for content input, Gutenberg breaks down content creation into smaller, modular blocks.
Gutenberg WordPress block editor allows users to create and design captivating contents using the drag and drop elements for text, images, videos, and many other site elements.
This approach simplifies the process of content creation and offers users greater flexibility and creativity in designing their websites. The block editor is preferred for various reasons. Some of which we have stated below:
- Create content using individual blocks such as paragraphs, headings, images, videos, buttons, and more. Each block can be easily manipulated, moved, and can be customized independently.
- With Gutenberg, you can simply drag and drop blocks into your content layout, rearranging them as needed. This makes it easy to create complex page layouts without the need for coding or third-party page builders.
- To avoid recreating the same block each time you need it, Gutenberg allows you to save custom blocks for reuse throughout your site. This feature enables you to store and access your custom blocks easily whenever you need them, saving you time and effort.
- The blocks in Gutenberg are designed to be responsive by default, ensuring that your content looks great on all devices without the need for manual adjustments.
- Gutenberg provides developers with a robust framework for creating custom blocks and extending the editor’s functionality through plugins and themes, offering endless possibilities for customization and integration with WordPress websites.
How is Gutenberg Block Editor Different from Old Classic Editor?
The Gutenberg WordPress block editor differs from the old classic editor in several ways, particularly in terms of the user’s ability to choose from a wider range of editing blocks, thereby making content creation easier. Gutenberg was updated to offer a more modern and flexible editing experience. Here are some comparison points between the older and newer versions:
| Gutenberg Editor | Classic Editor | |
|---|---|---|
| Editor Interface | Block-based editing interface where content is composed of individual blocks for text, images, videos, and other elements. | Features a traditional interface with a single large text field for content input. Users format content using a toolbar similar to a word processor. |
| Flexibility | Greater flexibility with customizable blocks | Limited layout options |
| Ease of Use | More intuitive, especially for beginners | May require HTML/CSS knowledge |
| Compatibility | Some compatibility issues with themes and plugins | Widely supported by themes and plugins |
| Modern Features | Drag-and-drop editing, rich formatting options | Traditional toolbar interface |
How do Gutenberg Block Editor Work
Gutenberg provides an array of block styles which let’s users to create compelling contents with its easy interface.
Using the Gutenberg interface is a straight forward process. To start with you will need to create a post or page.
- Go to Dashboard > Posts or Page.
- Click the Add New button at the top of the screen to start a new post or page.
- Selecting the block inserter “+” icon on the left will display all available blocks categorized by their respective functions.
- You can choose from the intended blocks and create the content you wish to choose.
- Once done click on Publish.
How to Use the WordPress Gutenberg Block Editor
Using the Gutenberg block editor is easy. Let’s know some of the features of the Gutenberg and see how the blocks work.
How to Add a New Block
To start with the process of creating a new content, the first step is to add a new block. It is a simple process which can be done in several ways.
After you add a post/page, you will notice a title block is already there. Simply move your cursor to the black “+“ sign and choose the appropriate block to start creating.
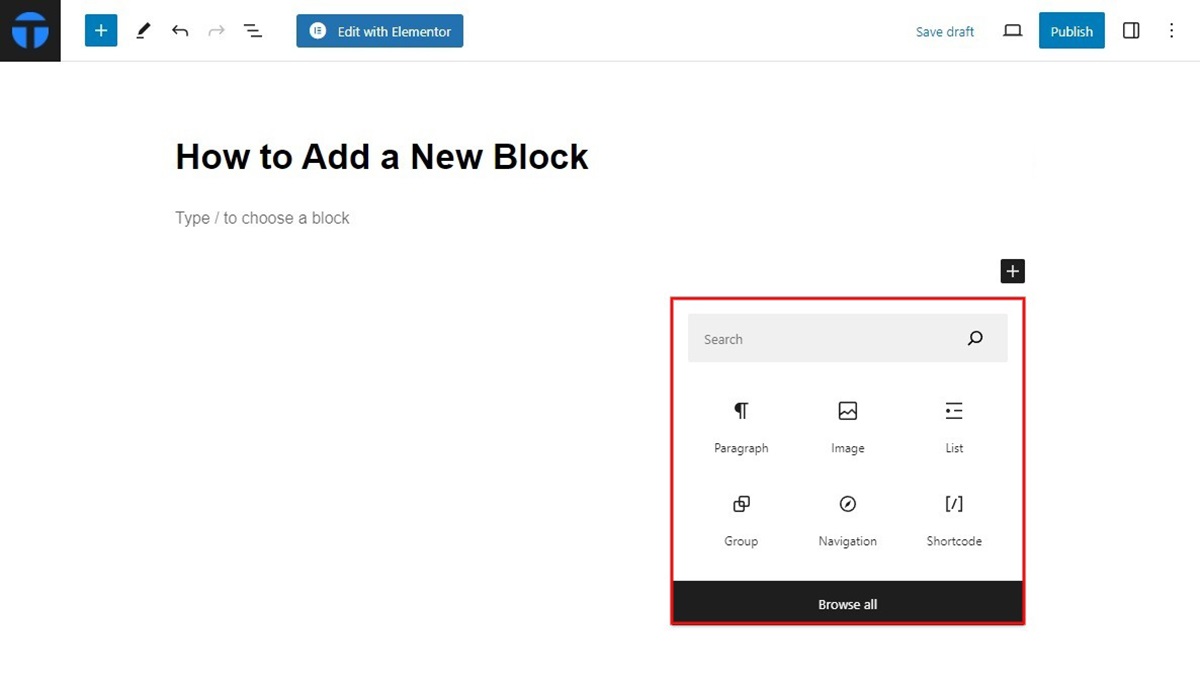
You can alternately add new blocks using the block inserter interface which you can access in the top left corner. Click on the blue “+” button to quickly navigate through the blocks.
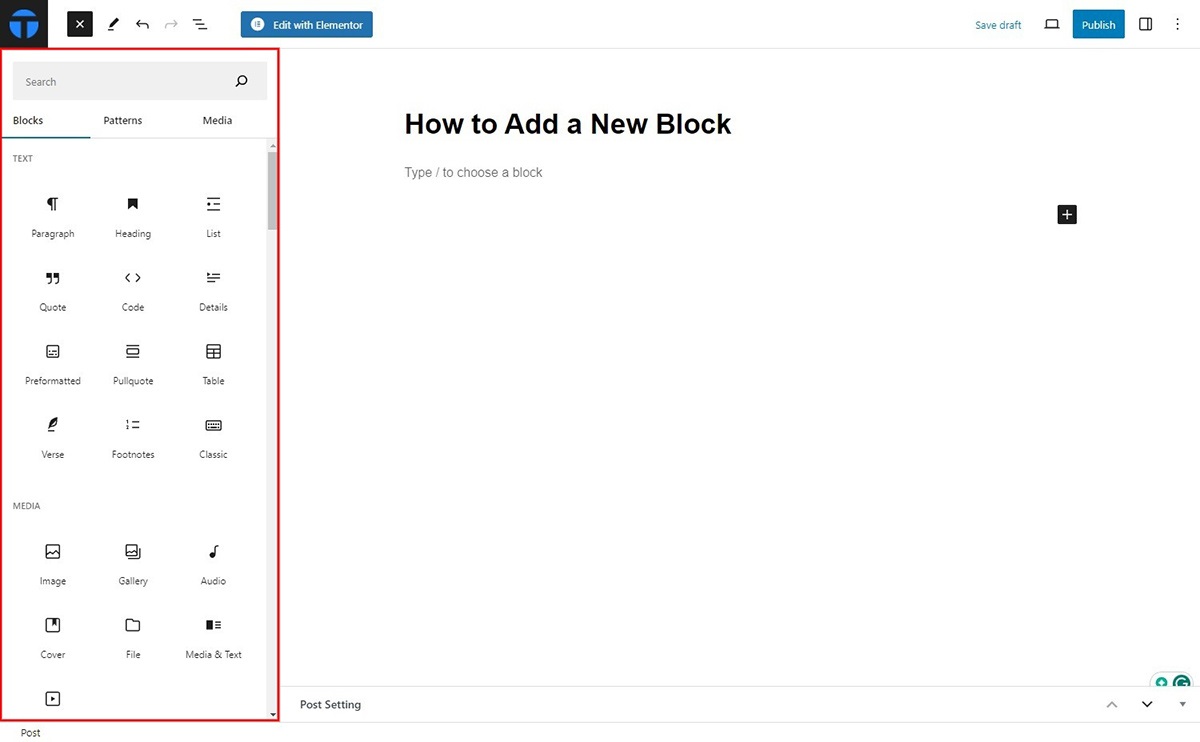
If the block you’re searching for isn’t available, the inserter will display results from the Gutenberg block directory. This directory is integrated with the WordPress plugin repository and includes single-block plugins.
How to Customize Blocks
The Gutenberg block editor allows you to easily edit the content of blocks you’ve added. Simply click on the block content, a block toolbar will appear automatically, allowing you to make further adjustments as needed.
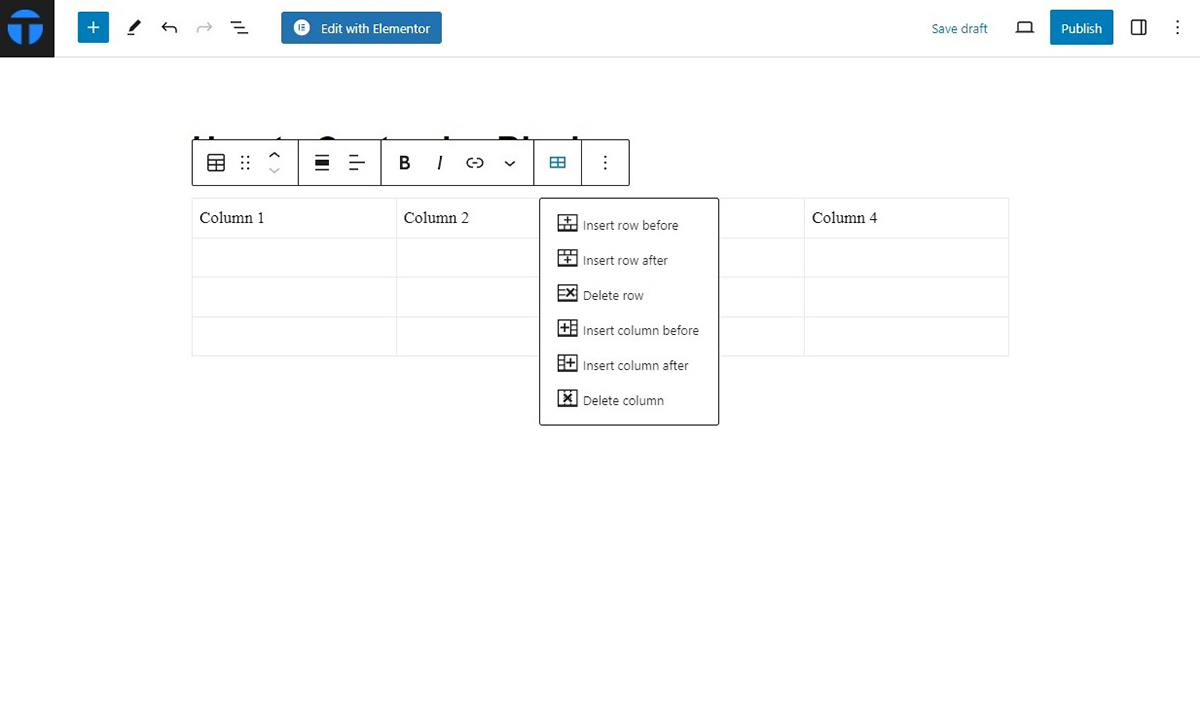
For example, if you’ve added a table block in Gutenberg, you can customize it further by adjusting text alignment and adding or removing rows and columns.
How to Arrange Blocks
Rearranging the blocks is the primary action that you will be doing on the Gutenberg editor. To rearrange blocks in the Gutenberg editor, you can simply click on the six-dot icon and drag the block to your desired position.
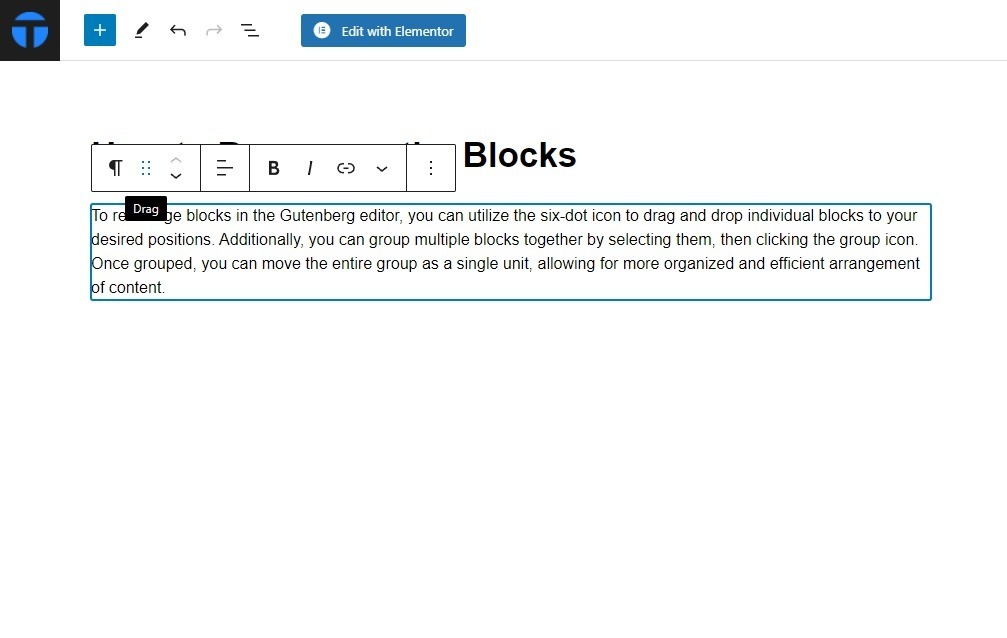
Additionally, you can group multiple blocks together by selecting them, then clicking the group icon. Once grouped, you can move the entire group as a single unit, allowing for more organized and efficient arrangement of content.
How to Group Multiple Blocks
Let’s say you’re setting up a Testimonials section on a homepage. Here, you aim to display multiple testimonials, each containing a quote from a client, their name, and their position or company. Grouping blocks can assist in organizing each testimonial seamlessly.
Create intended nested blocks by grouping multiple elements. These blocks are the blocks placed inside the parent block which creates a structured layout.
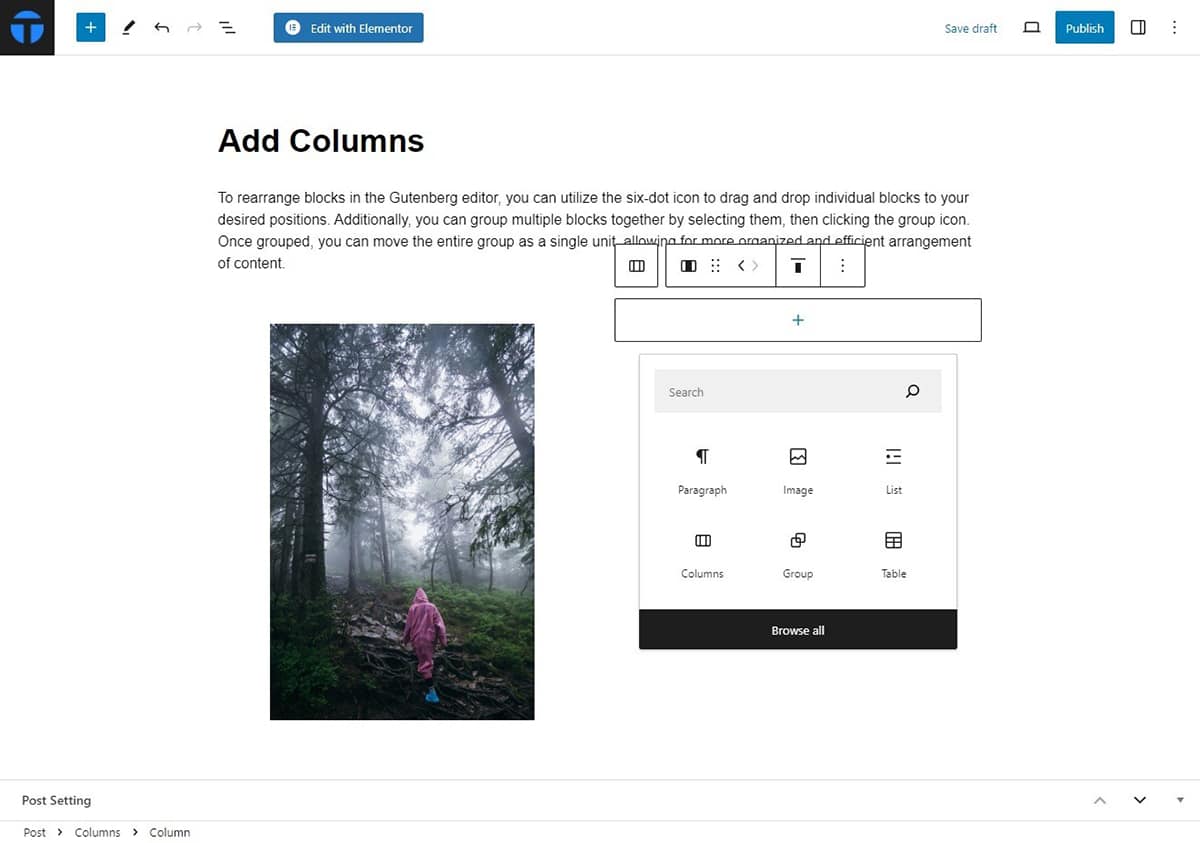
For instance, a column block can be a parent containing other blocks like texts and images.
Let’s illustrate using the column block as an example:
- Open the Block inserter > Design > Column.
- Add the desired column you want to configure.
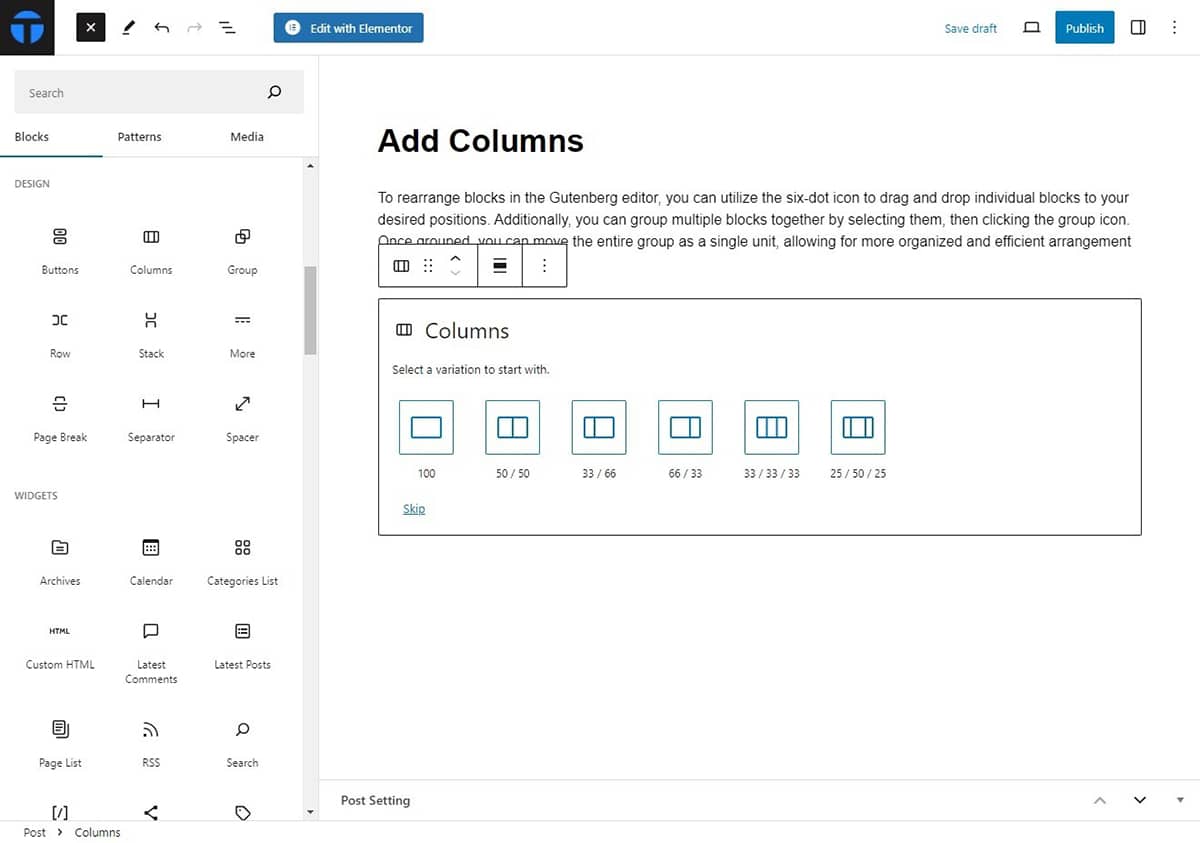
- Then, click on the “+” sign to add more block to each column.
After grouping the blocks, you can adjust how they look together. You can do this by using the alignment options in the toolbar or by going to the block settings on the side of the editor.
Inside these settings, there’s a checkbox labeled “Inner blocks use content width.” This option helps ensure that the grouped blocks fit neatly within the overall layout of your page. You can turn this option on or off depending on how you want your content to appear.
How to Add Heading and Text
To make your post or page more engaging, you’ll need to include paragraphs and headings. With Gutenberg blocks, adding headings and writing paragraphs is easy, allowing you to create compelling articles or blog posts effortlessly.
The easy way to start with your content is start writing as a paragraph or open the block inserter and add a Paragraph.
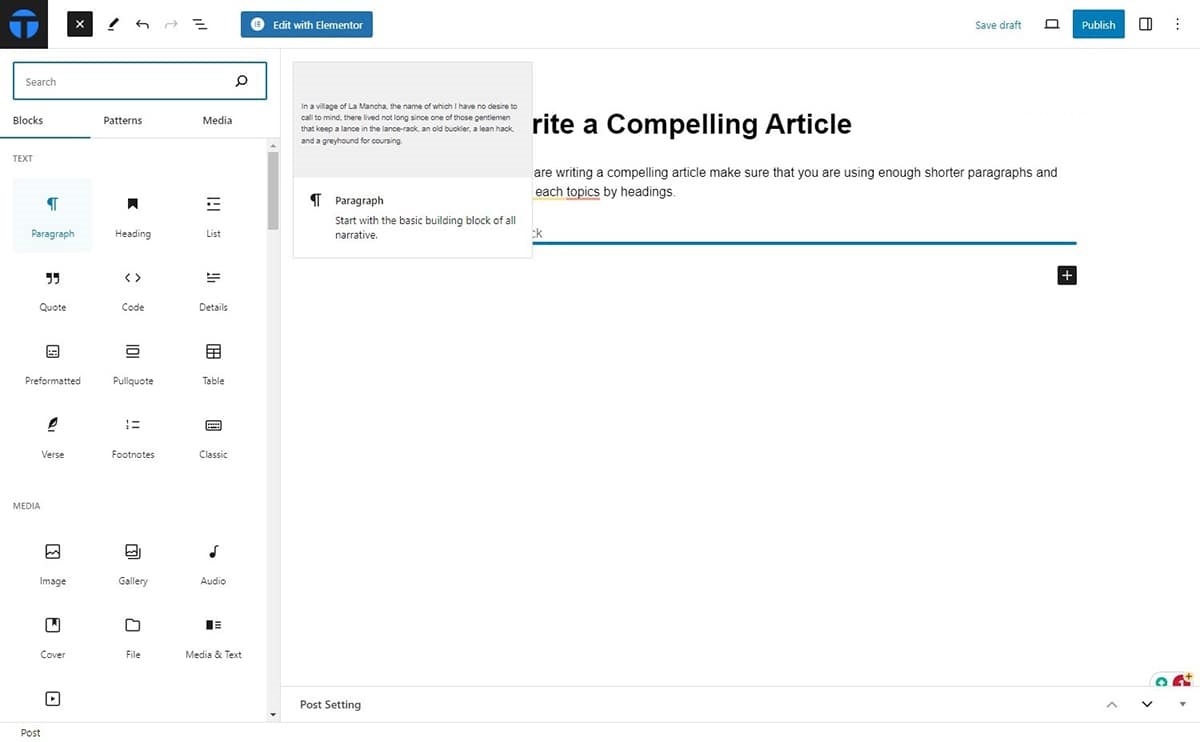
This block allows you to further add footnotes, add subscript or superscript according to the need of your content.
To ensure user engagement with your content, using a Heading block helps separate and organize the post/page, making it more structured and appealing. You can choose from heading H1-H6, to match the need of your contents.
How to Add Images and Media
Adding images, videos, and other media to your content can enhance engagement and understanding among your target audience. To add such media, Gutenberg block editor has a separate Media section from where you can add what you want. It offers dynamic content block like:
- Media and Text: This block allows the users to add images along with the text for a more comprehensive learning.
- Image Gallery: This section allows one to add multiple images to the content.
- Cover: A distinctive block for superimposing text on images or videos, ideal for crafting visually striking headers or focal points.
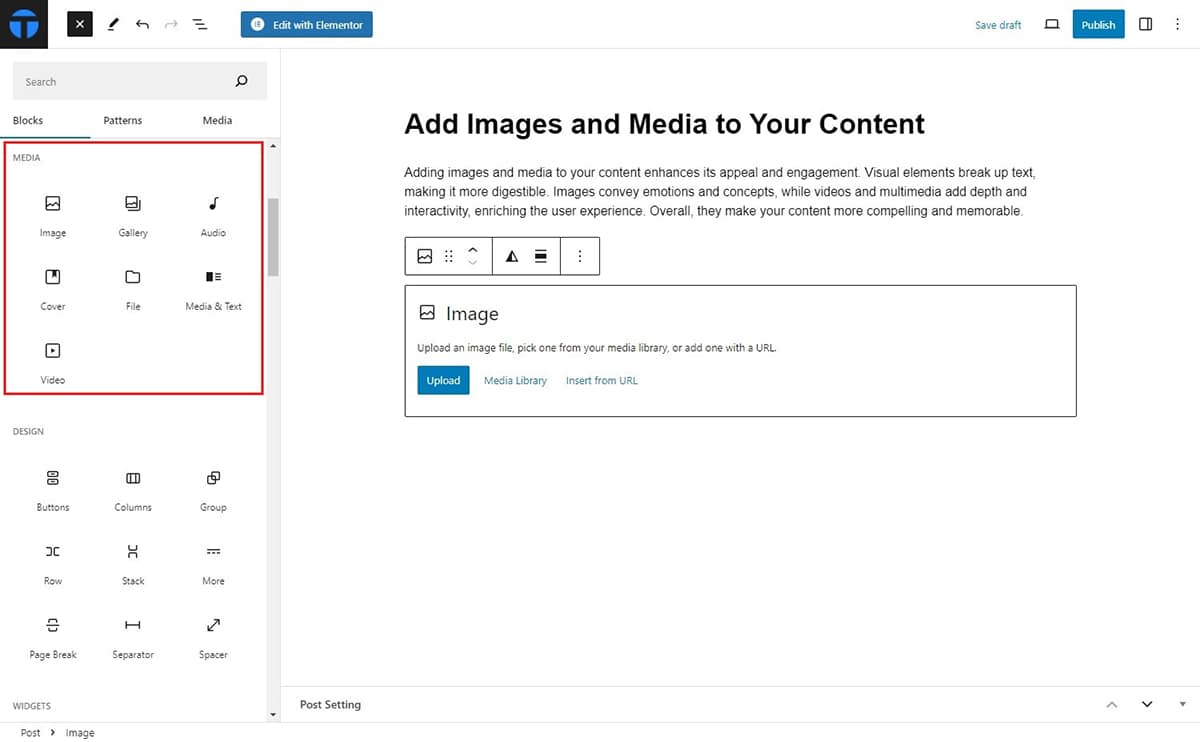
To add images, select the Image block and add Upload the medias that you have saved in your device.
How to Embed Media
WordPress supports embedding content from external sources such as tweets from Twitter, posts from Instagram or Facebook, maps from Google Maps, and more. Simply paste the URL of the content you want to embed, and WordPress will handle the rest.
To embed media into your content:
- Open the Block inserter > Embeds.
- Click on the social media of the link which you want to add.
- Paste the link and click on save changes.

How to Create Synced Patterns
Creating synced patterns are the reusable blocks which you can use to use it throughout the content to make sure that all your contents and pages align in the same pattern.
Follow these simple steps to create a synced pattern:
- Select the section of which you want to create a synced pattern.
- Click on the three dots and then select Create Patterns.
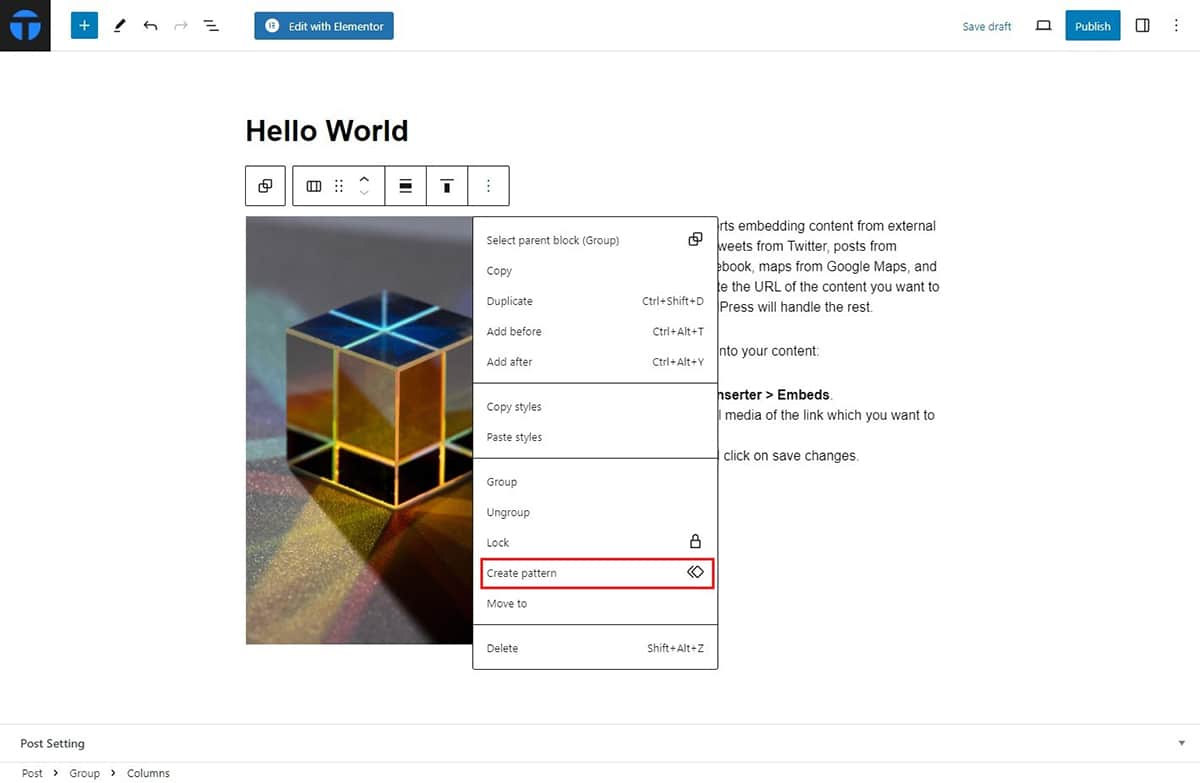
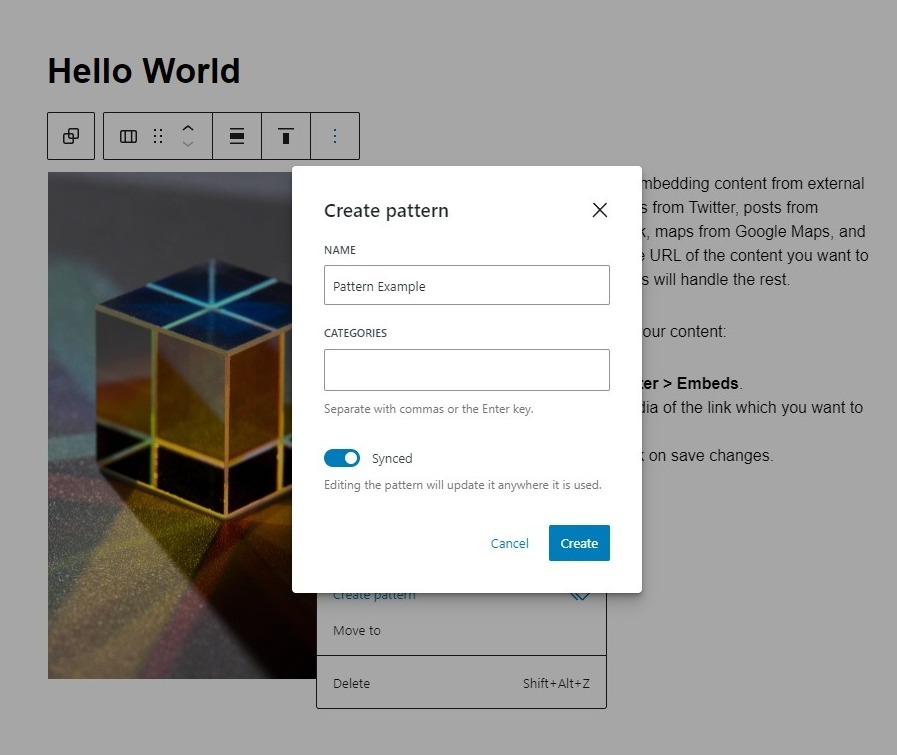
- Name the pattern and make sure that you toggle the Synced option so that it synchronizes to every post that it is applied. Then click Create.
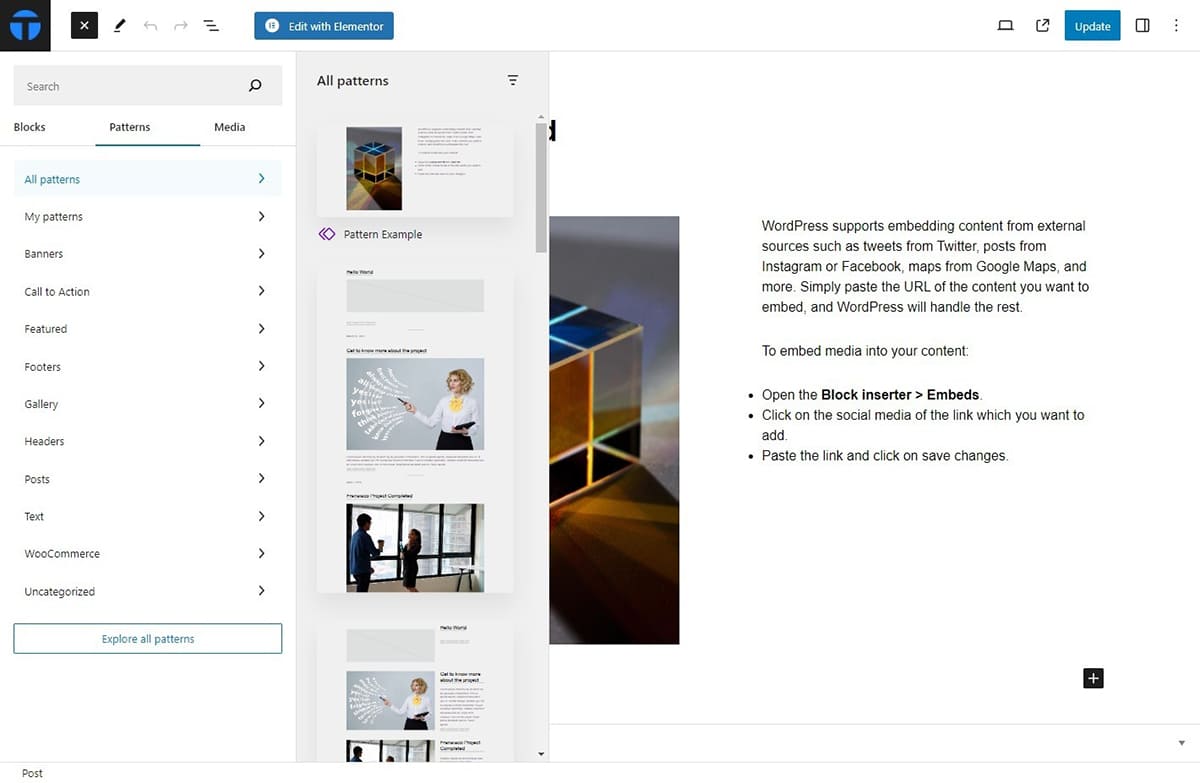
To utilize a pattern you’ve created, navigate to the block inserter. From there, select Patterns. Here, you’ll find all the patterns you’ve previously crafted. You can then choose the desired pattern and apply it to any post or page within your WordPress site.
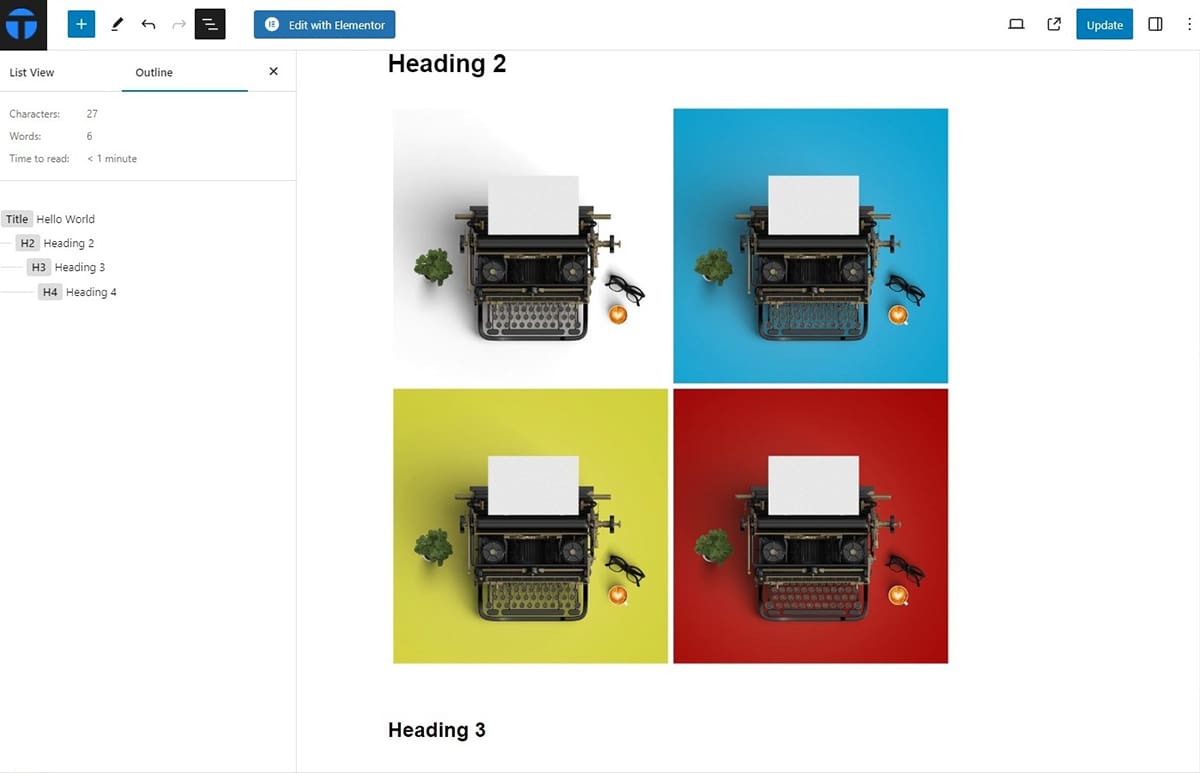
How to Use the Block List View
The block list view gives you a neat list of all the different content blocks you’ve put into your post or page. This helps you arrange them just the way you want, making it easier to work with your content, especially when you have lots of different blocks stacked up or nested inside each other.
To access the block list view, simply click on the icon with three horizontal lines stacked on top of each other, located at the top-left corner of the editor.
Every block in the pattern is clickable which takes you to the blocks where you can make the changes when necessary in more convenient way.
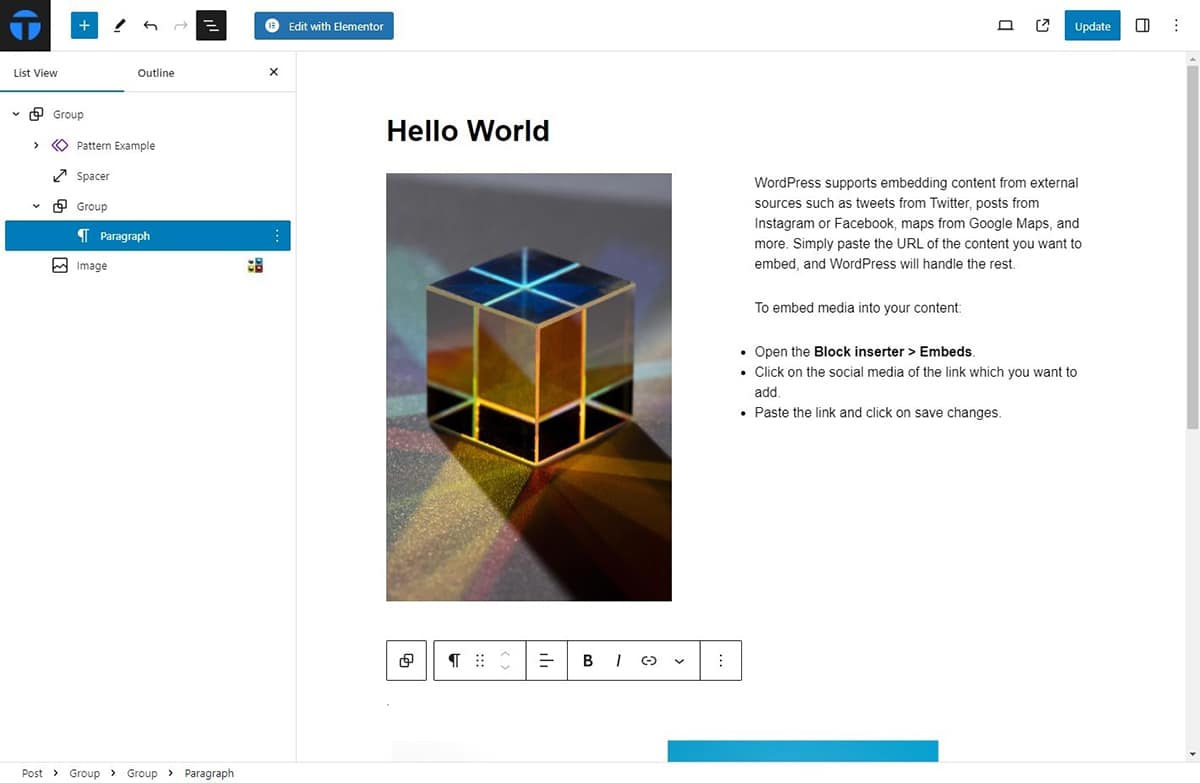
Next to the list view, you’ll find an outline section that displays the structure of your content based on headings. This feature helps you ensure that your headings match the actual content of your post or page. If a heading doesn’t correspond correctly to the content outline, you can easily identify and correct it.
Conclusion
In summary, Gutenberg block editor is a game-changer for WordPress editing. It offers an easy way to add and customize content blocks like text, images, and videos, making website creation simpler and more flexible. With features like saving custom blocks and creating synced patterns, Gutenberg ensures consistency across your site. Plus, tools like the block list view and content outline help you stay organized while editing. Gutenberg makes it easy for anyone to design a beautiful website and share their ideas online.