
Hash Form Documentation
Welcome to the documentation of Hash From where we will guide you through the process of using this plugin and clear any confusion that you may have.
Hash Form – Drag and Drop from Builder
Hash Form is a plugin that allows you to create contact forms with its easy drag and drop feature. With the form elements create the type of form that aligns with your websites preferences.
Installation
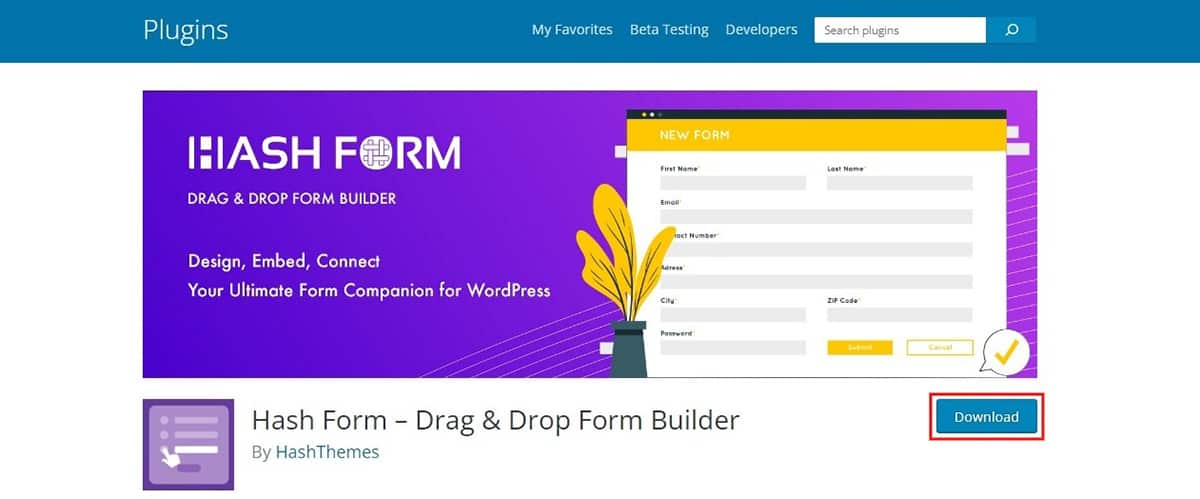
The installation of Hash Form is a simple process of uploading a .zip file. Here is the Download link if you need it.
Installation Via WordPress Dashboard
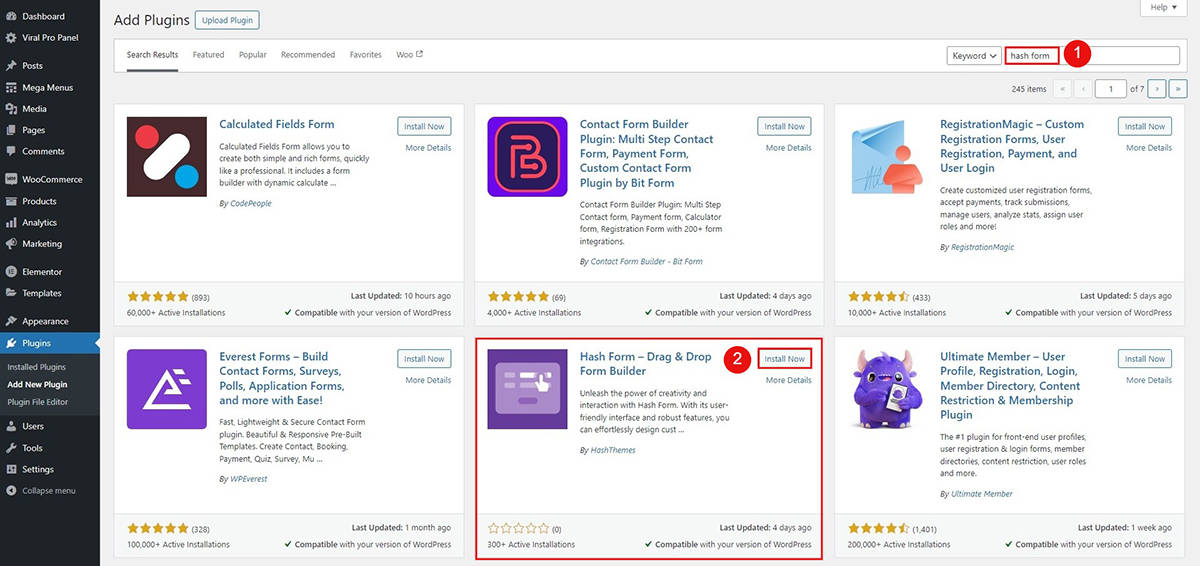
To install the plugin via WordPress Dashboard follow these steps:
- Go to Dashboard > Appearance >Plugins.
- Click on Add New Plugins button then search for the HashForm keyword in the search field.
- Navigate to Hash Form plugin and click on the Install button.
- Once you have actively installed the plugin, you must activate it. Click on the Activate button once the plugin is installed.
Installation Via Ftp/CPanel
Installing Hash Form follows the simple plugin installation procedure, which you may already be familiar with. If not, here are the steps to guide you:
- After you follow the download link, hover on to the top where you can see the Download button.
- Download the Hash Form .zip file and save it to your computer.
- Extract the downloaded .zip file you will find a folder with style and other plugin files inside it.
- Now Connect the FTP server using the FTP details and copy the extracted folder to the ‘site-name/wp-content/plugins/’ path.
- Now go to the Dashboard > Plugins > Installed plugins.
- You’ll see the Hash Form plugin in the theme dashboard.
- Activate the plugin.
Setting Up Hash Form Plugin
Setting up the Hash Form plugin is simple once you have successfully activated the plugin. To configure the Hash Form:
- Log in to your WordPress dashboard.
- Navigate to the Hash Form option in the left-hand menu of your dashboard.
- To create a new form you will need to create a new one. Click on the Add New button and give your form a title.
- You will be redirected to the plugin’s settings page where you can personalize and make necessary changes accordingly before you integrate it into your WordPress website.
Build
This section allows you to add the field types and make changes related to the field types accordingly. Building a form field is now easier with the use of Hash Form- drag and drop form builder.
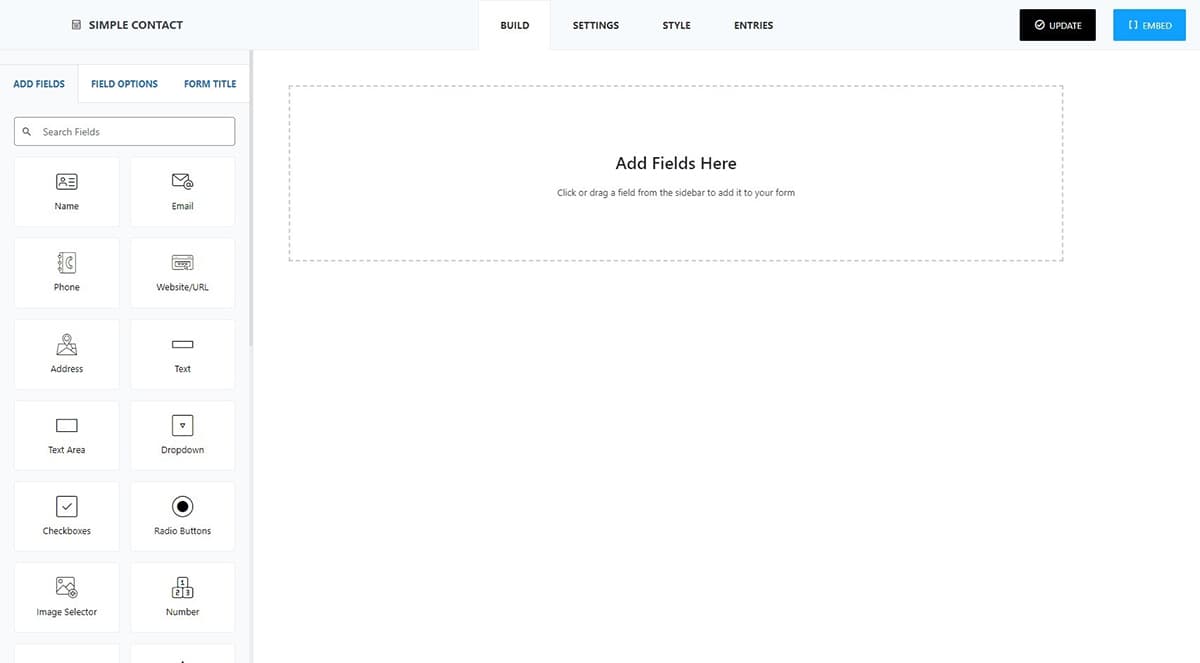
Add Fields
In the Add Field section, you can use field types to drag and drop elements, crafting the form you want. There are over 20 form field elements to choose from, such as:
- Name
- Email
- Phone
- Website/ URL
- Address
- Text
- Text Area
- Dropdown
- Radio Buttons
- Image Selector
- Number
- Range Slider
- Star
- Spinner
- Date
- Time
- Upload
- User ID
- Hidden
- Heading
- Paragraph
- Separator
- Spacer
- Image
- HTML
- reCaptcha
Combining these field types allows you to create endless variations of forms to suit your preferences.
Field Options
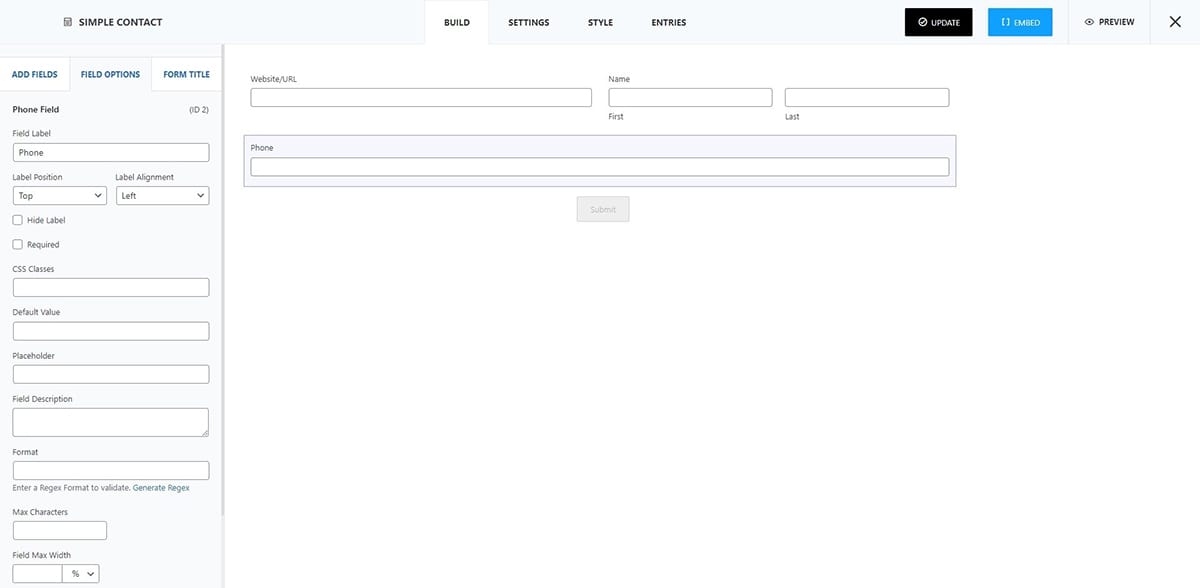
In the Field Options, you can choose to make changes in the field types. Simply click on the field you want to make the changes and you can change the name of the field along with the label position and alignment. Furthermore, you can choose to hide the label or mark the field type as required when users fill out the contact form. To make sure that the users are clarified about what the label is about you can add a short description to the label as well.
Form Title
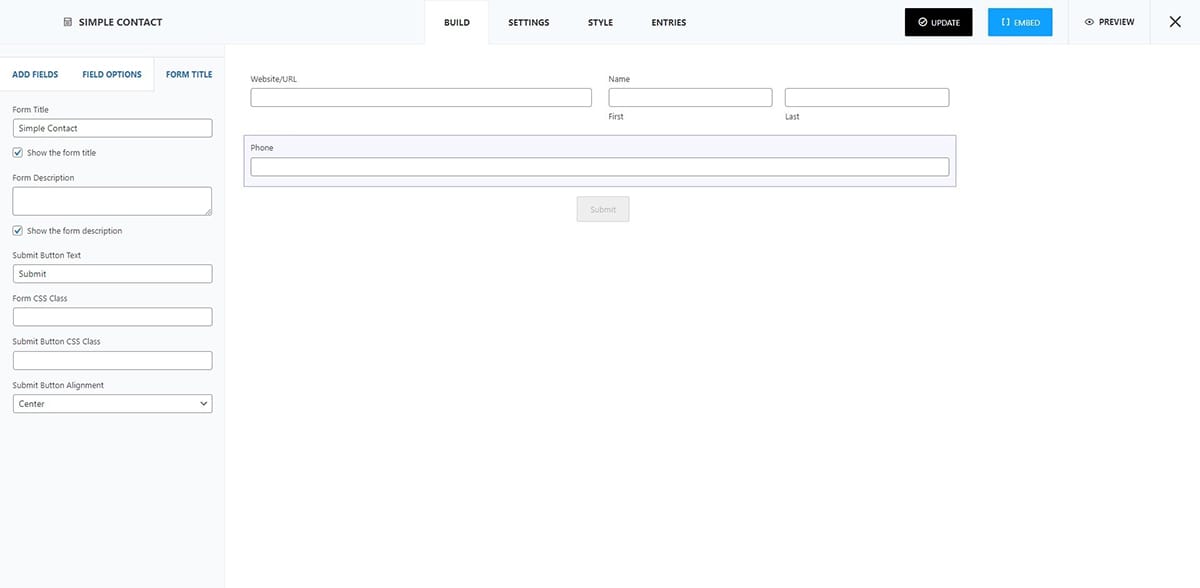
In the Form Title section, you can decide whether to display or hide the form title. You have the option to include a brief description explaining the purpose of the form.
For the button, you can choose its placement – either at the center, left, or right side of the form. Additionally, customize the text for the Submit button according to your preference.
Settings
Under the Settings Tab, you can choose to make changes in different settings options. The settings that you can configure are:
- Email Settings
- Auto Responder
- Confirmation
- Conditional Logic
- Import/ Export
Email Settings
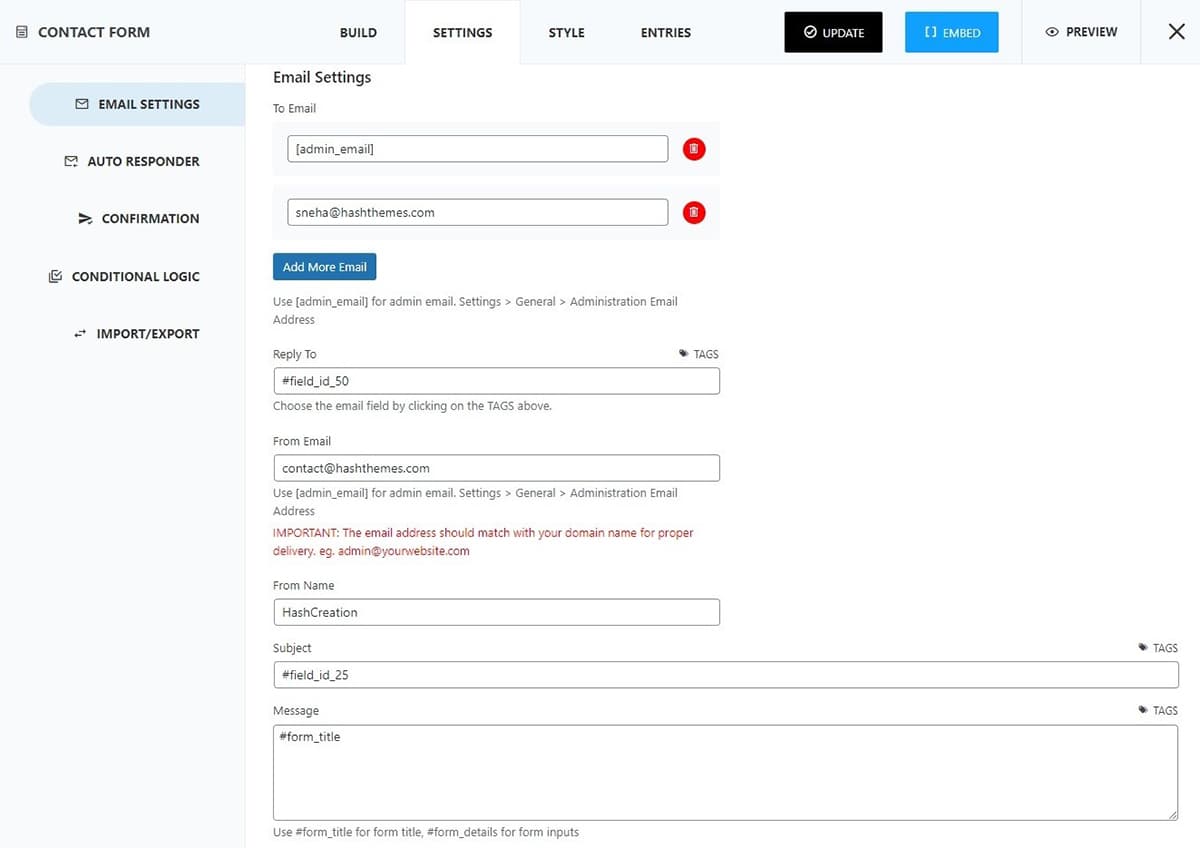
In the Email Settings section, the field To Email is where the users can view to whom they are directing their messages to. When you apply the shortcode “[admin_email]”, the email will be sent to the administrator email address that you have set in the General Settings. You can wish to add many email addresses that you wish to add to make sure that the mail is directed to other concerned parties as well.
The Reply To section in an email is where the sender’s email address is displayed. By adding the appropriate tag to this field, when you reply to emails, your response will automatically be directed to the original sender without the need to manually copy their email address.
The From Email and From Name are the received information from who filled up the contact form.
The Subject is the field where a concise description of the message is written.
In the Message section, you can incorporate tags for the form title and form details. If you have coding skills, you can utilize code to craft your own contact form, encompassing all the necessary fields typically required for such a form.
Let’s see how a simple contact form looks like and how are emails received. Please refer to the following screenshot:
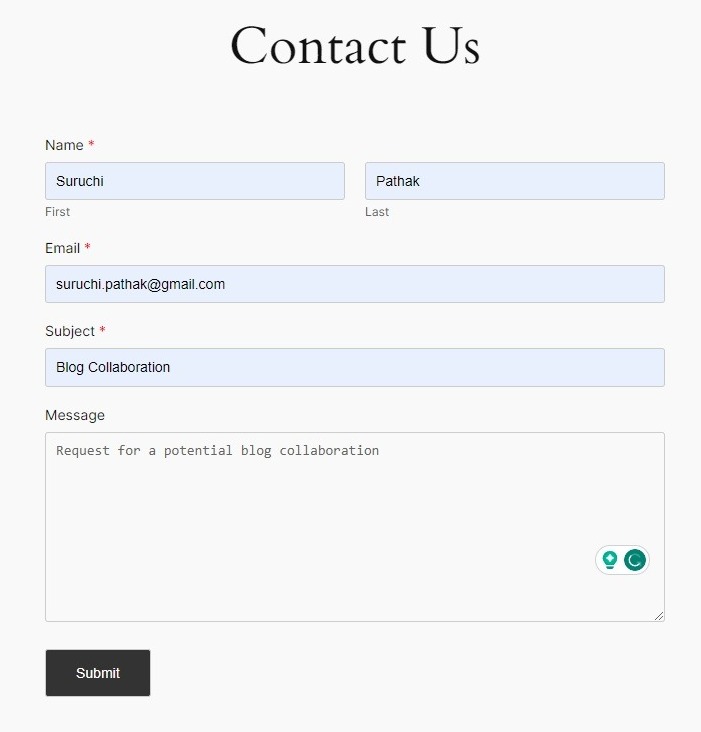
You can see the fields where users can place the required information like Name, Email Address Subject , and Message.
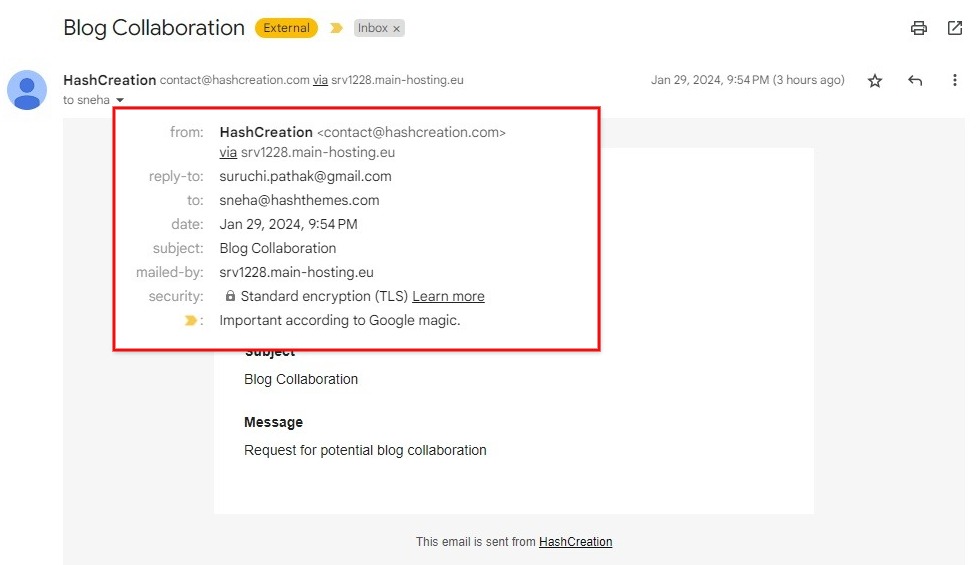
Here, you will find all the essential fields necessary to convey clear information to the email recipient. The highlighted section contains the sender’s name and email address, the date and time the email was sent, and the subject line. This concise format aims to facilitate the recipient’s understanding of the email’s sender and content.
Auto Responder
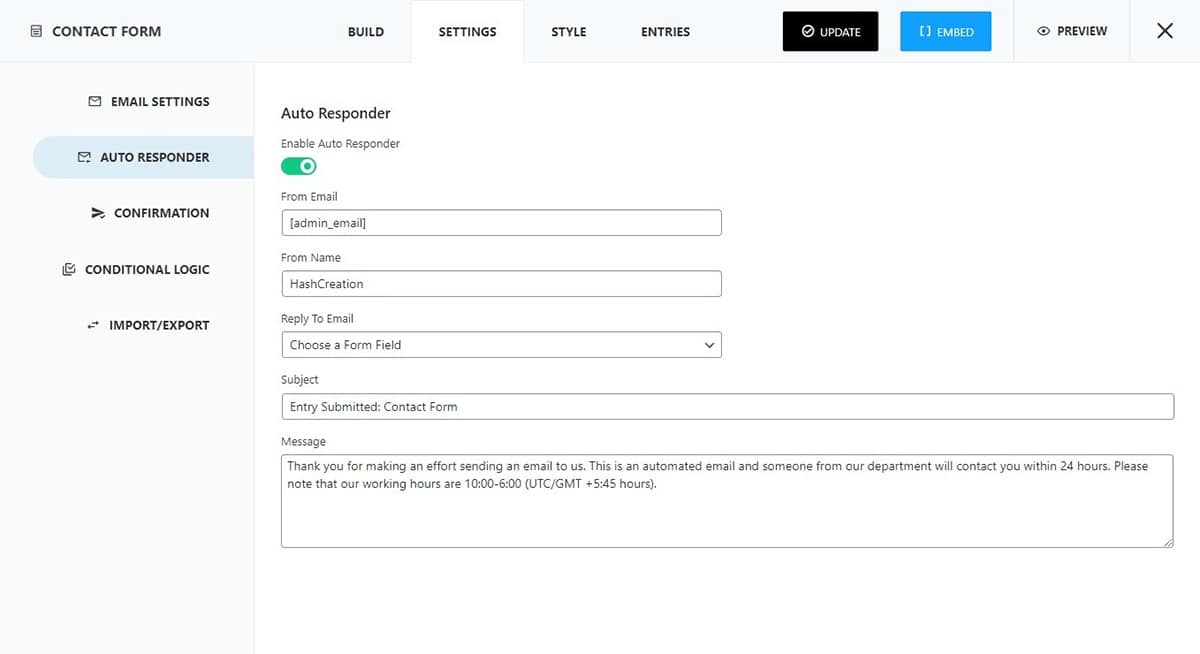
An automated response email is dispatched to the user upon completion of the contact form and clicking the send button. This automated message is intended to promptly acknowledge receipt, ensuring users feel acknowledged and reassuring them that their message will be attended to at the earliest convenience.
To make sure that your confirmation email is sent make sure you toggle the auto responder and type the message you want to convey letting the receiver know that they will be attended to shortly or the team members will contact them anytime soon.
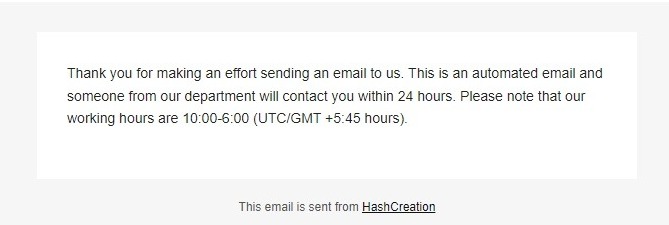
In the screenshot you can see that the automated message was sent reassuring the recipient that their messages will be addressed soon.
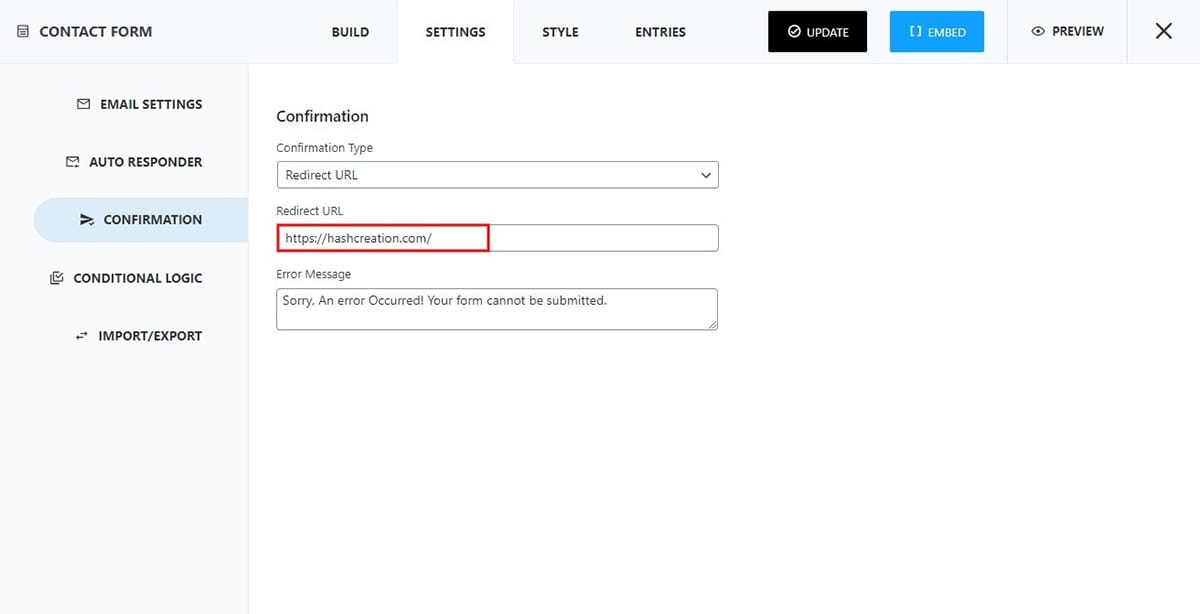
Confirmation
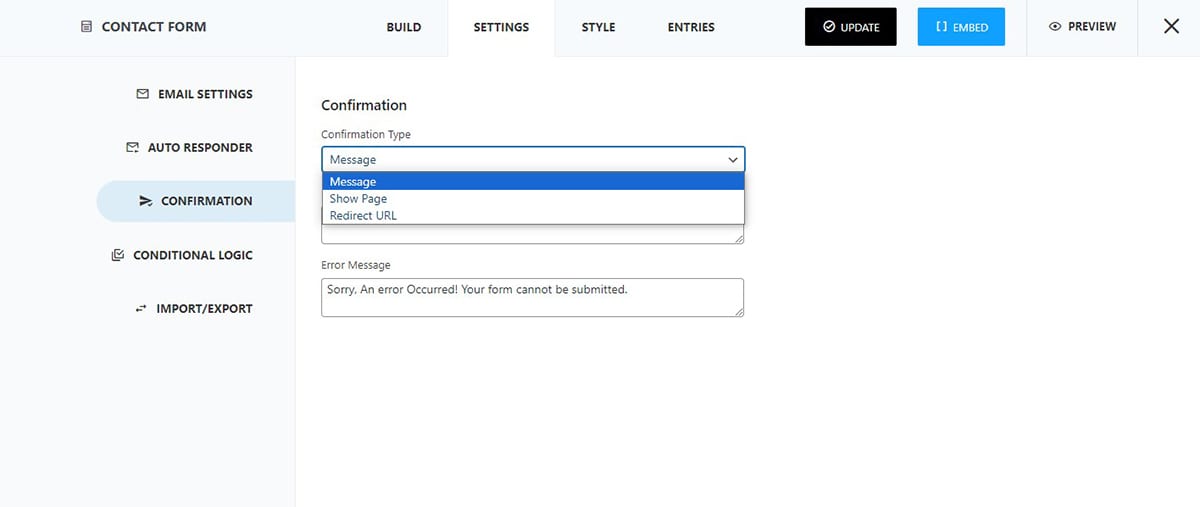
The Confirmation message lets the user know that their message has been delivered to the concerned parties.
The plugin allows you to add the message you want users to see after they have completed filling out their contact form and have clicked the send button.
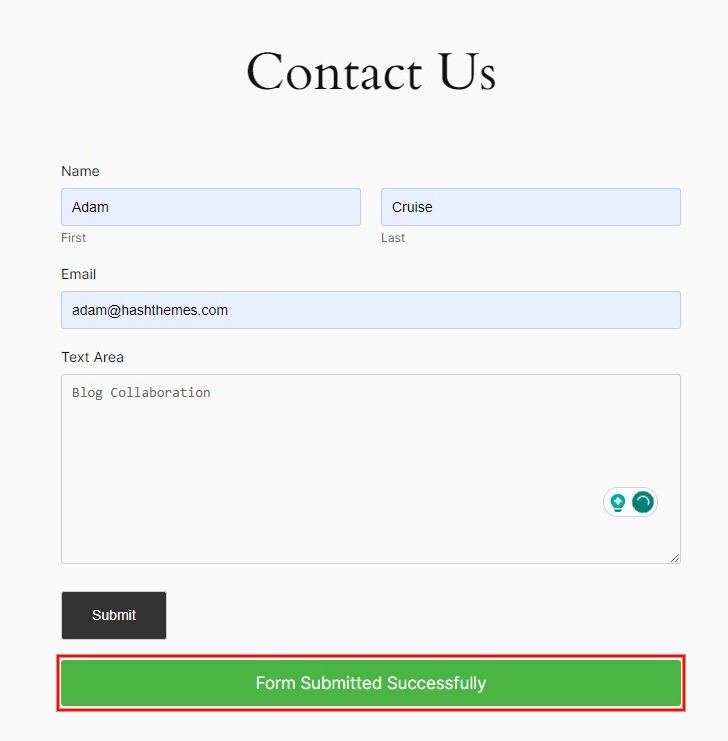
Refer to the following screenshot of how the confirmation message appears.
When you opt for the confirmation type Show Page, the contact form will load with a page with the confirmation message. You can configure the page further by adding additional texts and images to let your users know that their forms have been submitted.
If you want to redirect the users to other websites after the completion of the form you can choose the Redirect URL option. You can add the URL link to which you want users to redirect.
Conditional Logic

Conditional Logic in contact forms refers to the capability of dynamically altering the behavior of a form based on certain conditions or criteria. Instead of displaying all form fields to every user, the form can adapt and show or hide specific fields based on the responses or choices made by the user.
Let us show you an example of the conditional logic which will make you clear of this concept.
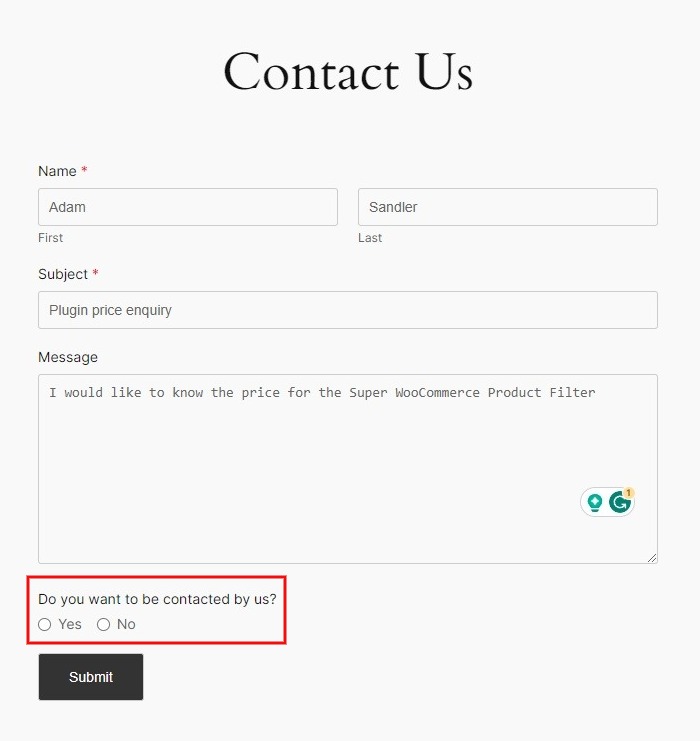
Here you can see there is a simple contact form with the contact form fields like Name, Subject, and Message. The highlighted section demonstrates conditional logic. Let’s observe the behavior when each option is selected.
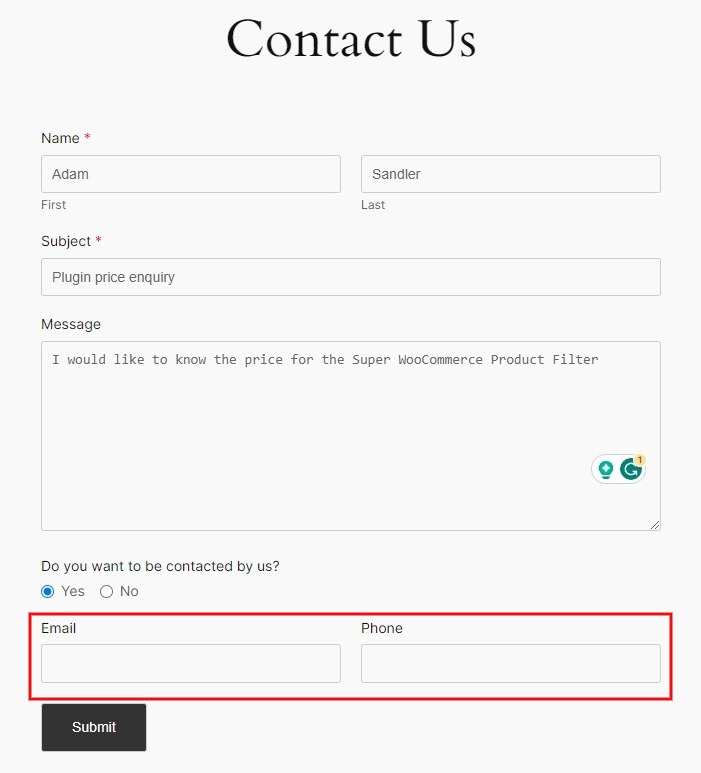
When the option Yes is selected, you’ll notice that two additional options, Email and Phone, appear. These options allow users to either send an email or make a phone call to clarify any confusion.
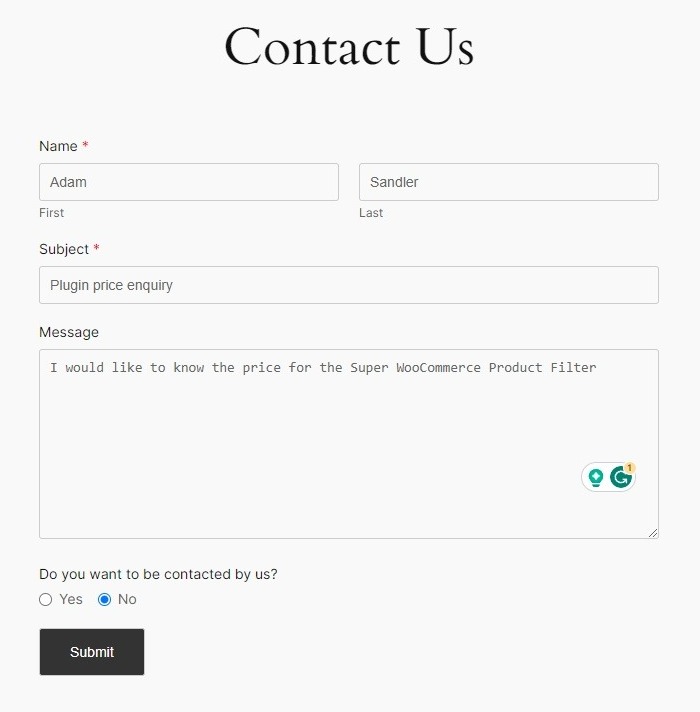
However, if option No is selected, the additional options Email and Phone will not appear, simplifying the form and indicating that no further contact methods are required.
This is just an example of the conditional logic. You can create many conditional logic as per your form requirement.
Import/ Export

The Import/Export feature of this plugin lets you bring in forms you’ve made before or send them to other platforms when necessary. This saves you time from repeatedly creating similar forms.
Style
Within this section, you have the option to select either the Default Demo Form or the Simple Contact Form. Once you’ve chosen a form style, you can proceed to tailor it to your preferences. Adjust the typography, spacing between rows and columns, font style, font size, letter spacing, line height, text color, and various other customization settings to suit your needs.
SMTP
SMTP, which stands for Simple Mail Transfer Protocol, is a system for transferring emails from the sender’s mail server to the recipient’s mail server. It serves as the intermediary that facilitates communication between two users, ensuring that the email is neither classified as spam nor encounters delivery issues.
There are numerous benefits of incorporating SMTP. Since SMTP is a TCP Protocol program it makes sure that the email addresses exist and doesn’t let the messages go unnoticed.
To know in detail follow this article: What is SMTP and the Best WordPress SMTP Plugins.
reCaptcha Settings
reCAPTCHA serves as a security measure to prevent bots from accessing your website and ensures that real users are the ones filling out your form. This feature enhances the security of your website by adding an extra layer of protection against automated, potentially malicious activities. You can enable reCAPTCHA to safeguard your site, providing a more secure environment for genuine users during the form submission process.
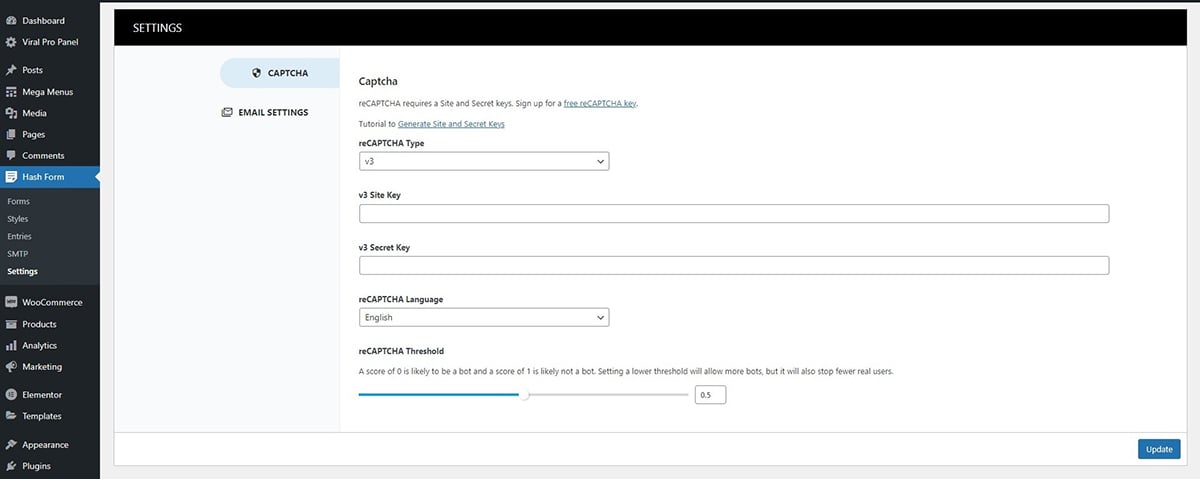
You have the option to integrate either the v2 or v3 site key and secret key into your forms. To make reCAPTCHA appear on your forms and enhance security, generate the specific keys required in this section. This ensures an additional layer of security for your forms against automated activities.
To learn how to create Recaptcha site key and secret follow this detailed article: Generate Recaptcha V2/V3 Site Key and Secret Key
Email Settings
In the Email Settings, you have the option to include a header image and can select from three available email templates.
- Go to Dashboard > Hash Forms > Settings.
- Click on the Email Settings tab.
- Here you can see the additional changes you can make to the email section.

In the Email Settings, you have the option to include a header image and can select from three available email templates. Refer to the following screenshots for the sample of the email templates:
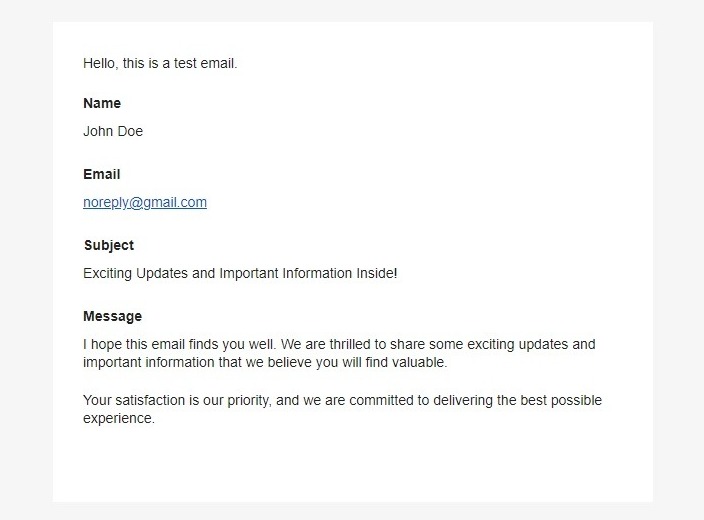
Email Template 1
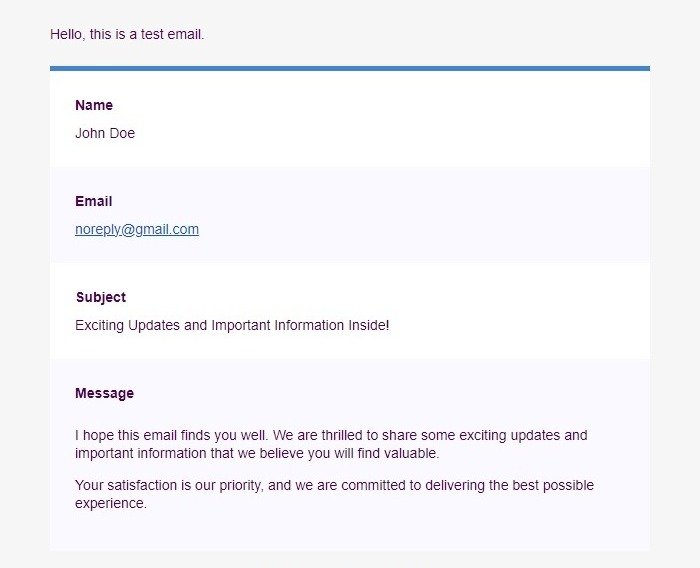
Email Template 2
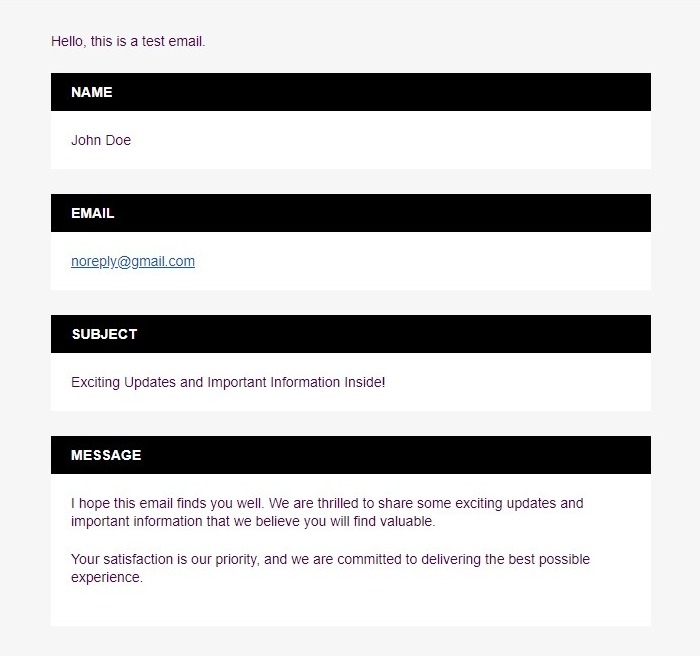
Email Template 3
Choose the right template and save the changes.
The header image serves as a visual element at the top of your email messages sent through the contact form. This feature allows you to personalize and brand your emails, making them visually appealing and recognizable to recipients.