
Are you looking to install multisite on WordPress? Creating a multisite can be a great way to manage multiple websites using the same WordPress installation.
Multisites are mostly used by blogs, schools, and businesses that run separate websites but are managed under one dashboard.
In this article we will discuss what a WordPress multisite is, pros and cons using a multisite and how to install and set up a multisite on WordPress network. In the end of the article you will be clear about the multisite and will be able to install and run your own WordPress multisite. With that being said, let’s get started:
Table of Contents
What is a Multisite Network on WordPress?
Multisite Network are those networks that allow you to create and manage multiple websites from a single WordPress dashboard. It enables you to create new websites instantly using the same login detail of your dashboard. You can even allow other users to sign up to your site and create their own blogs on the domain.
Pros of Having Multisite Network:
- Easy management of multiple websites from a single dashboard
- Each website on the network can have its own admins. The site admins will have the ability to manage only their owned website.
- You can install and activate themes/plugins for multiple sites with one download.
- Easy management of updates as you only need to update it once on the Master installation.
Cons of Having Multisite Network:
- All the websites will share the same resources. If your network is down, all the websites will go down as well.
- Management of traffic and server resources can be difficult at the beginner level. So, if one of your sites gets unexpected traffic, it will affect all the websites on the network.
- If one of the websites gets hacked, all your websites on your network will get hacked.
- Some of the WordPress plugins might not be compatible with multisite and may not work well on your multisite network.
- Some of the hosting providers might not properly support WordPress multisite networks.
How to Install Multisite on WordPress?
Now that you know what is a multisite and the pros and cons of having multisite, let’s discuss how to set up multisite on WordPress. We will go stepwise to install and set up the multisite to make the process more clear.
Step 1: Enabling Multisite Network Feature on WordPress
Multisite Network comes inbuilt on each WordPress installation. All you need to do is install and set up WordPress like you normally would. Then, enable the multisite feature.
You can also enable multisite in your existing site. But before you enable the multisite, don’t forget to backup your WordPress site.
To enable the multisite, paste the following code to your wp-config.php file just before /* That’s all, stop editing! Happy blogging. */ line.
 /* Multisite
 */ define( 'WP_ALLOW_MULTISITE', true );
Once you have done so, you can save the file. This code will simply enable the multisite feature on your WordPress website. Once the feature is enabled, you will need to set up the multisite network.
Step 2: Setting Up Your WordPress Multisite Network
Now that you have enabled Multisite Network feature on your WordPress website, it’s time to setup the network.
Login to your WordPress dashboard and go to Tools >> Network Setup.
You will land to a page like the one below. Give the title and admin email for your network.
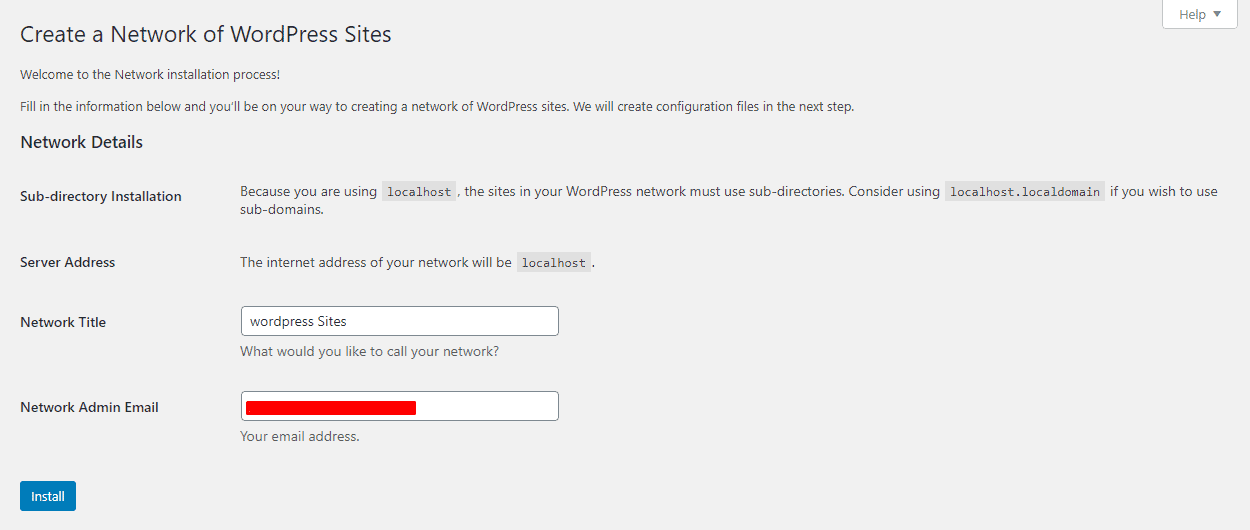
Then, click on the “Install” button.
You will land to enable the network page. There you need to complete 2 different steps to enable the features for creating a network of websites.
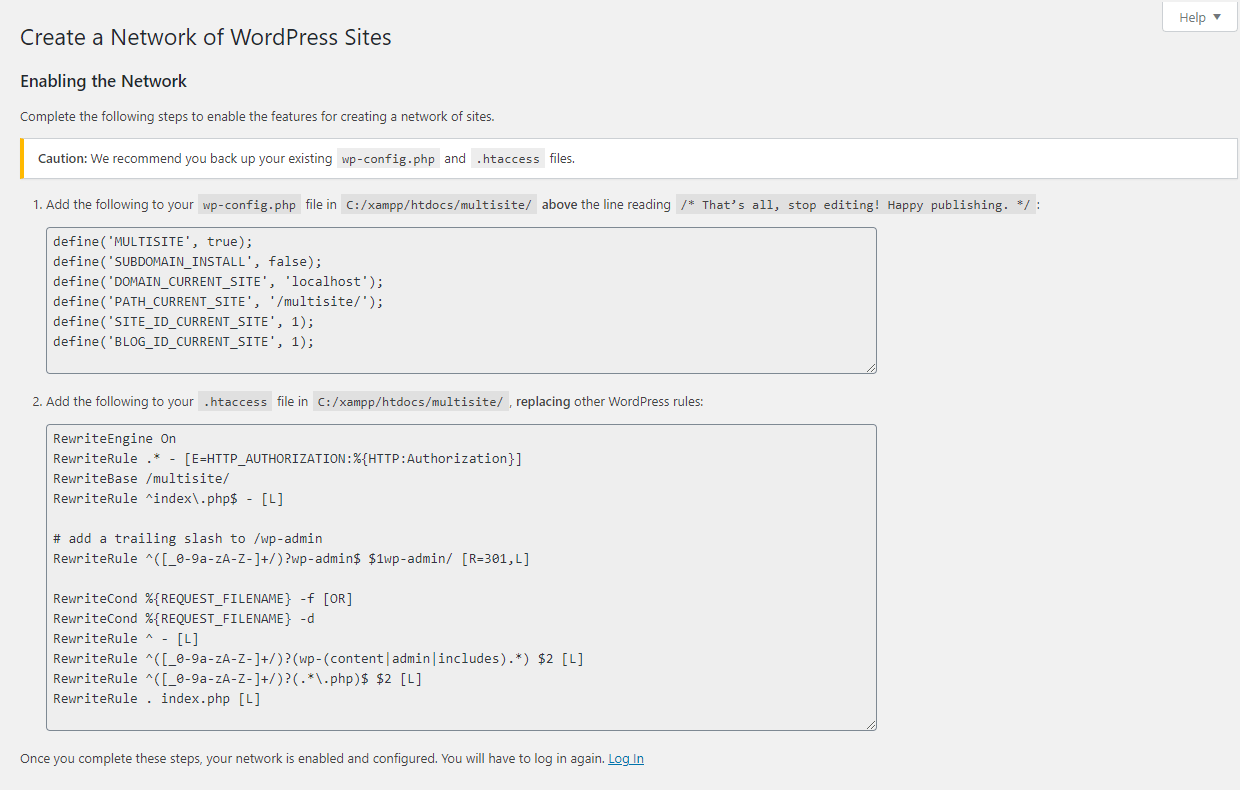
The 1st step includes adding the codes on your wp-config file.
You can find the wp-config file from your cPanel dashboard. Login to your cPanel dashboard and locate file manager.
Now locate the public_html and wp-config.php file.
After that, paste the following codes below /* That’s all, stop editing! Happy publishing. */ line.
define('MULTISITE', true);
define('SUBDOMAIN_INSTALL', false);
define('DOMAIN_CURRENT_SITE', 'localhost');
define('PATH_CURRENT_SITE', '/multisite/');
define('SITE_ID_CURRENT_SITE', 1);
define('BLOG_ID_CURRENT_SITE', 1);
Once done, click on save changes to save.
The 2nd part includes adding the code on the .htaccess file.
Locate the .htaccess file from public_html of the file manager. Then, replace the WordPress rule by following codes.
RewriteEngine On
RewriteRule .* - [E=HTTP_AUTHORIZATION:%{HTTP:Authorization}]
RewriteBase /multisite/
RewriteRule ^index.php$ - [L]
add a trailing slash to /wp-admin
RewriteRule ^([_0-9a-zA-Z-]+/)?wp-admin$ $1wp-admin/ [R=301,L]
RewriteCond %{REQUEST_FILENAME} -f [OR]
RewriteCond %{REQUEST_FILENAME} -d
RewriteRule ^ - [L]
RewriteRule ^([_0-9a-zA-Z-]+/)?(wp-(content|admin|includes).) $2 [L] RewriteRule ^([_0-9a-zA-Z-]+/)?(..php)$ $2 [L]
RewriteRule . index.php [L]
Once done, click on “Save Changes” to save.
Once the steps are completed, you will be logged out from the admin area and you need login again.
Now, your multisite setup is ready and you can start adding your new website.
Step 3: Adding a New Site and User
Now you have completed setting up the multisite WordPress network, it’s time to create a new site and user.
To create a new site, go to the Network Admin dashboard and click on Sites >> Add New.
Now, give the Site Address (URL), Site Title, and Admin Email. Once done, click on “Add Site”.

Your new site is created. Now visit the dashboard of your new site and go to Users >> Add New to add new users for your website.
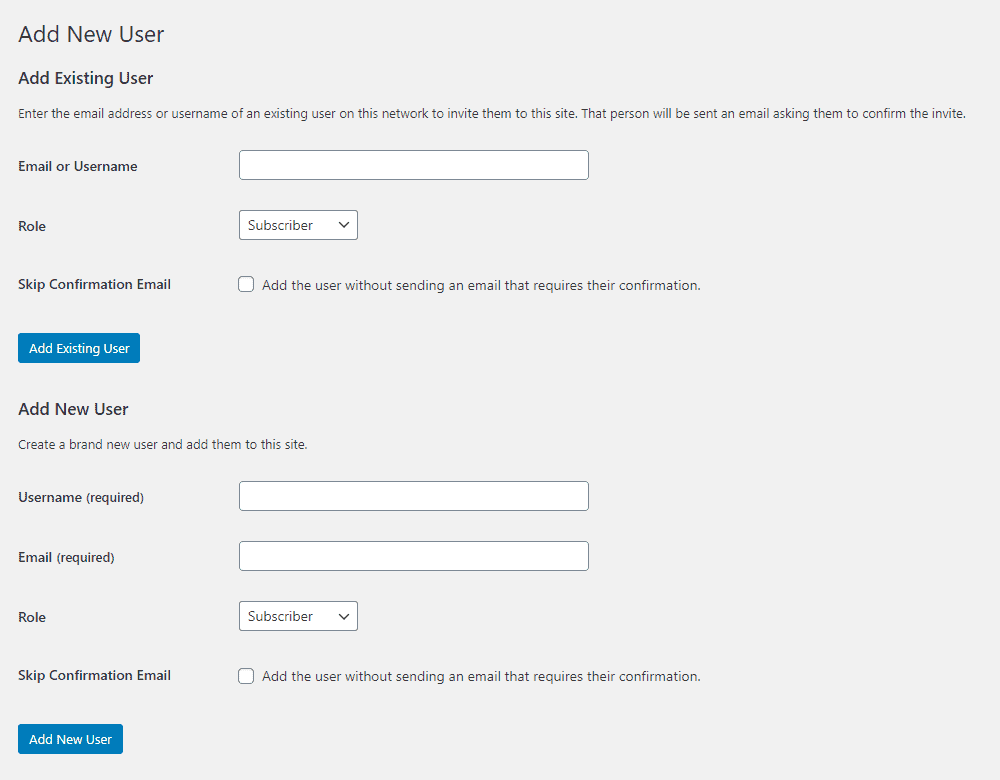
You can add users and assign them to different roles. You will be assigned as the Super Admin and will be able to manage all your websites.