Mega Menu allows you to show a bunch of menus in a beautiful and organized way. With our premium WordPress themes, you don’t have to buy and install extra mega menu plugins. In this tutorial, we will guide you on creating a mega menu with the Total Plus plugin.
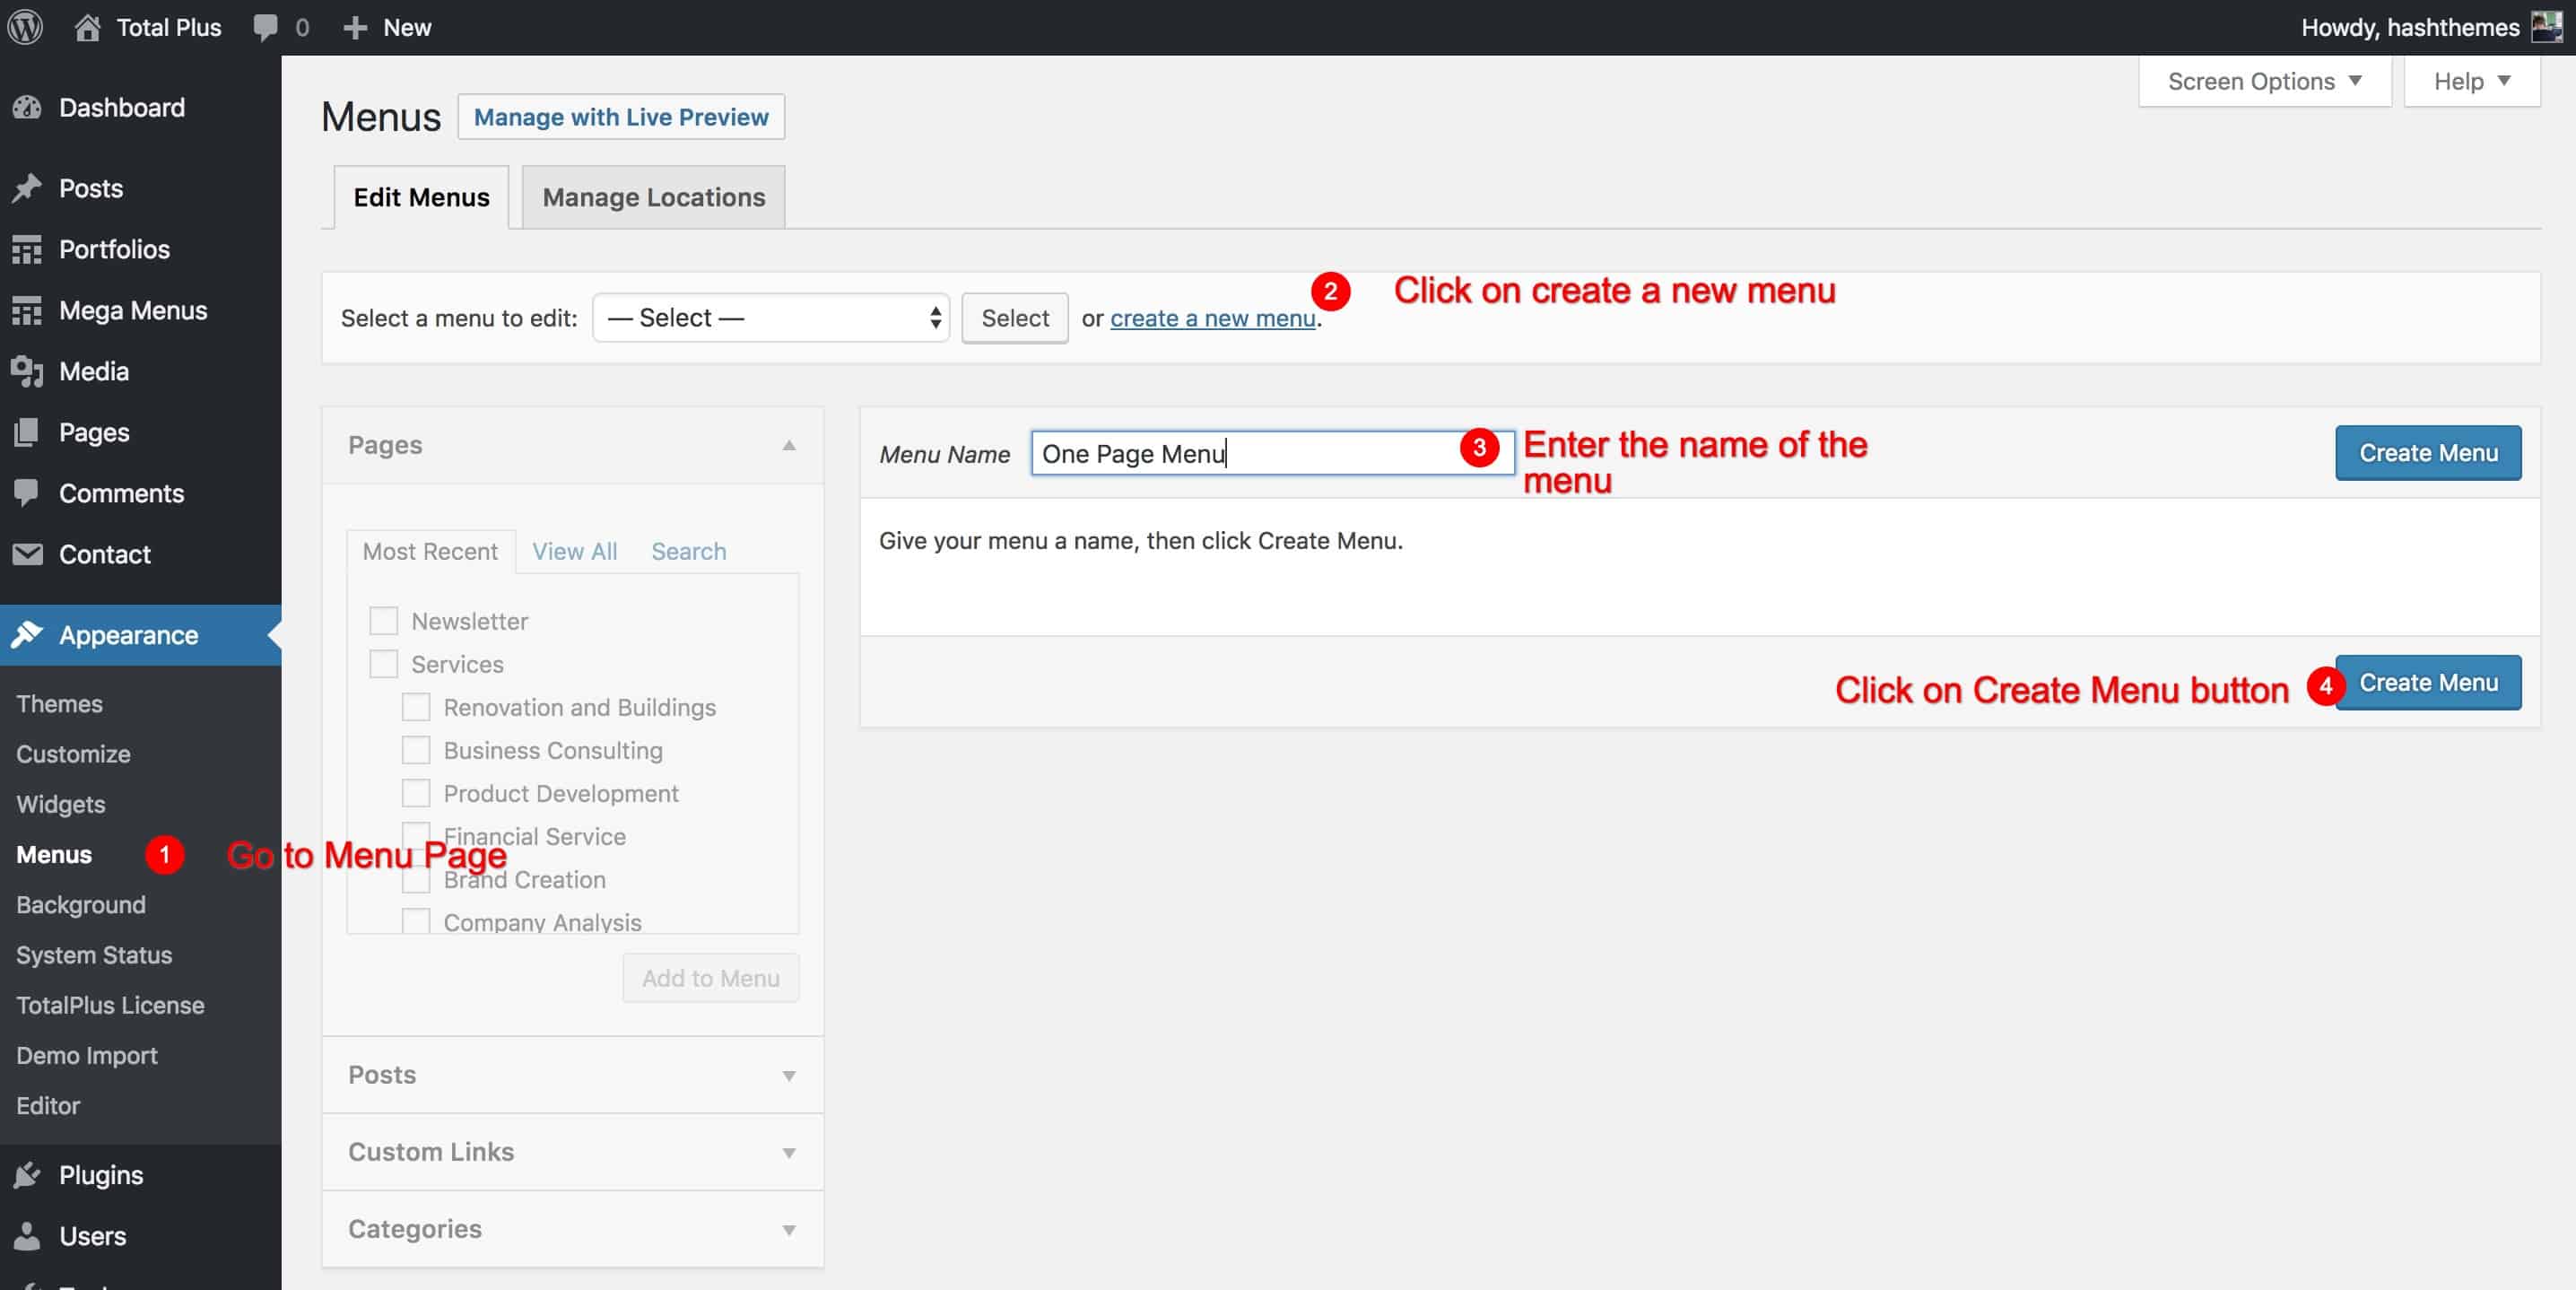
Let’s get started by creating a new menu.
- Log in to the WordPress Dashboard.
- Go to Appearance > Menu Page.
- Click on Create a new menu link at the top of the page.
- Enter a name for your new menu in the Menu Name field.
- Click the Create Menu button.
Add the Menu Item from the left. You can add Pages, Posts, Custom Links, or Categories.
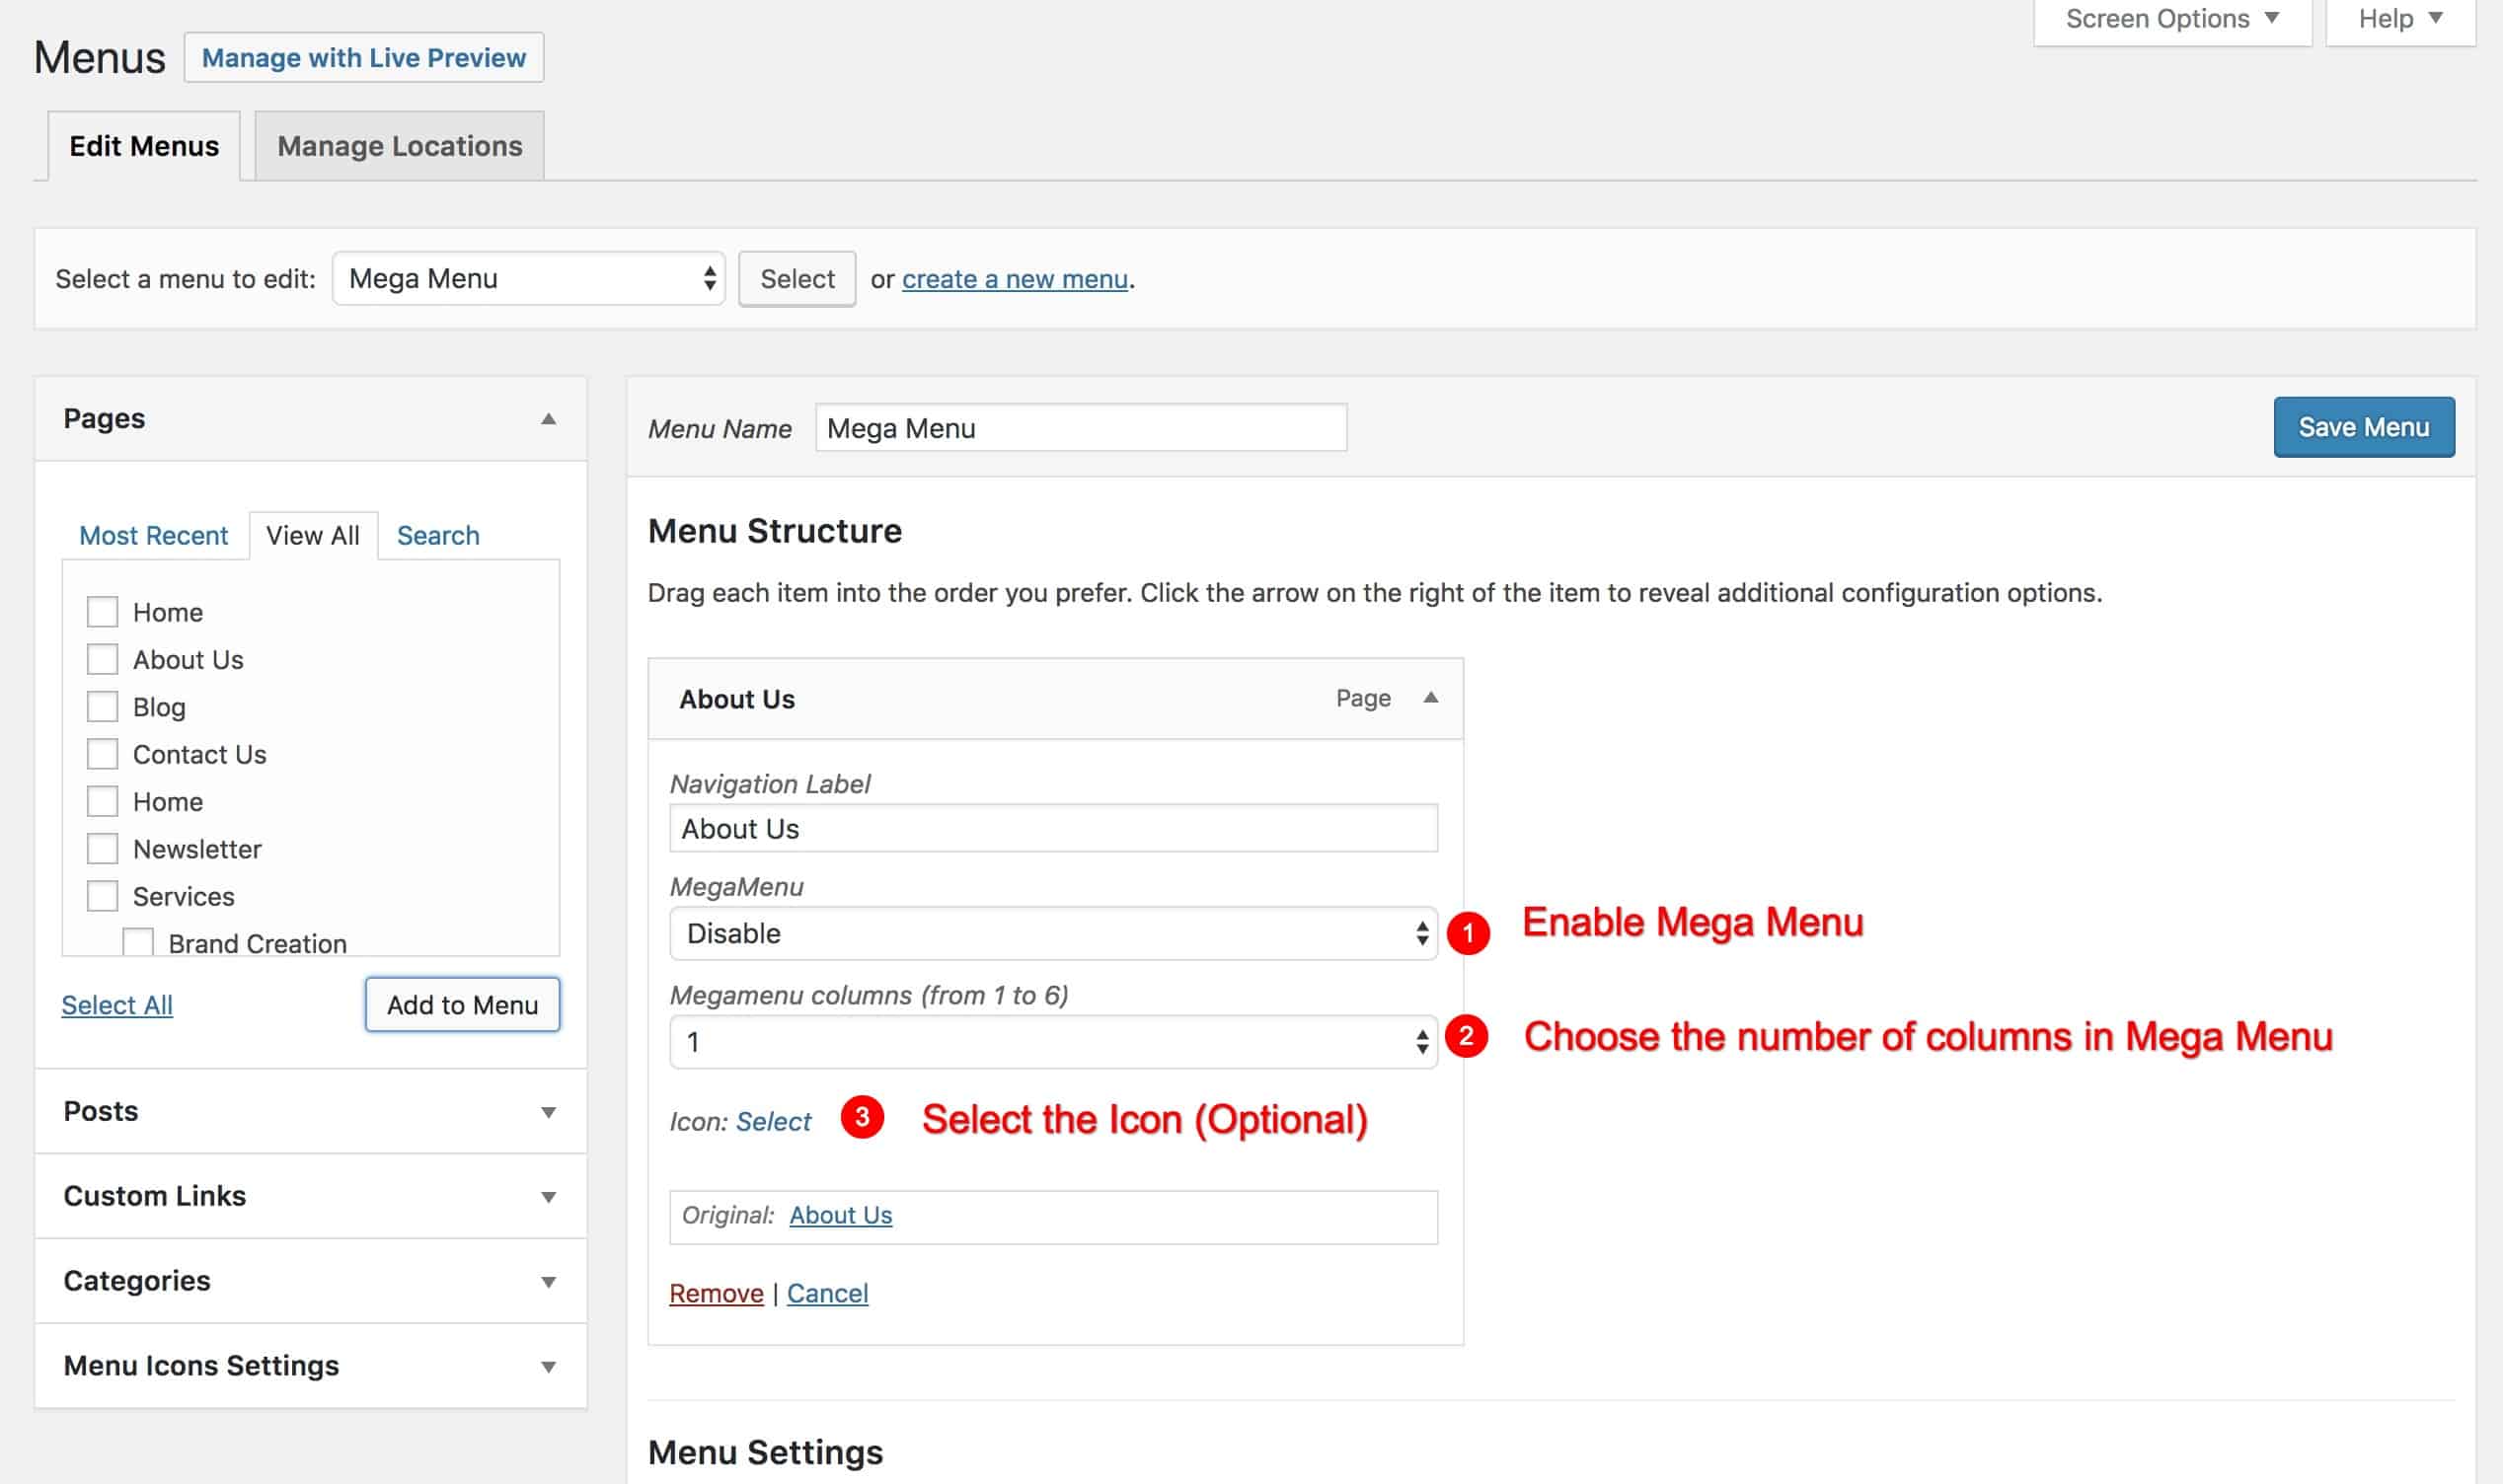
Let’s add a Page Menu Item(About Us). On Clicking the Page Menu Item, the menu bar expands and you will see the option to Add the Navigation Label, MegaMenu, and Megamenu Columns, and choose the icon.
- Enter the Navigation Label. By default, it will show the title of the page, post, or category depending on the menu you add.
- Choose the Megamenu Option. By default, the megamenu is disabled. You can choose Megamenu – Full Width or Megamenu – Auto Width. With Megamenu – Full Width, the Megamenu will cover the full width of the menu. With Megamenu – Auto Width, the megamenu will cover the width depending on the number of columns.
- Select the number of columns to display in the mega menu.
- You can add the icon before or after the menu label. Select the icon that you want to add.
Once you have created the Main Menu Item. Now it’s time to add the submenu. Add the menu item from the left available list of menu items or create a custom link. Drag the menu item to the right to make it the submenu. You will see a submenu indented to the right of the main menu. Click on the submenu item to expand. In the submenu, new sets of fields will appear.
- Navigation Label – It is the text that appears in the menu. By default, it will show the title of the page, post, or category depending on the menu you add. However, you can change to a different title.
- Is Heading? – If the heading is set to yes, the link will be disabled and the menu item will show as a heading. You can even hide the menu and display the submenu under it only.
- Mega Menu Template – You can create your own mega menu template from Dashboard > Mega Menus. Once you create a mega menu template, you can assign it here. (We will discuss this in more detail later)
- Mega Menu Widget Area – You can even show the widget in the mega menu column. For this just choose the Widget Area and then go to Appearance > Widgets and add the widget content.
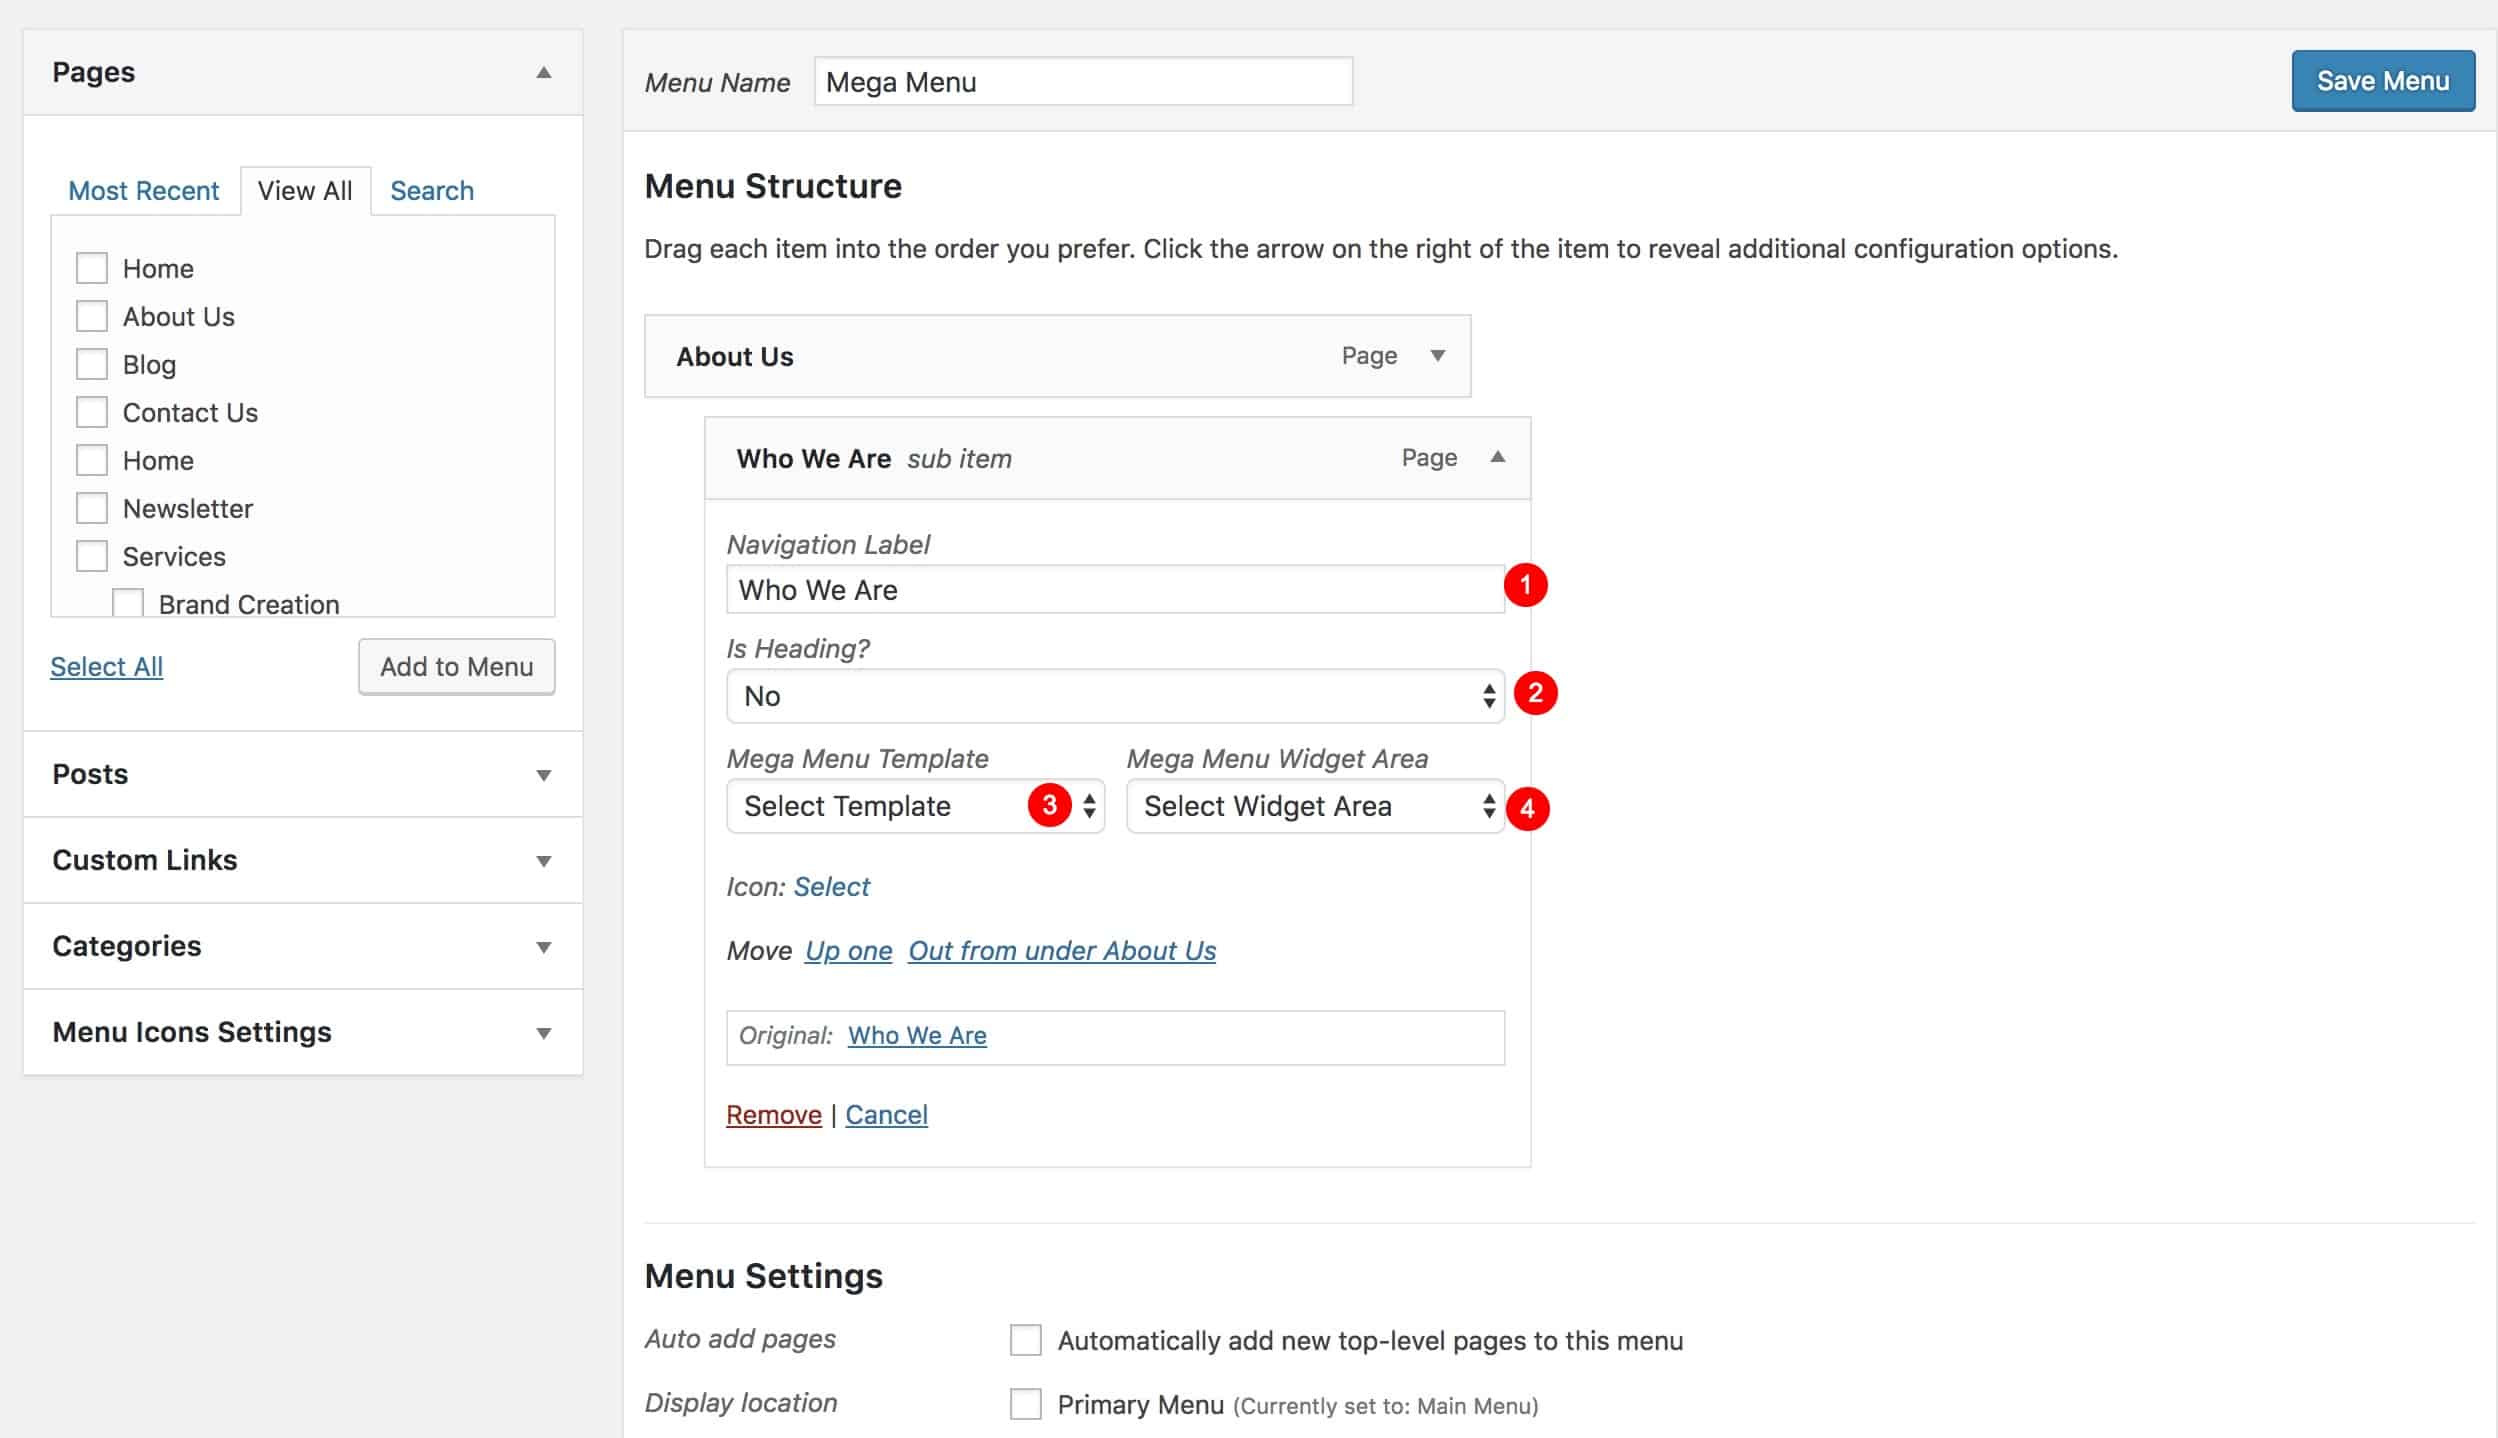
Note: Is Heading, Mega Menu Template, and Mega Menu Widget Area fields only work if the Mega Menu is enabled in the parent menu otherwise it will work as simple normal links.
Let’s start by adding the Simple Links
- Choose the Megamenu – Full Width for the Megamenu option in the Parent Menu(Services).
- And set the Megamenu columns to 4.
- Add the submenu items and drag them under the Parent Menu(Services) as shown in the below Screenshot. Leave all the fields in the submenu to their default.
- Is Heading? – No
- Mega Menu Template – Don’t Choose
- Mega Menu Widget Area – Don’t Choose
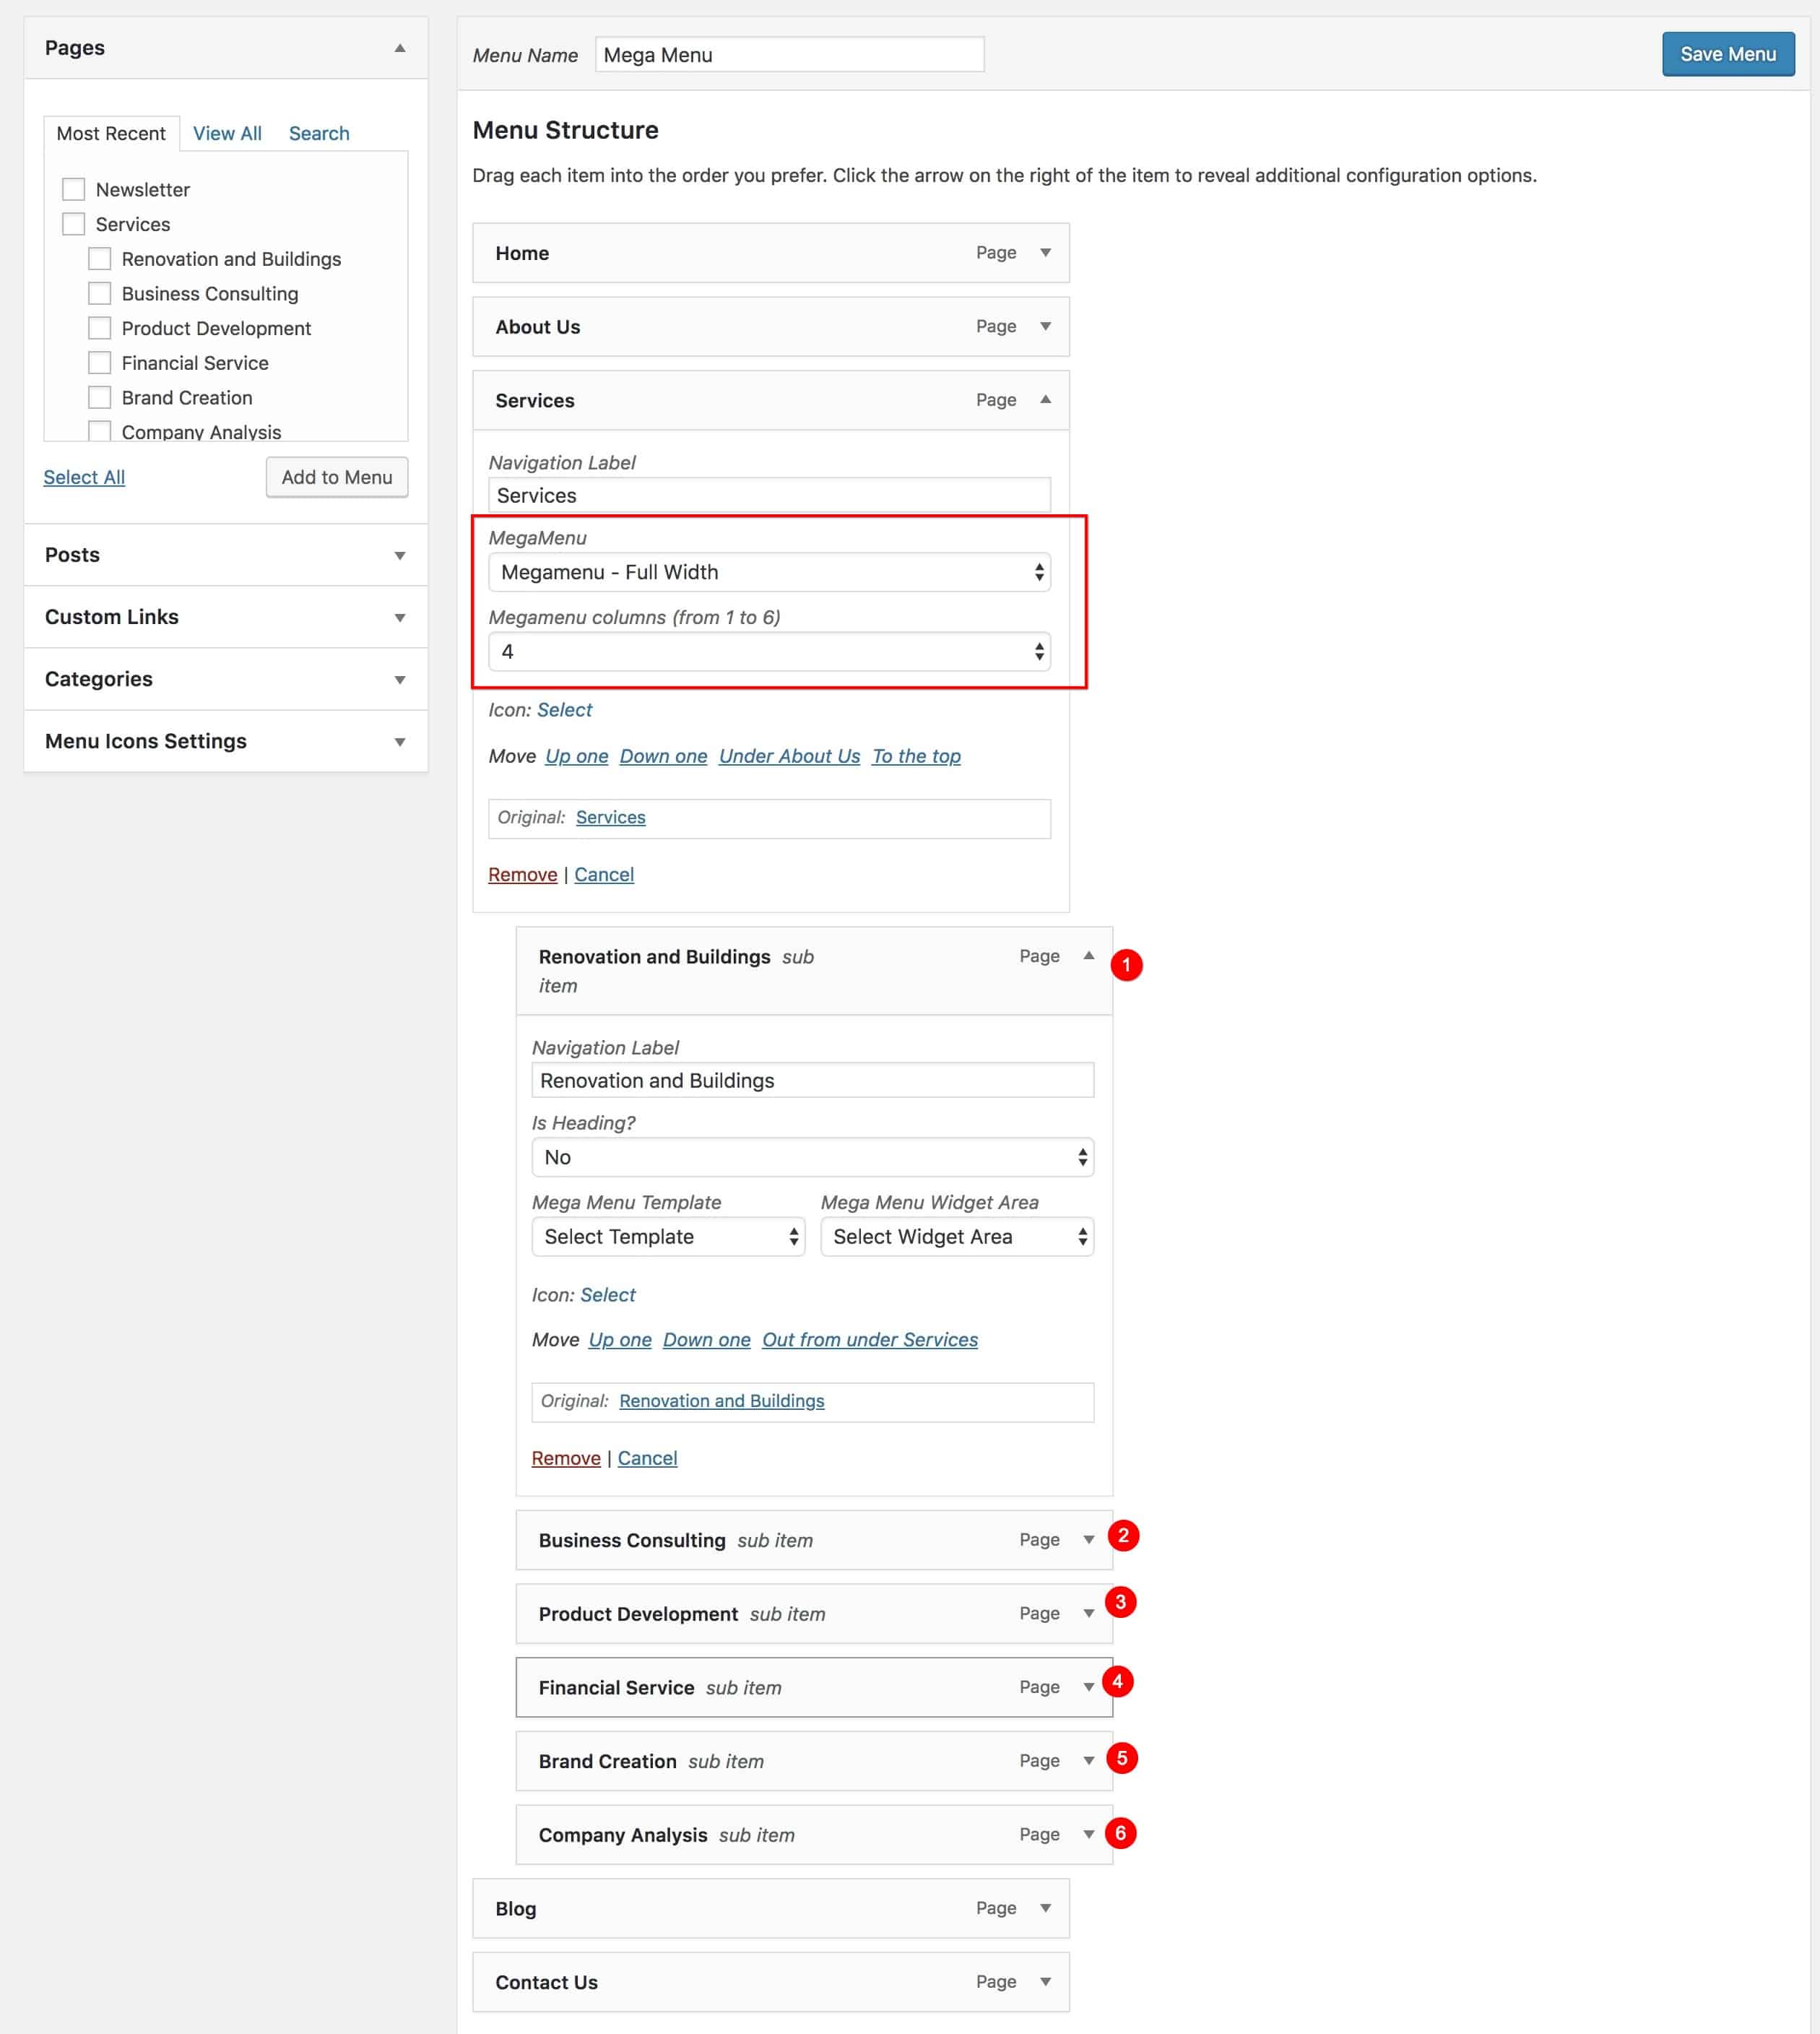
This is how the MegaMenu will appear on the frontend. The submenu will float with 4 columns from the left to the right. Remember we have set the Mega Menu Column to 4.

Now, let’s set the menu as shown in the below screenshot.
- Add 4 Custom Links with Navigation Label as below and set the Is Heading option to Yes
- Column 1 Heading
- Column 2 Heading
- Column 3 Heading
- Column 4 Heading
- Add the submenu under each heading. We have added 2 submenu items under each heading. You can add as many as you want.
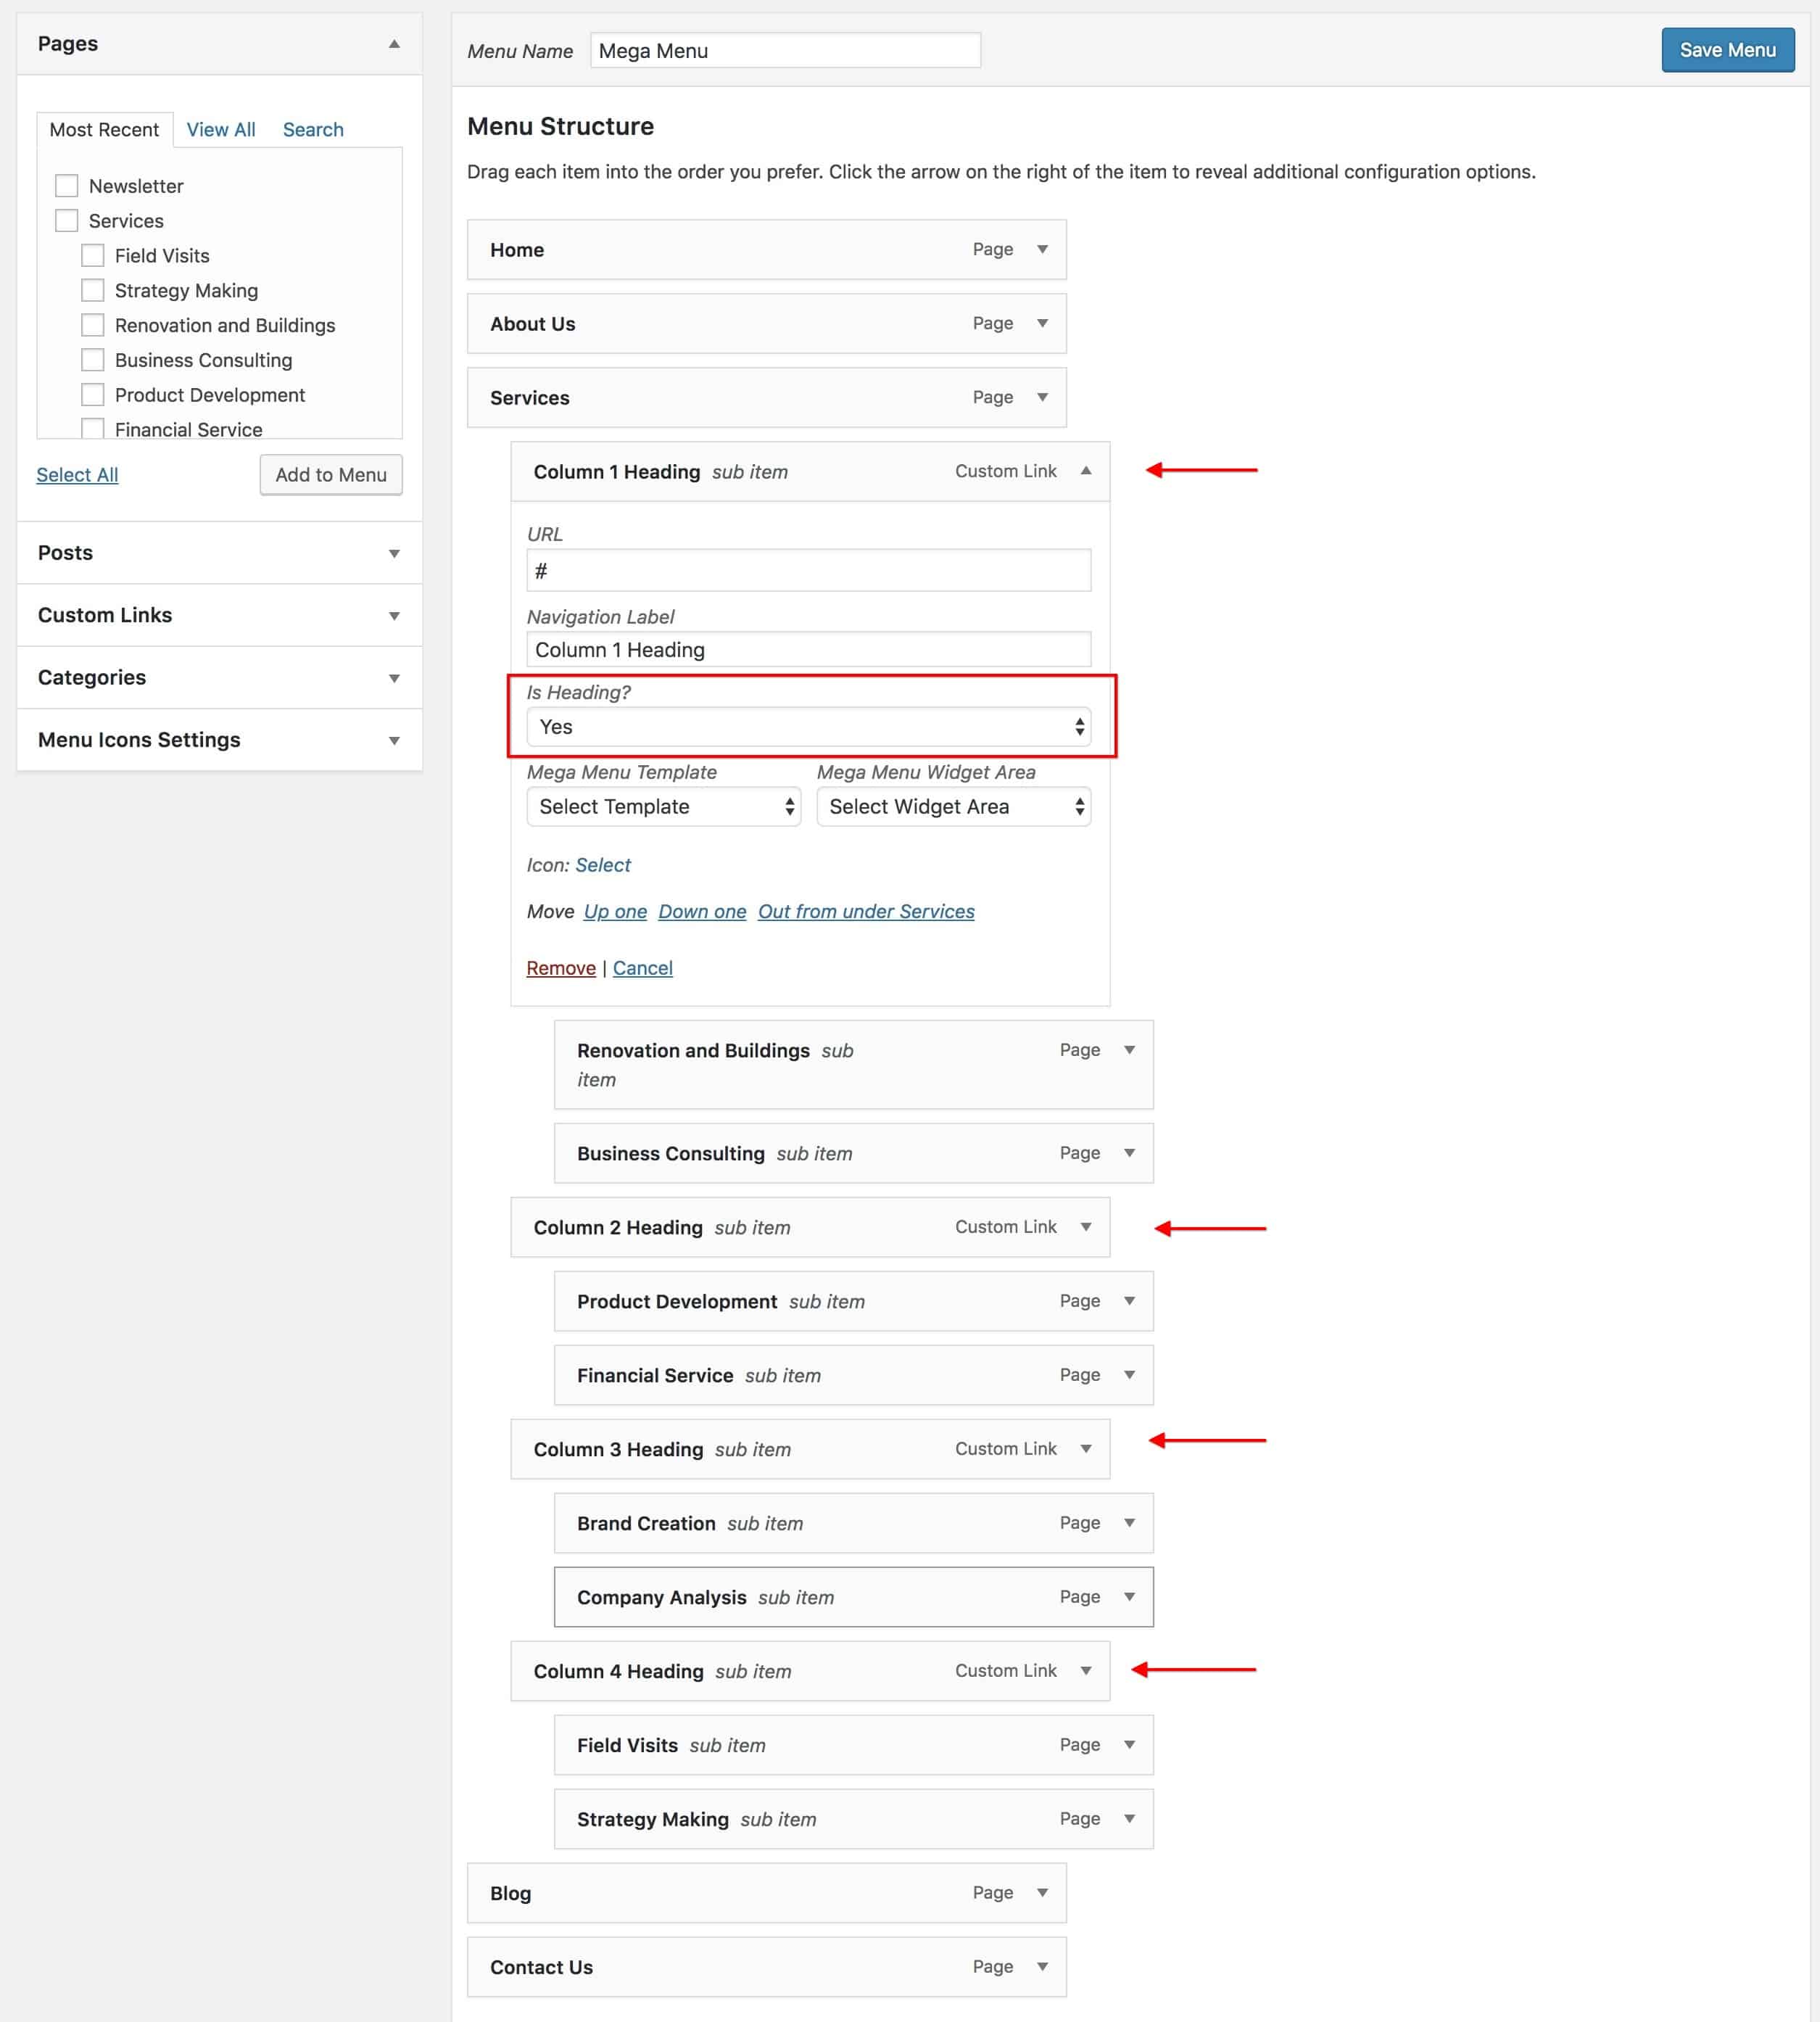
Now what happens is that the 2nd level submenu floats from the left to the right with 4 columns as we had set the Mega Menu Column to 4. And the 3rd level submenu (the menu under 2nd level menu) appear below it in the list without floating.

Now let’s create a MegaMenu from Page Builder
1) Site Origin Page Builder
To create a mega menu from the template, you will need to install a page builder. Here we have installed the Site Origin plugin to create a MegaMenu from Template. We first need to create a template for the mega menu. Once you create a Megamenu template, a list of created templates will appear in the drop-down of the Mega Menu Template option in the menu field.
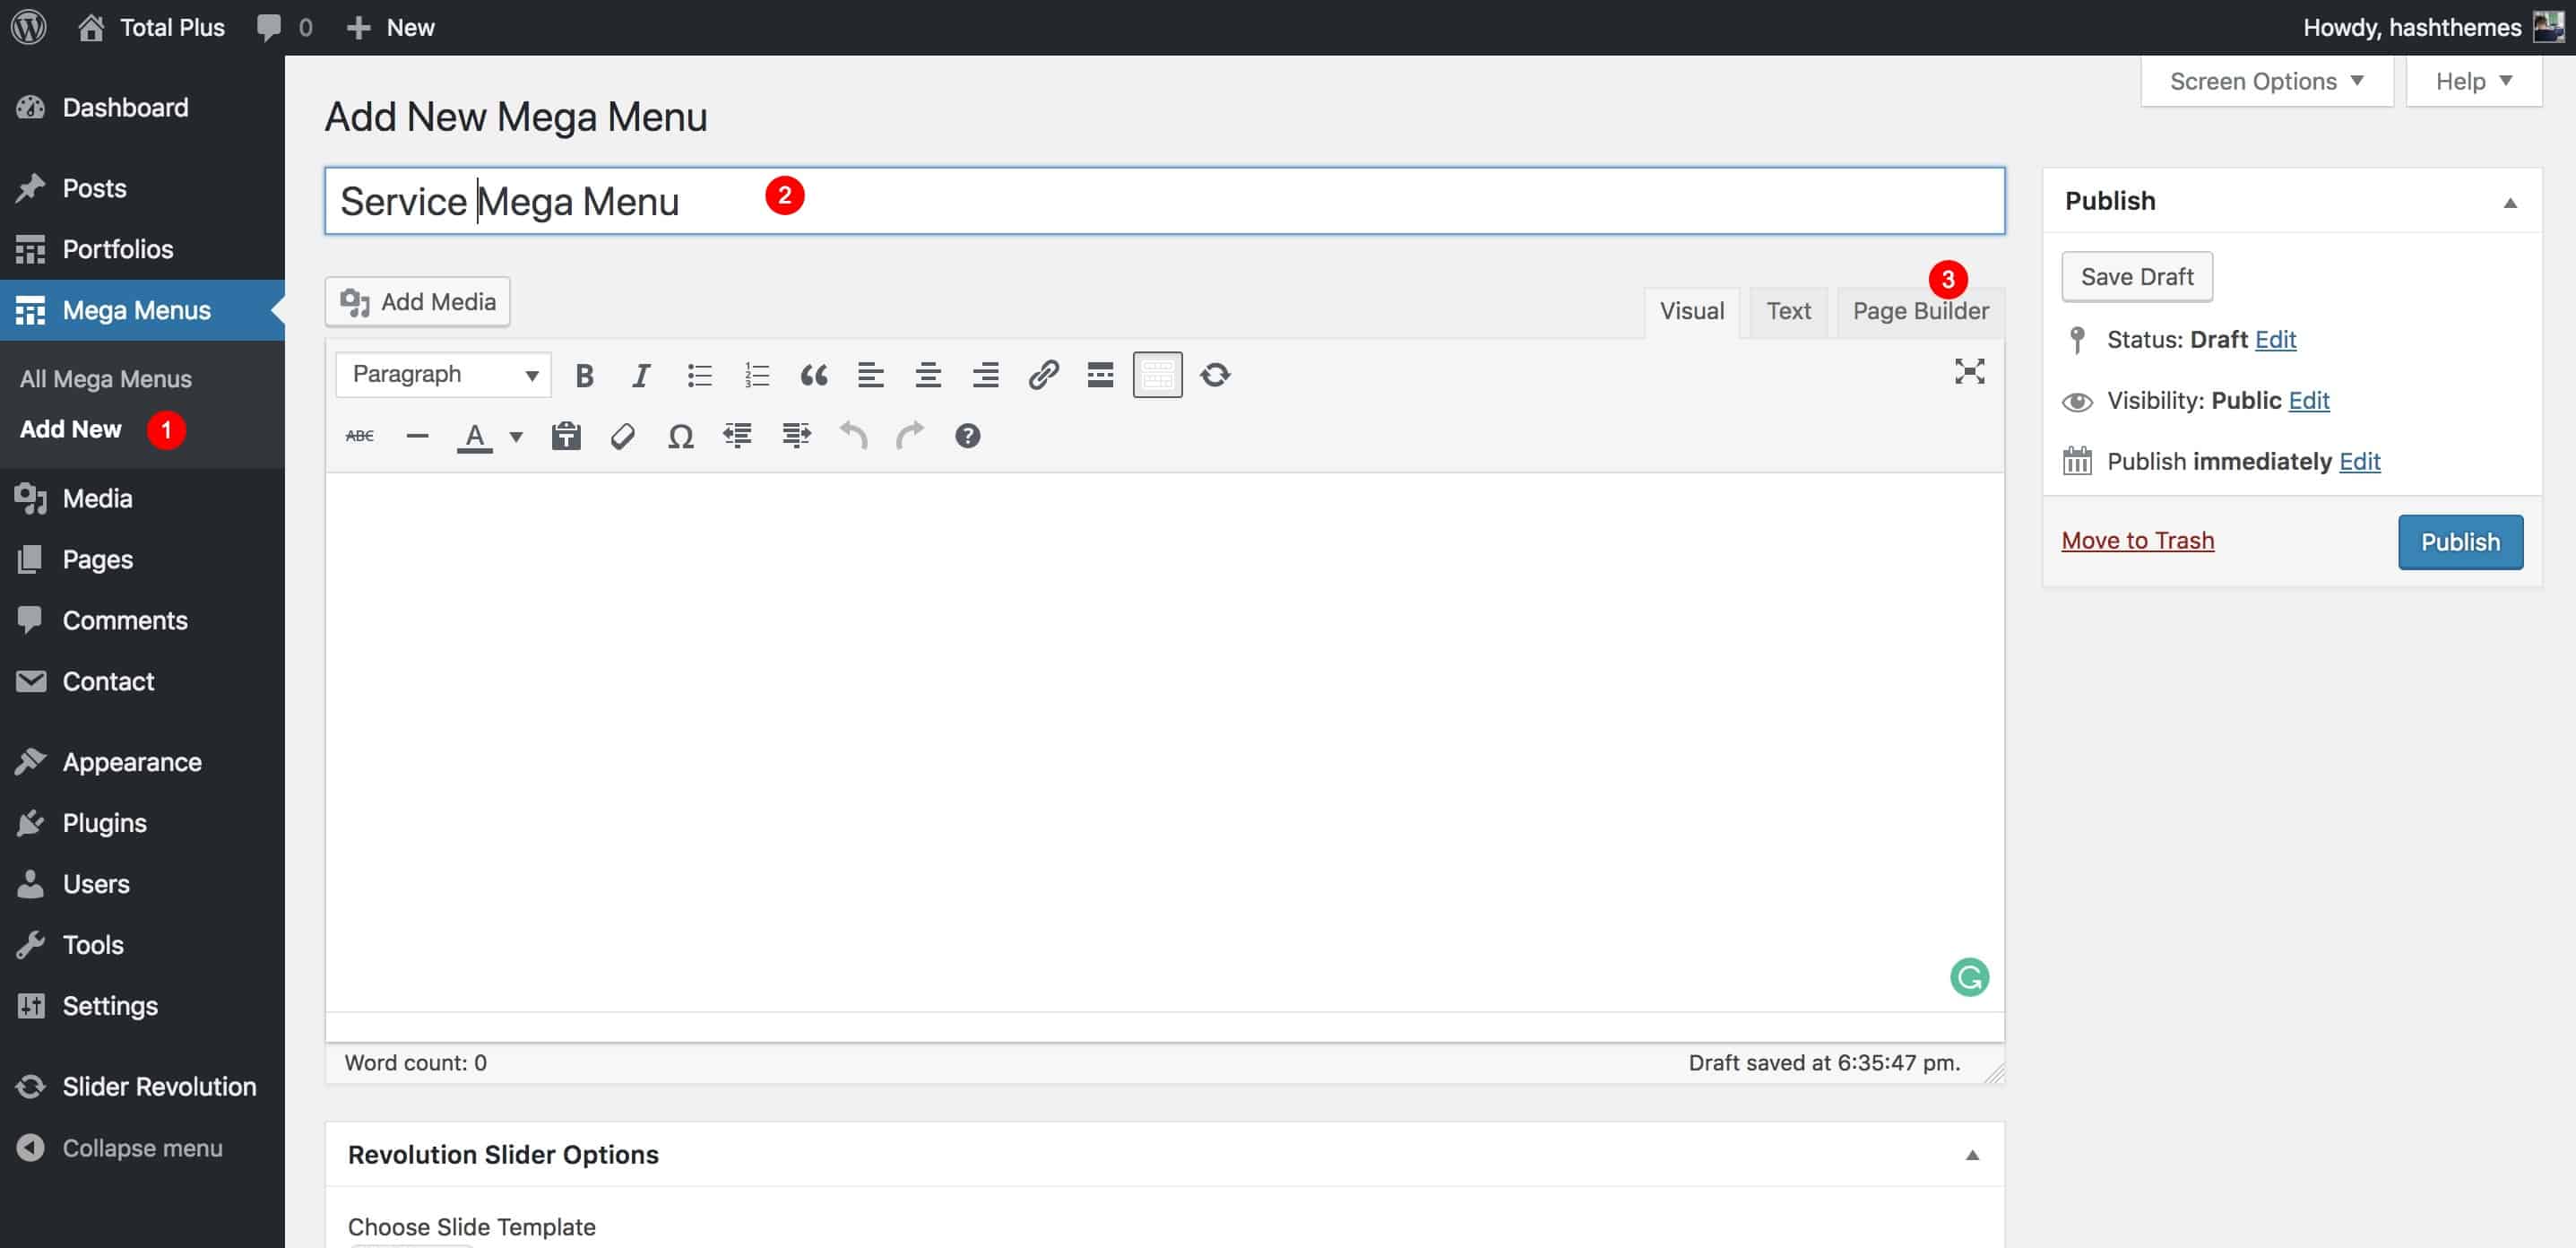
- Go to Dashboard > Mega Menus and click on Add New.
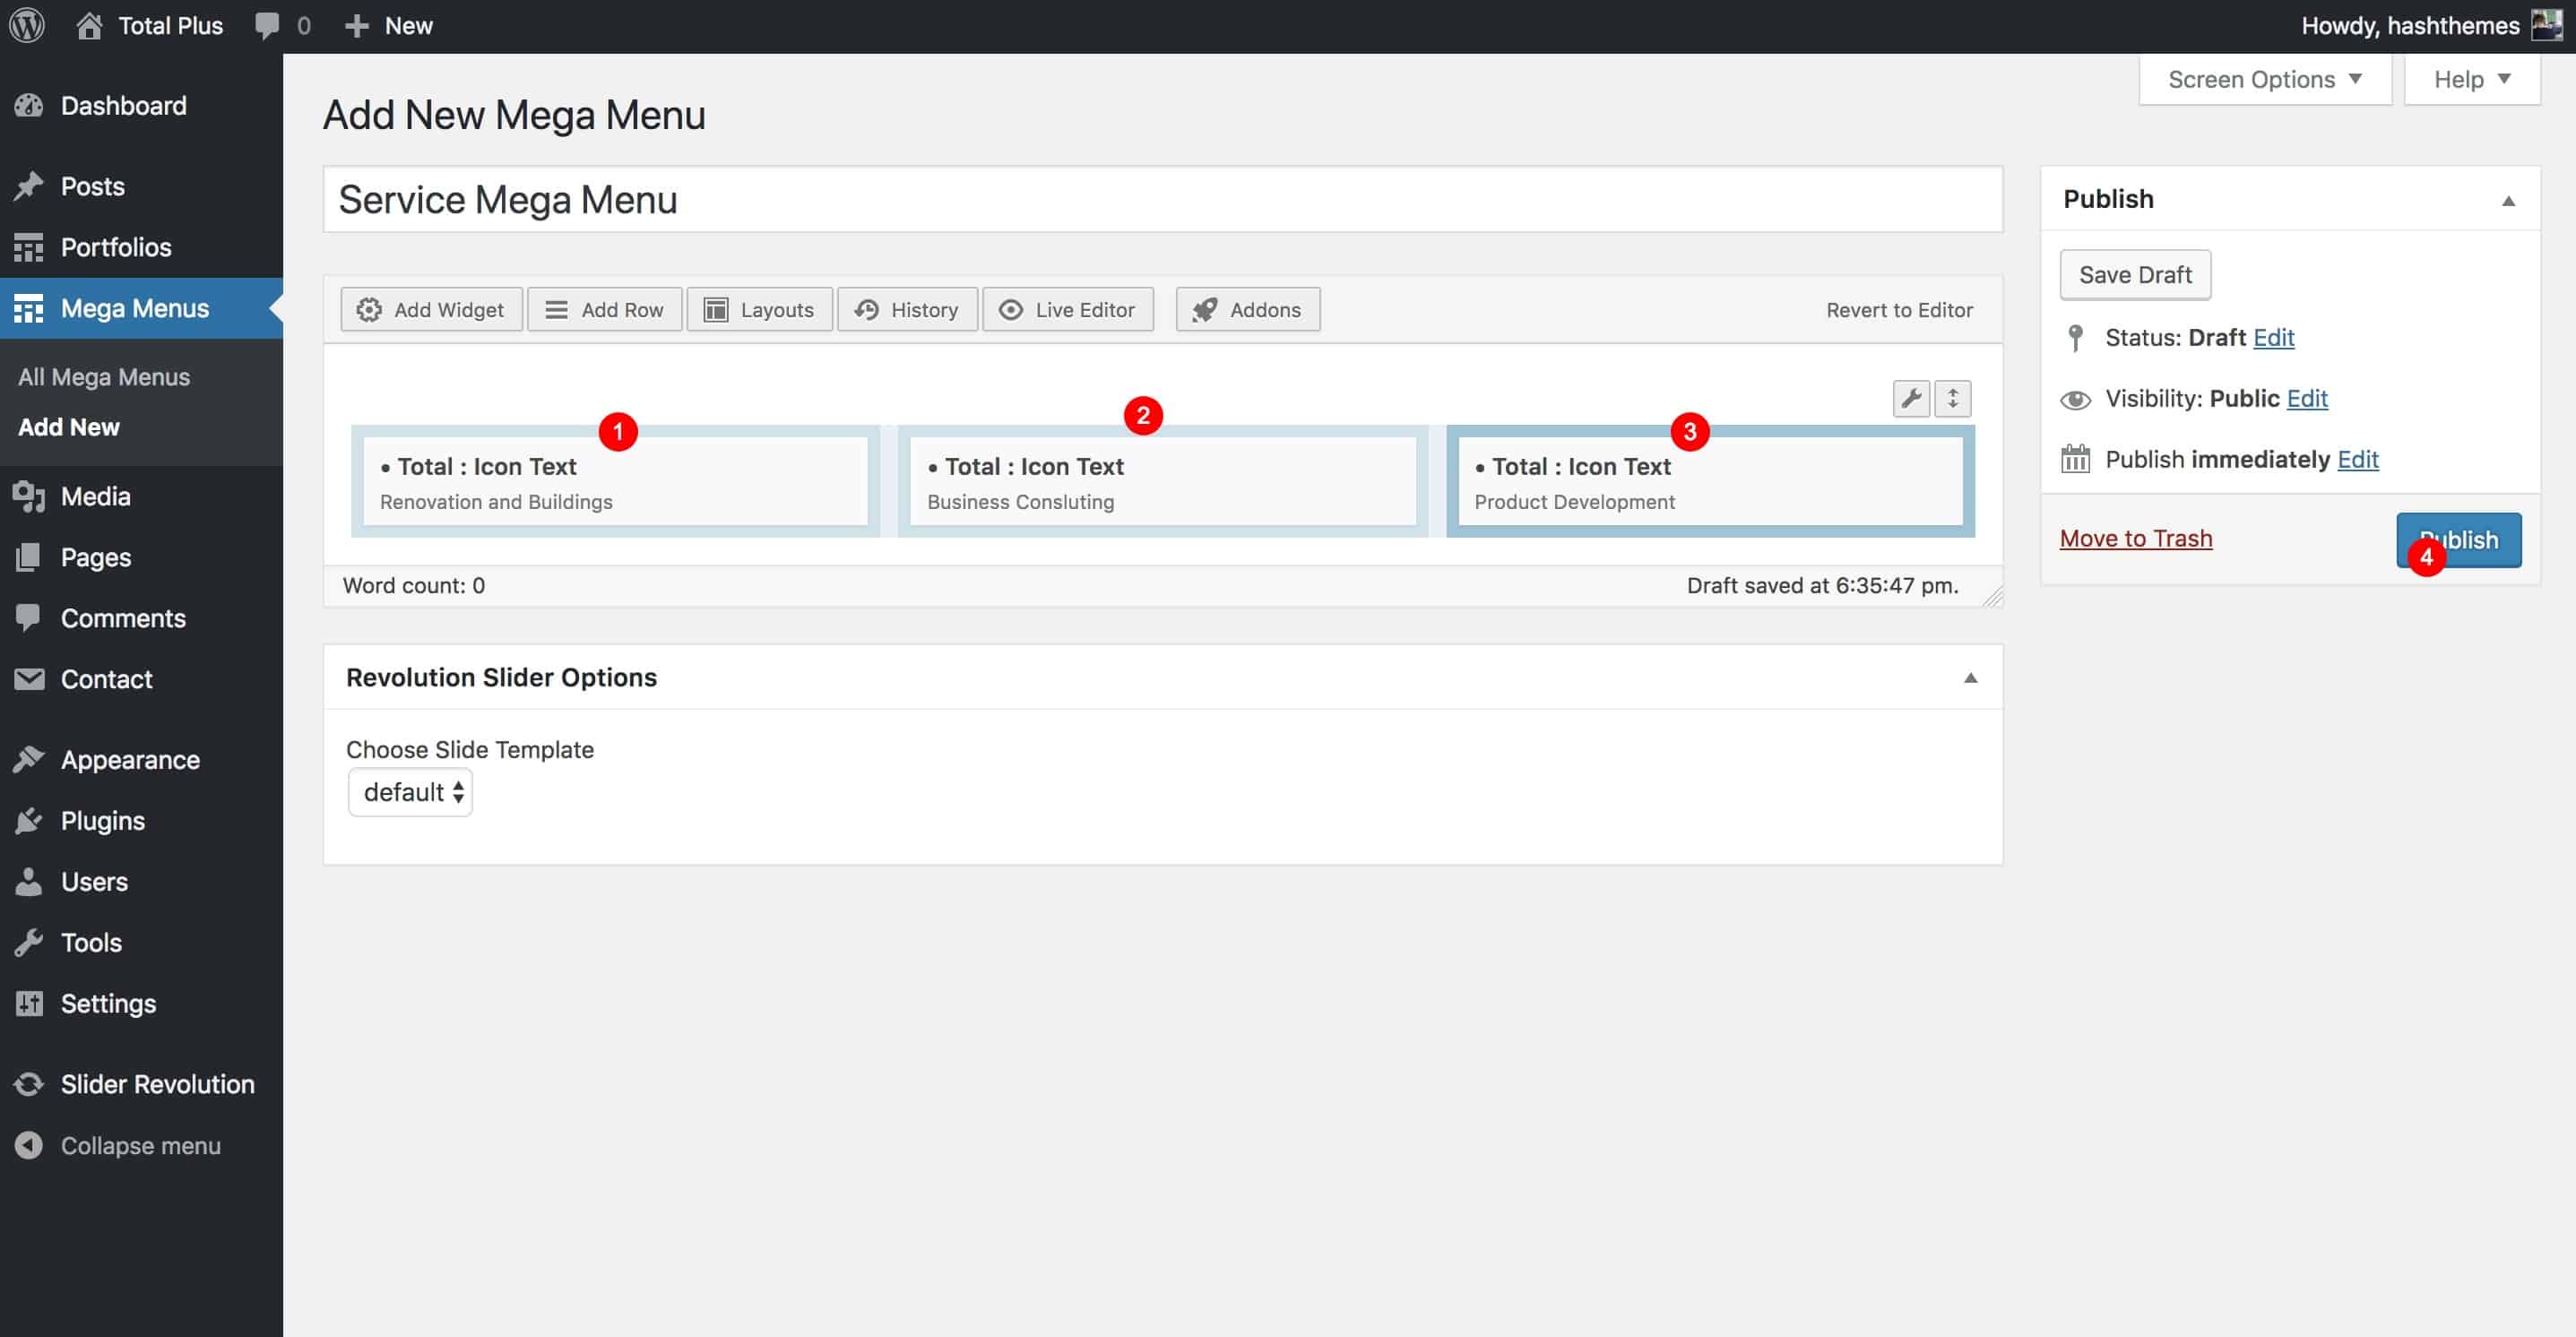
- A normal post editor will appear. Add the title of the Mega Menu and click on the Page Builder tab as shown in screenshot 1
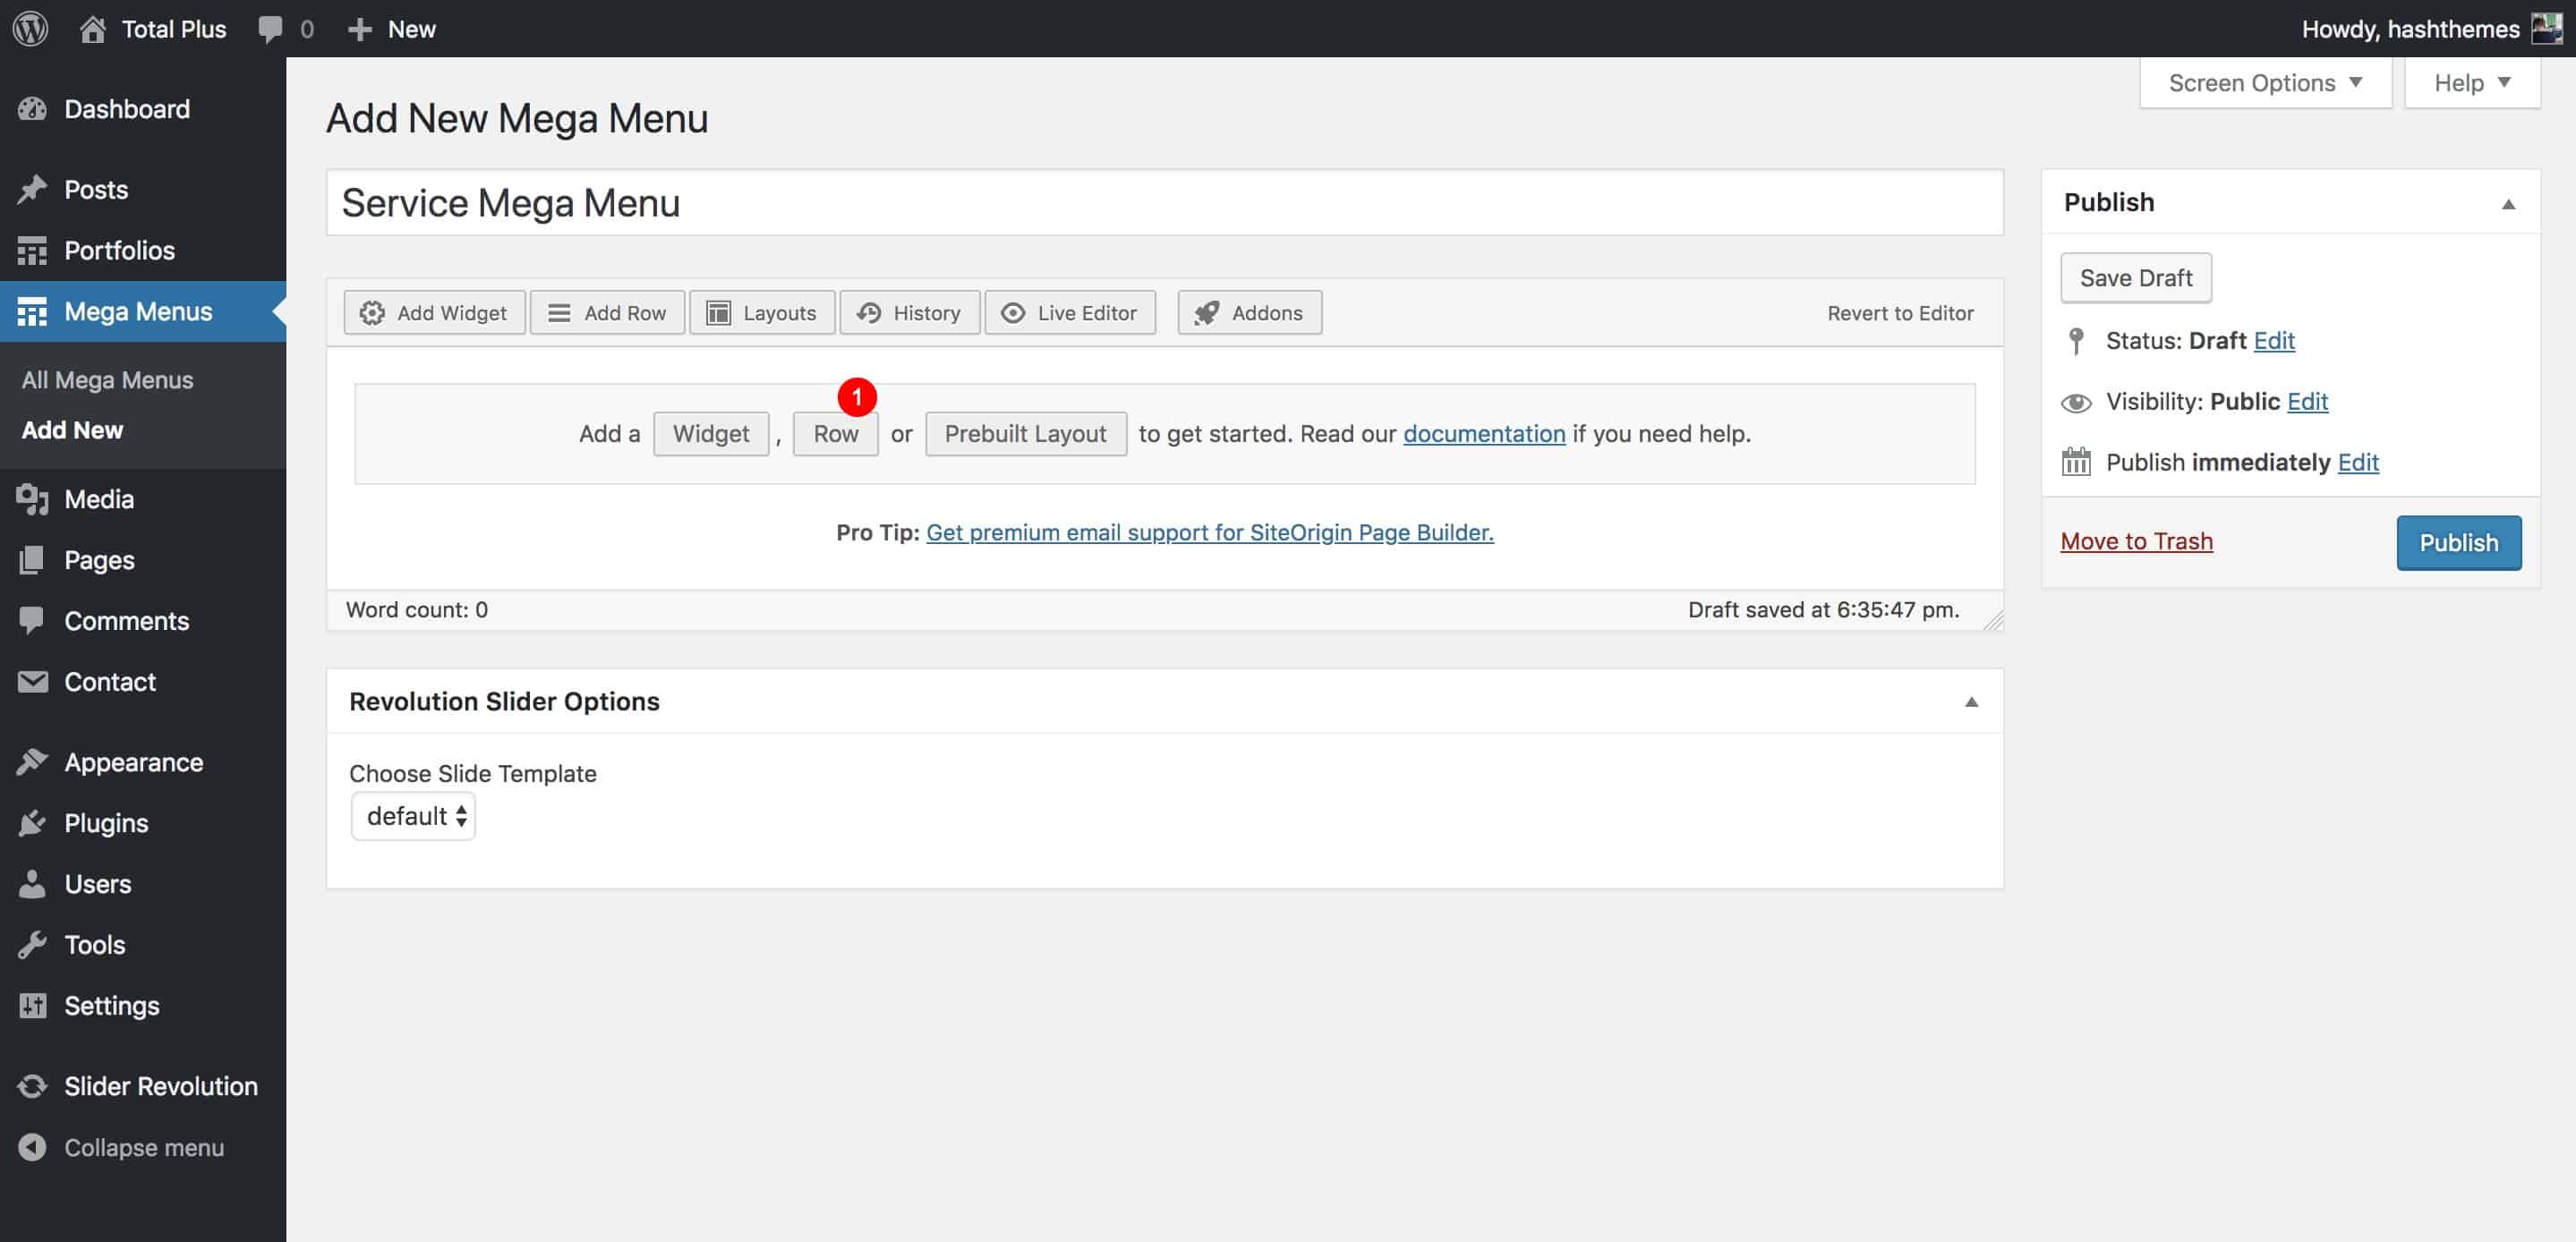
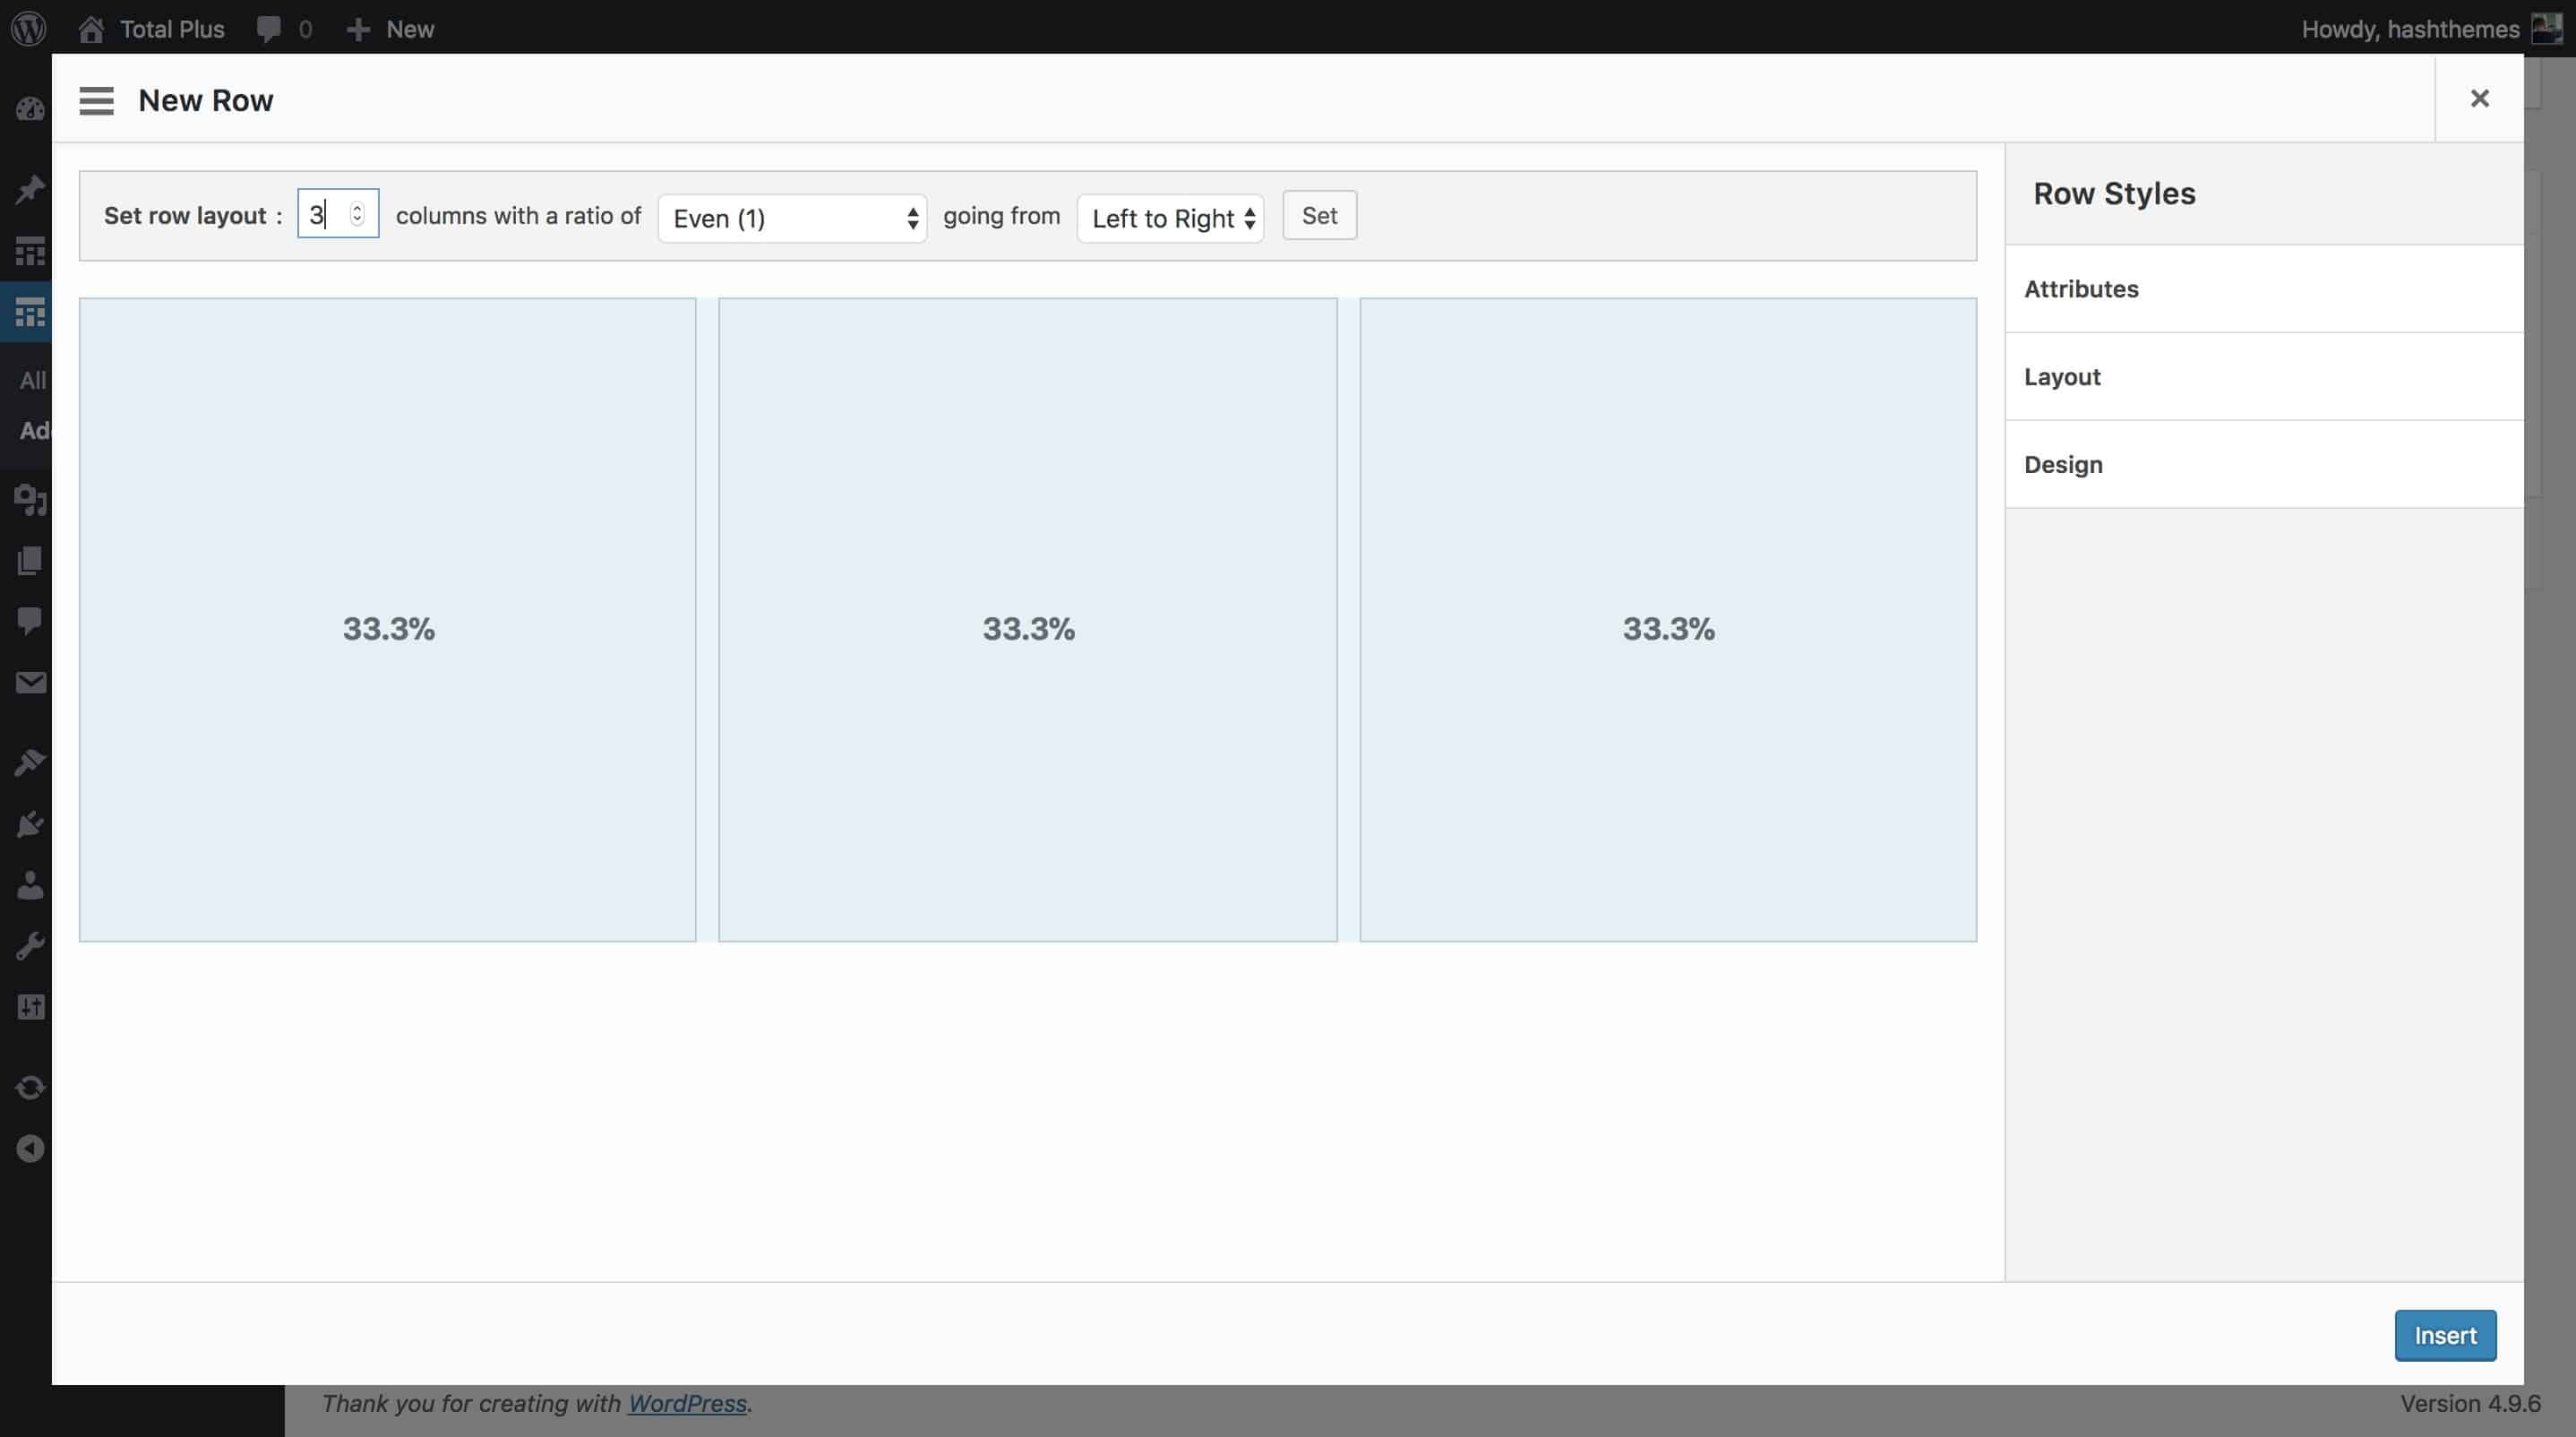
- A page builder will appear. Click on the Row button as shown in screenshot 2 and set the column as required.
- We have added 3 columns as shown in screenshot 3.
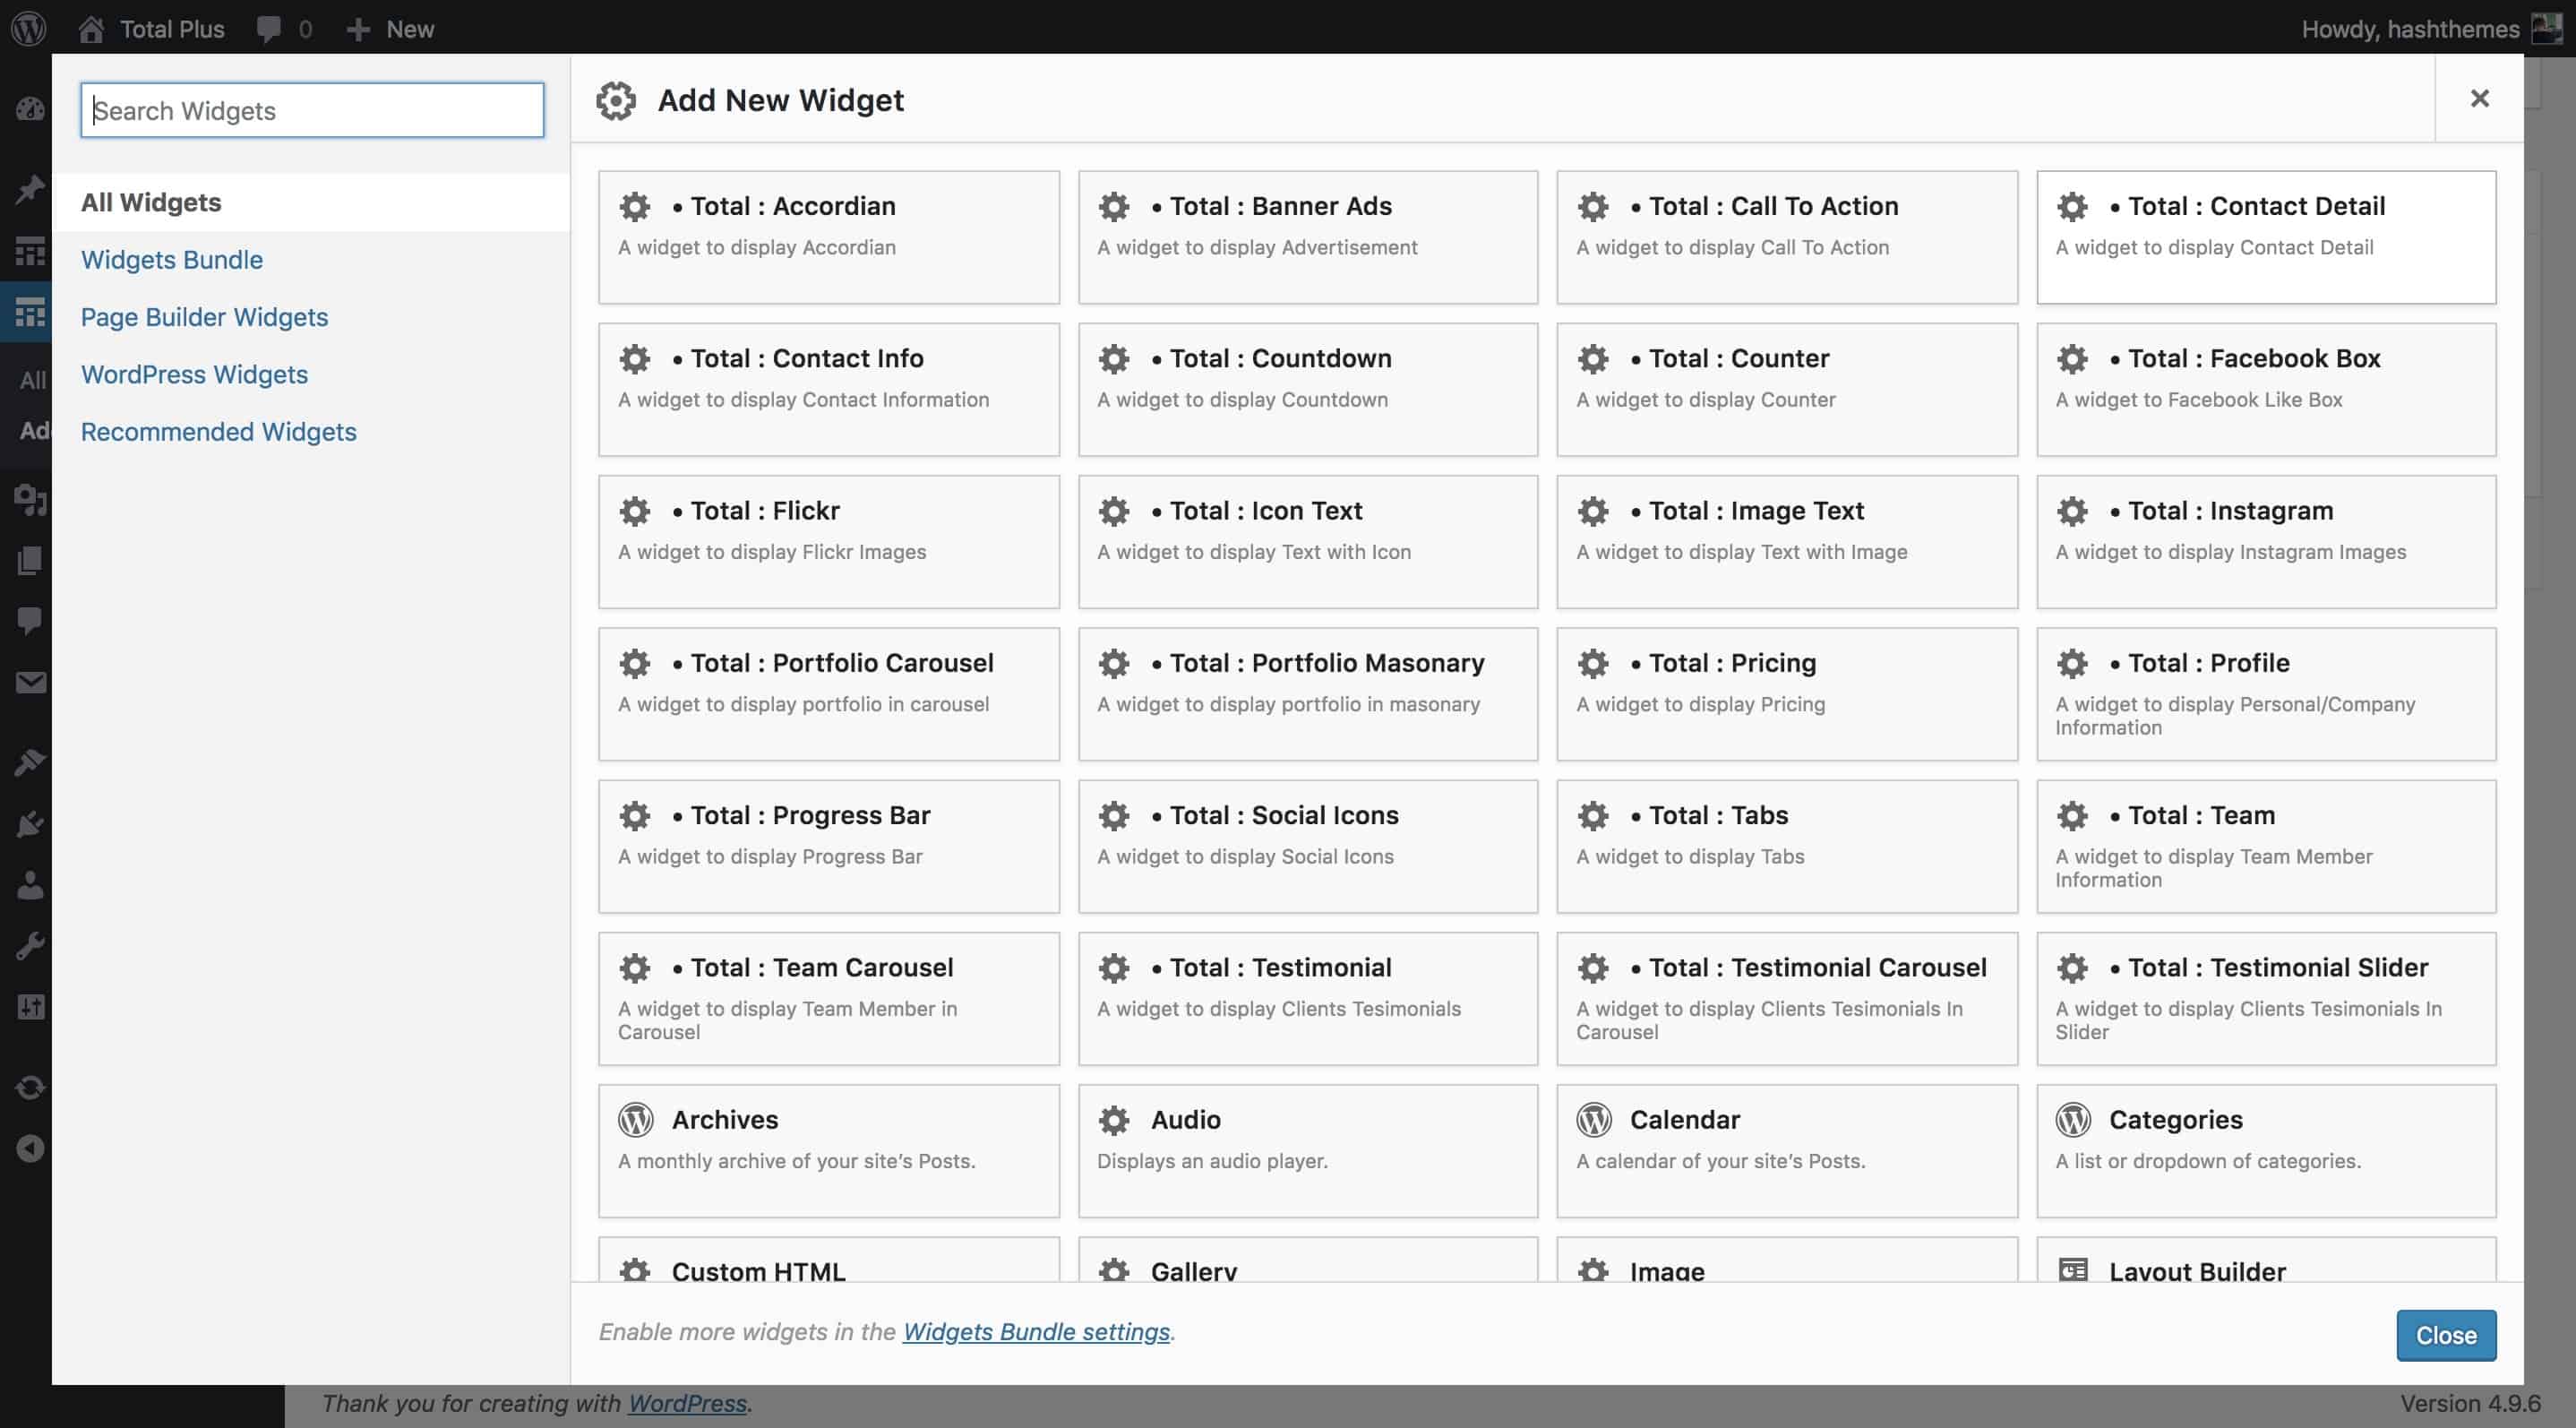
- Now add the widgets in the created columns. We have added the “Icon Text” widget. You can add any widget from the available 30+ widgets as shown in screenshot 4.
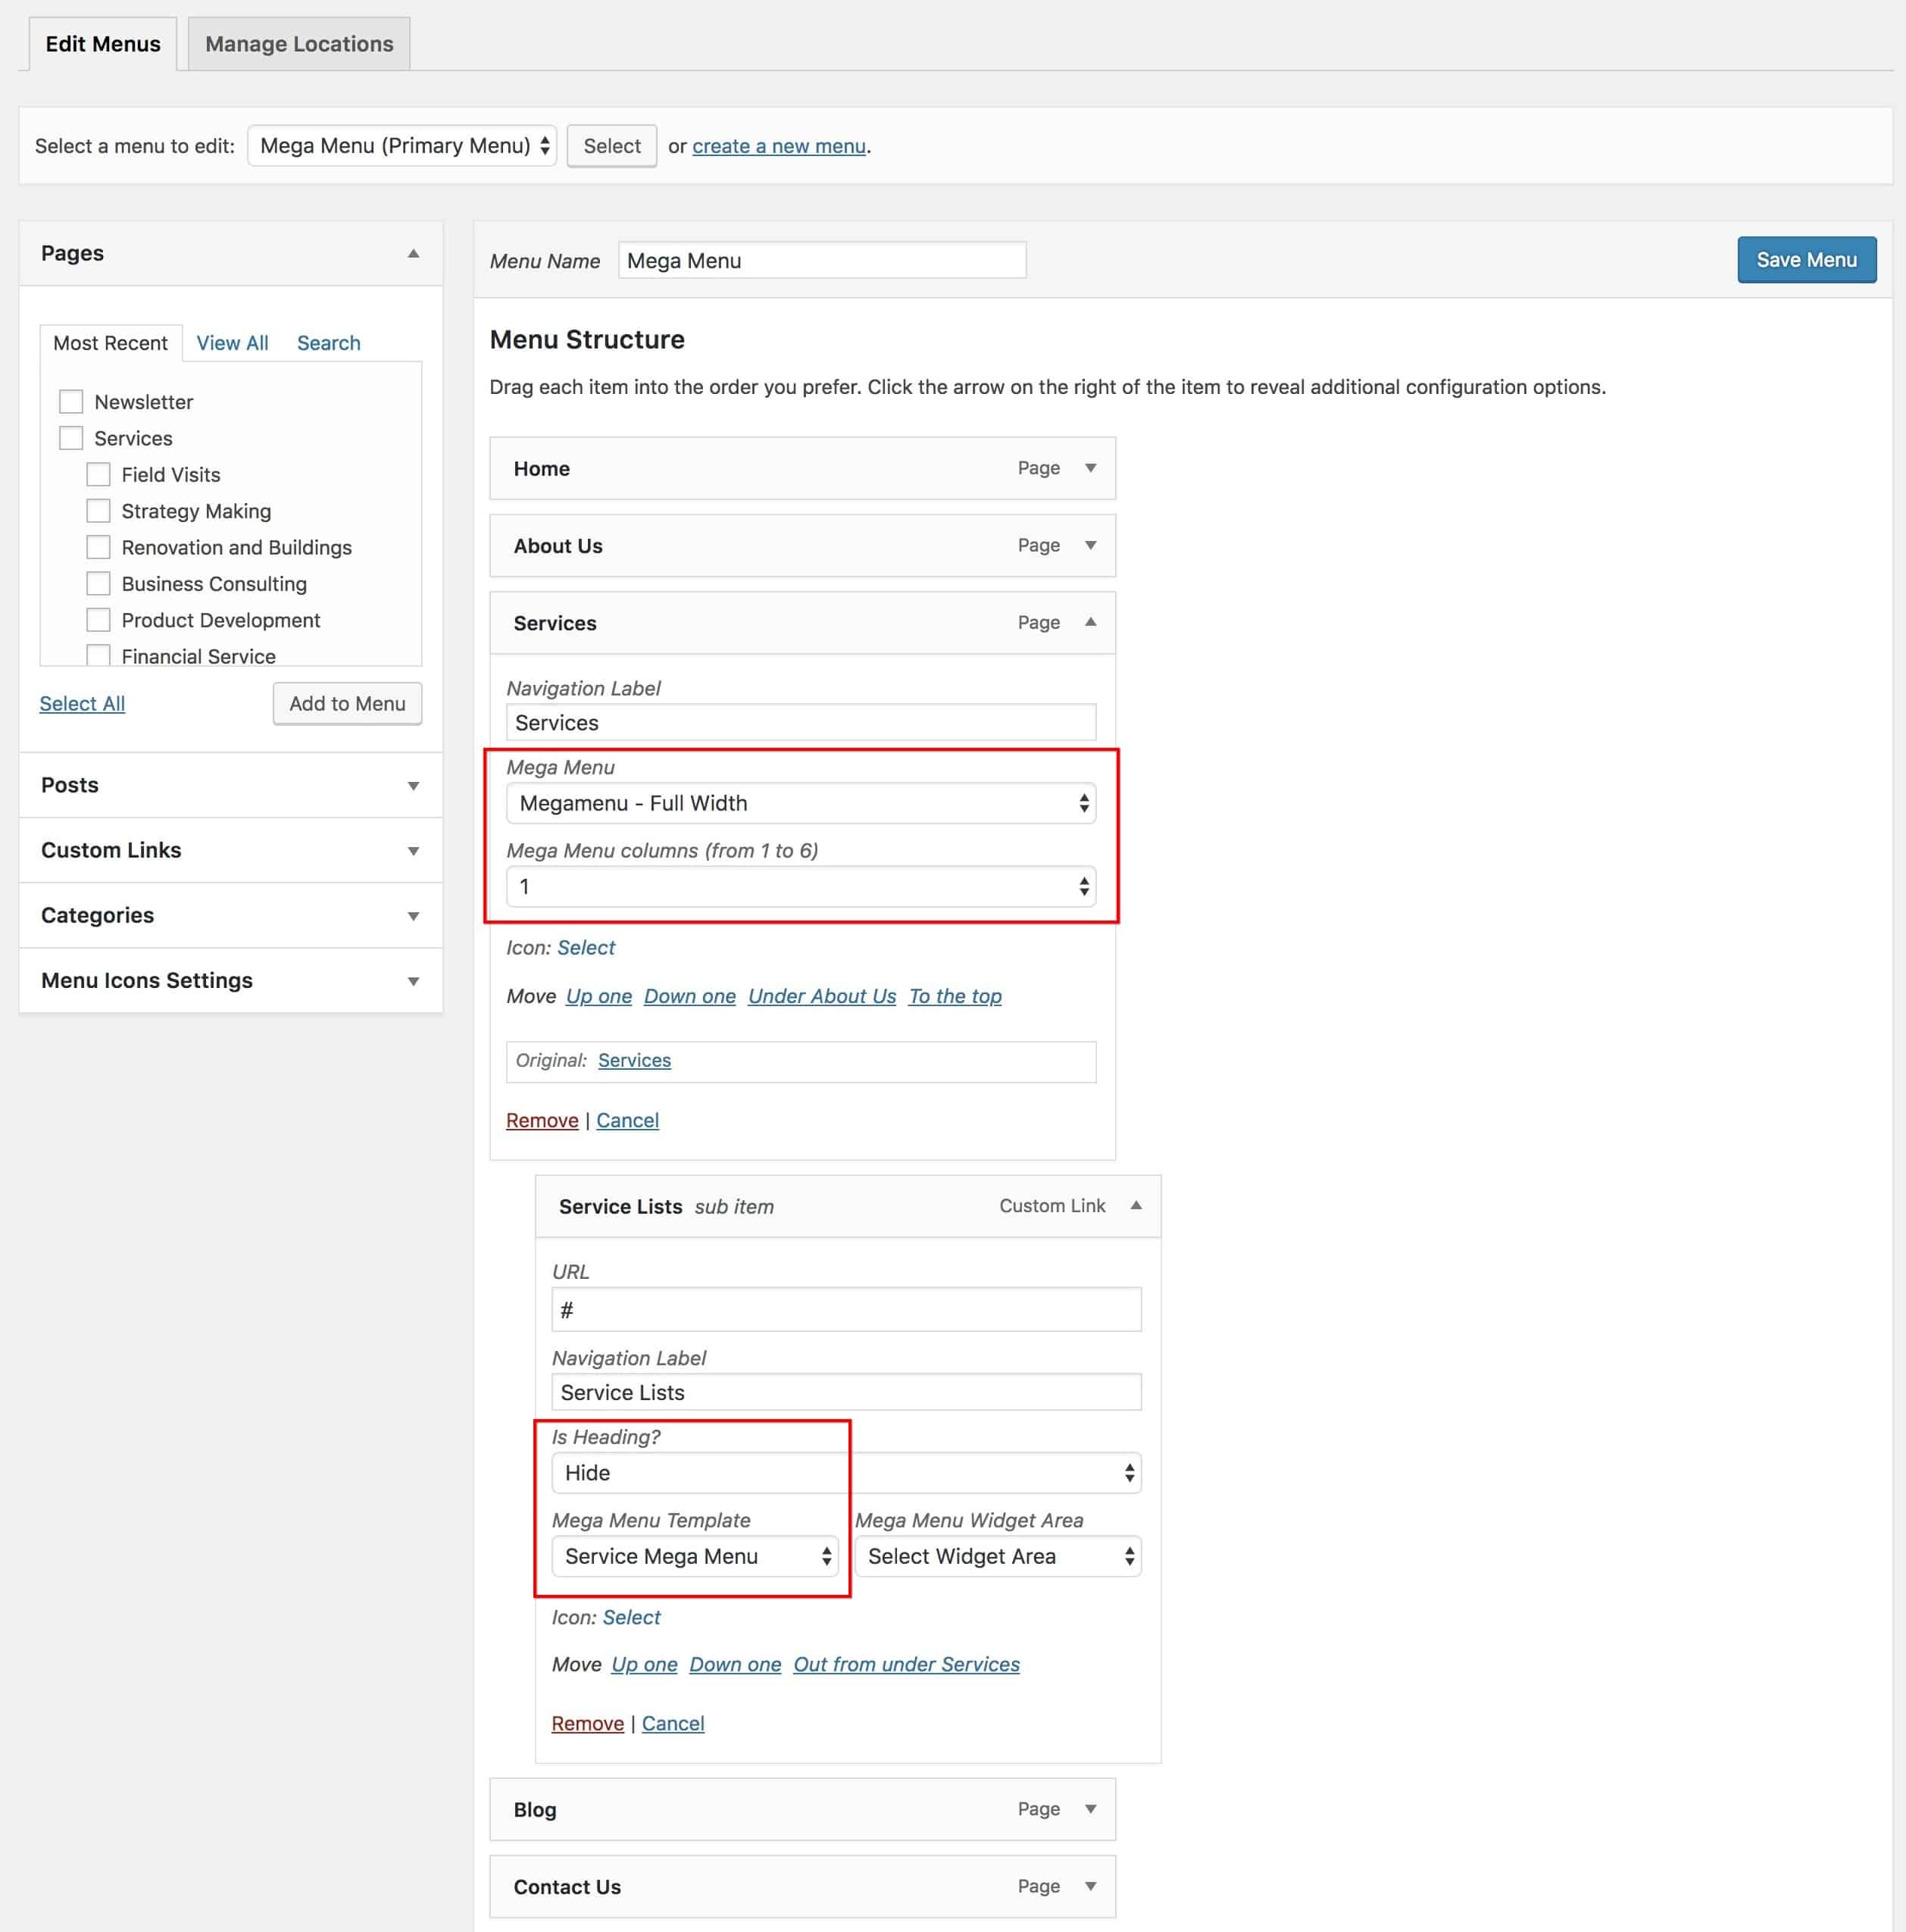
- After you have created a Mega Menu template, go to Dashboard > Appearance > Menu. Create a menu and add menu items. Choose the menu item that you want to show the megamenu and set the MegaMenu – Full Width for the Mega Menu option and Choose column 1 for the Mega Menu Columns.
- Add the custom link as a submenu of the megamenu and then hide the heading by setting the Is Heading option to Hide. Choose the MegaMenu Template that we created earlier in the Mega Menu Template option as shown in screenshot 6.
The megamenu appears on the front end as shown in screenshot 7.

2) Elementor Page Builder
The first step in creating mega menus with Elementor is to install this page builder if you haven’t installed it yet. Creating a Mega Menu using Elementor is a breeze. Follow these steps to create a MegaMenu:
- Go to Dashboard > Mega Menus and click on Add New.
- Add the Title of the Mega Menu.
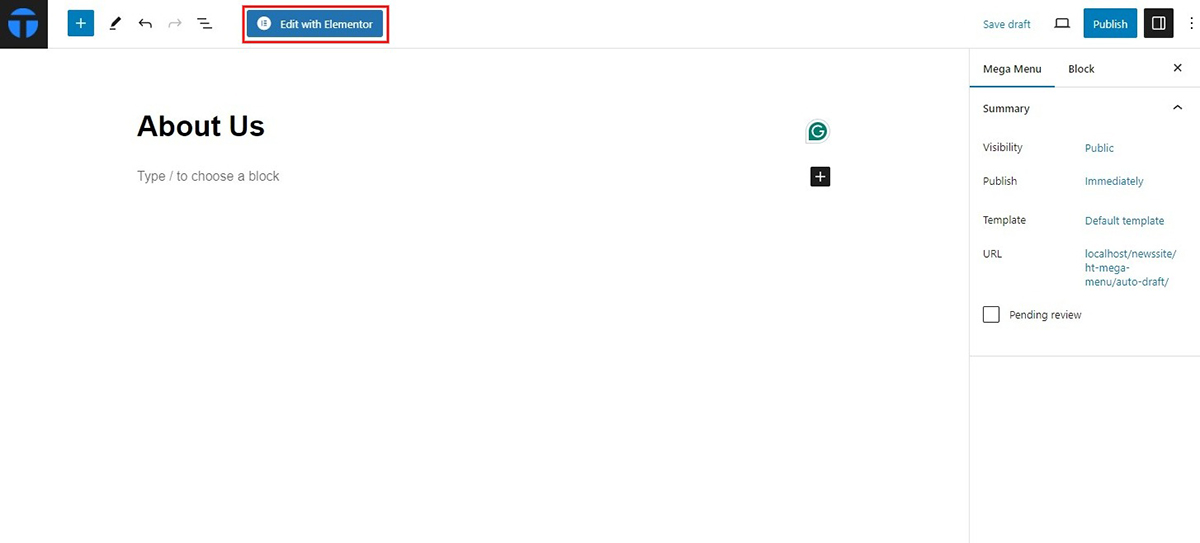
- Click on Edit with Elementor. You will be redirected to the Elementor page builder where you can make further changes.
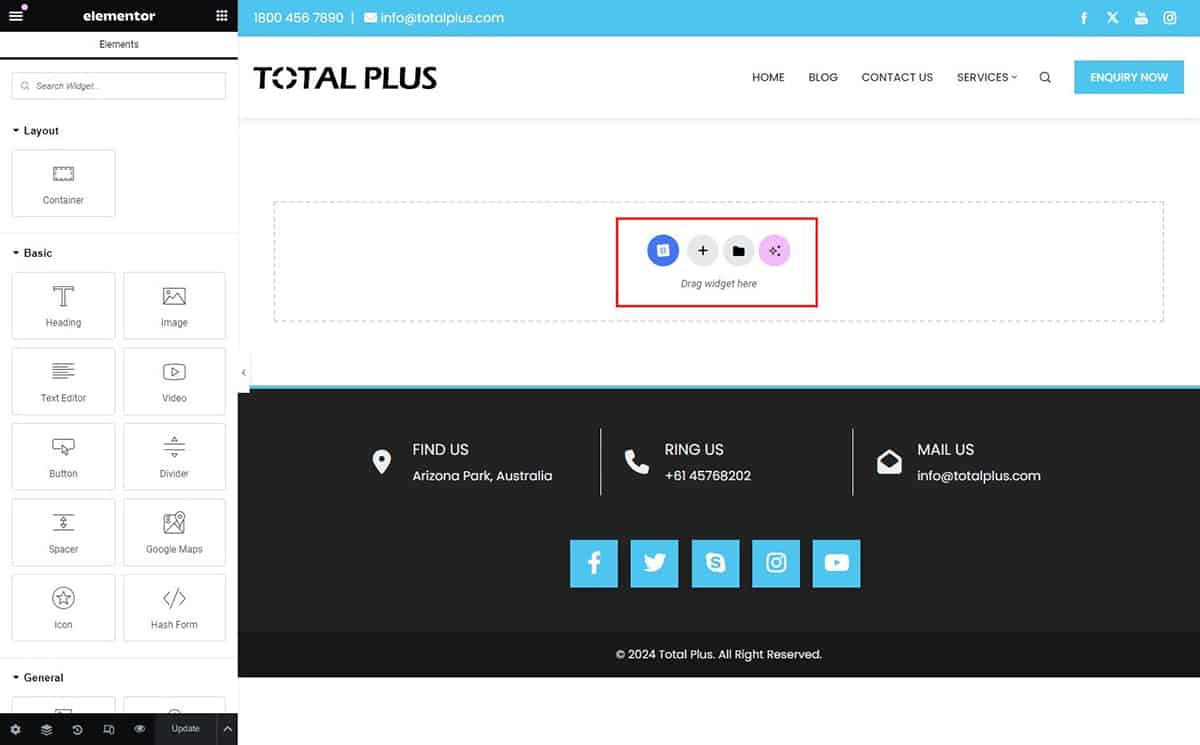
- Choose the appropriate widget and elements to create the Mega Menu of your preference.
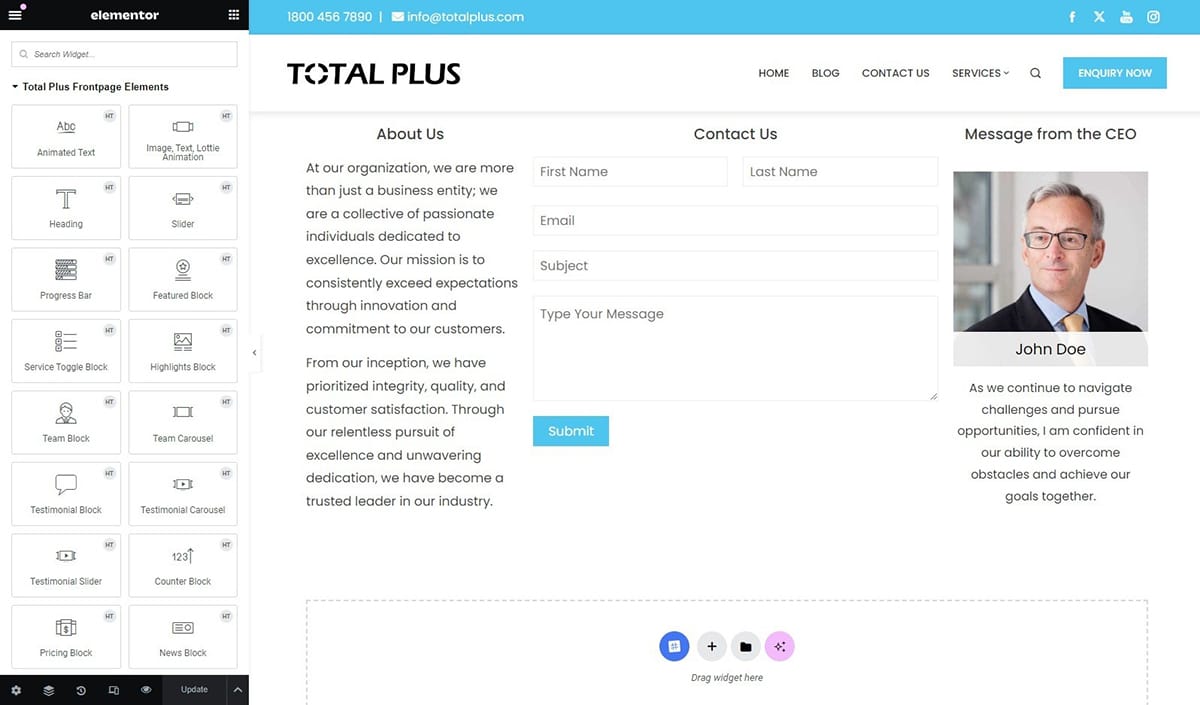
- Here in this presented screenshot, you can see that we have created mega menu along with different contents.
- Click on Update to save the necessary changes.
To make sure that your Mega Menu appears on the menu header follow these steps:
- Go to Dashboard > Appearance > Menu. Create a menu and add menu items. Choose the menu item that you want to show the megamenu and set the MegaMenu – Full Width for the Mega Menu option and Choose column 1 for the Mega Menu Columns.
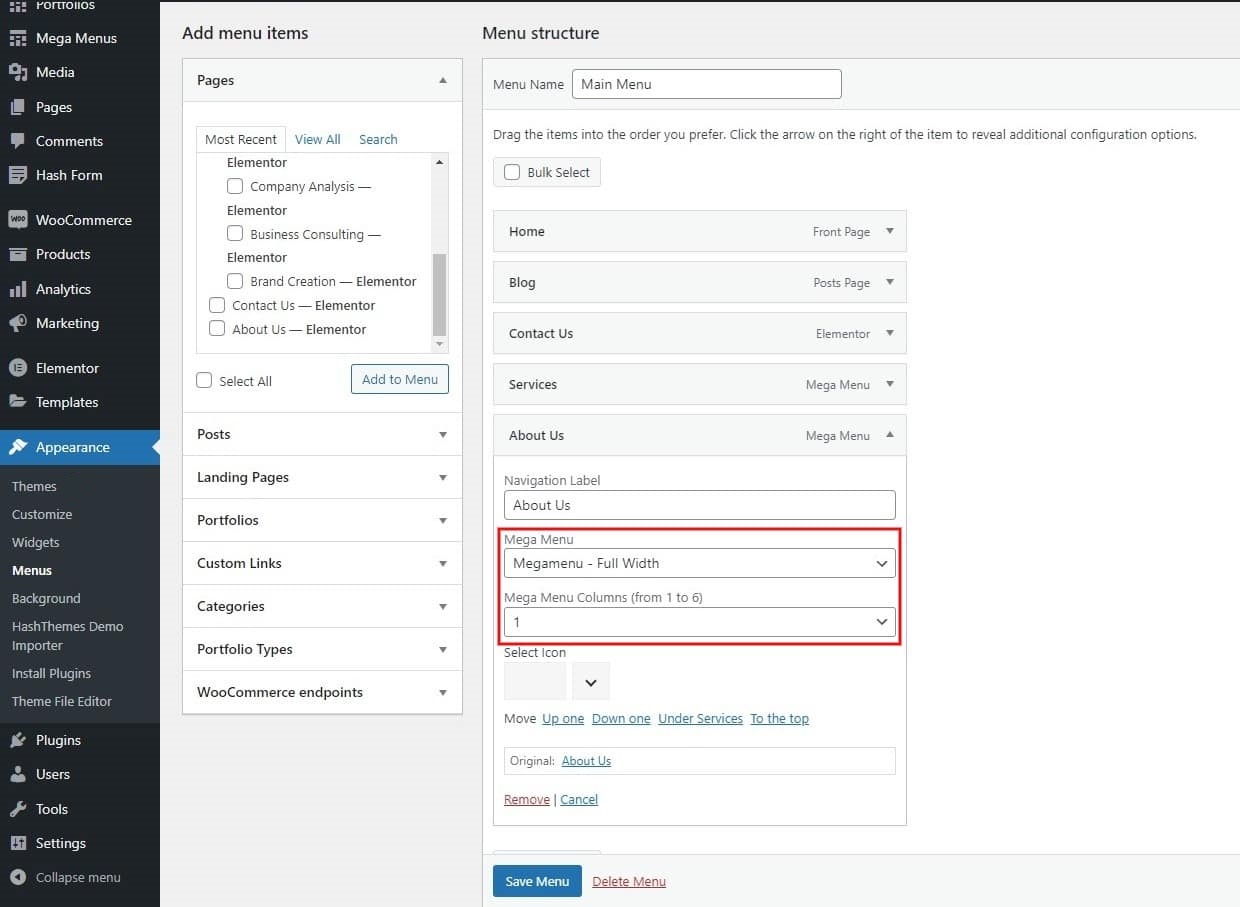
- Add the custom link as a submenu of the megamenu and then hide the heading. Next, choose MegaMenu Template that we created earlier in the Mega Menu Template option as shown in screenshot.

- The Mega Menu appears on the front end as show in the screenshot.

Following this process you can create as many Mega Menus you can.
Now let’s create a MegaMenu from Widgets
To create a MegaMenu from the widget, we need to go to the widget page and then add the widgets into the widget areas. You can create your widget area which we will discuss below.
- Go to Dashboard > Appearance > Widget Page.
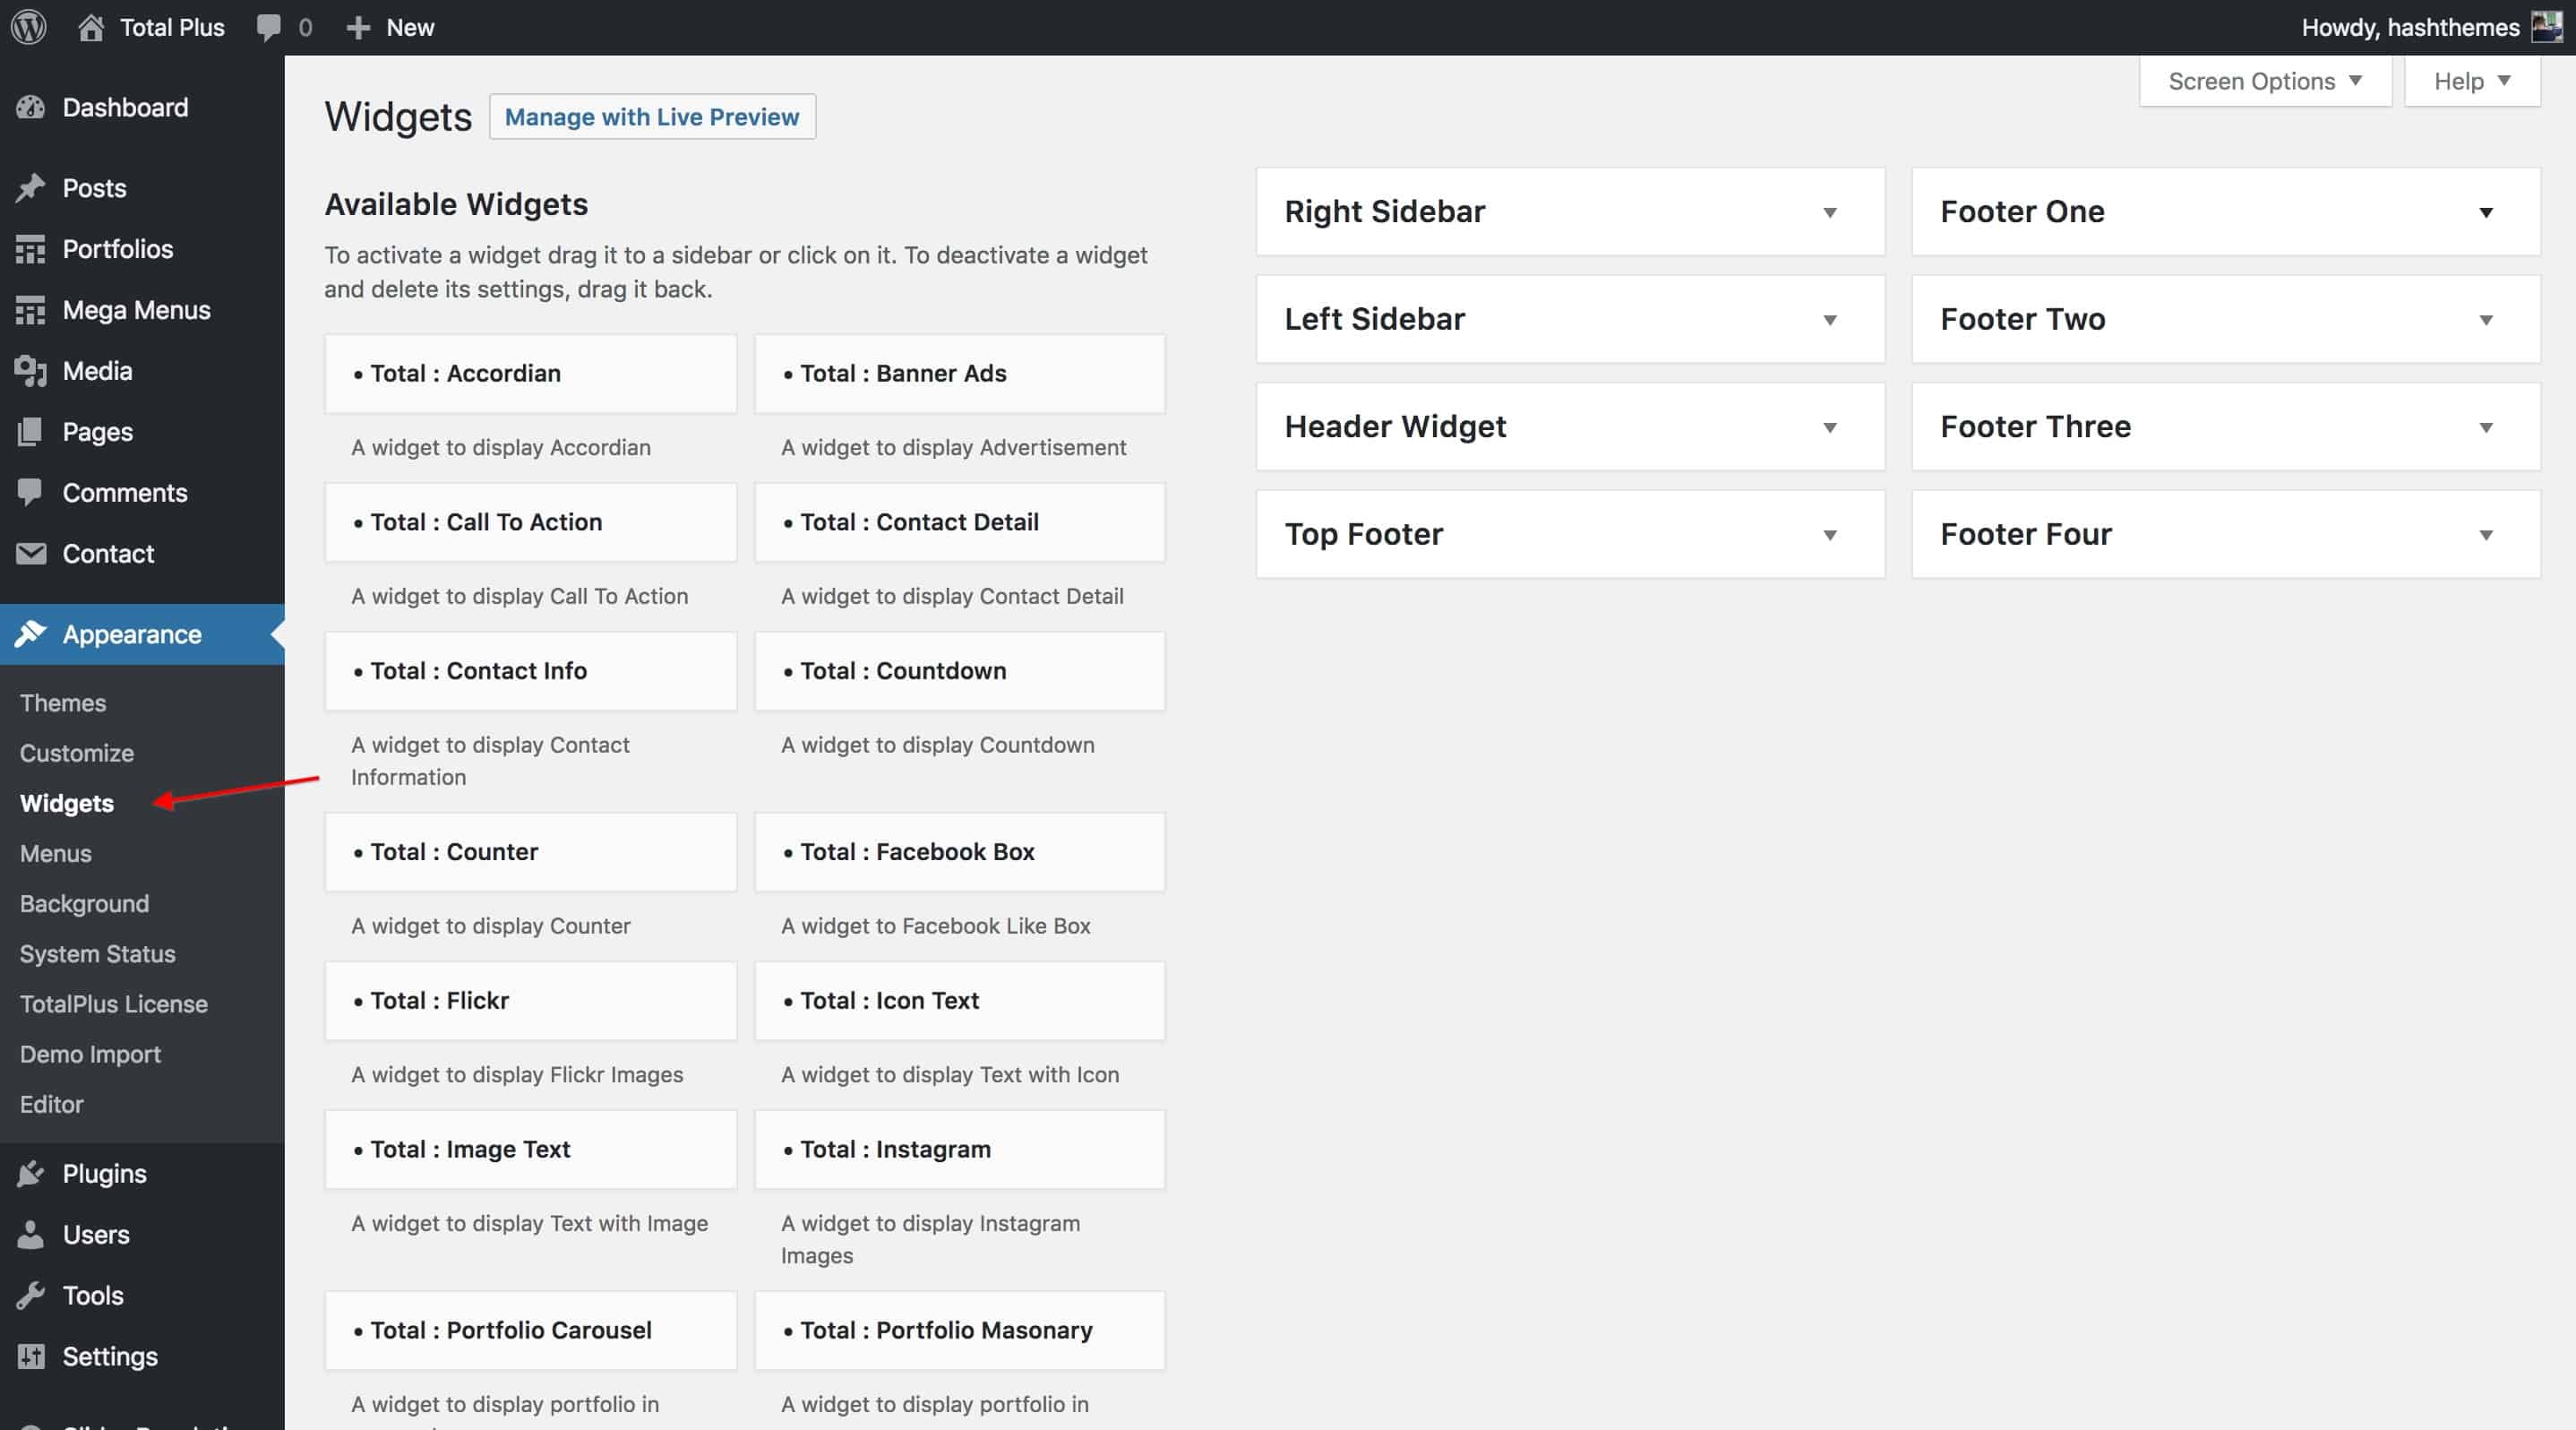
- You can add the widgets in the available widget area in the right column but it would be better to create your own widget area so that you have separate widget areas for your menu.
- Scroll to the bottom of the widget page. You will see a box that will allow you to create the widget as shown in screenshot 2.
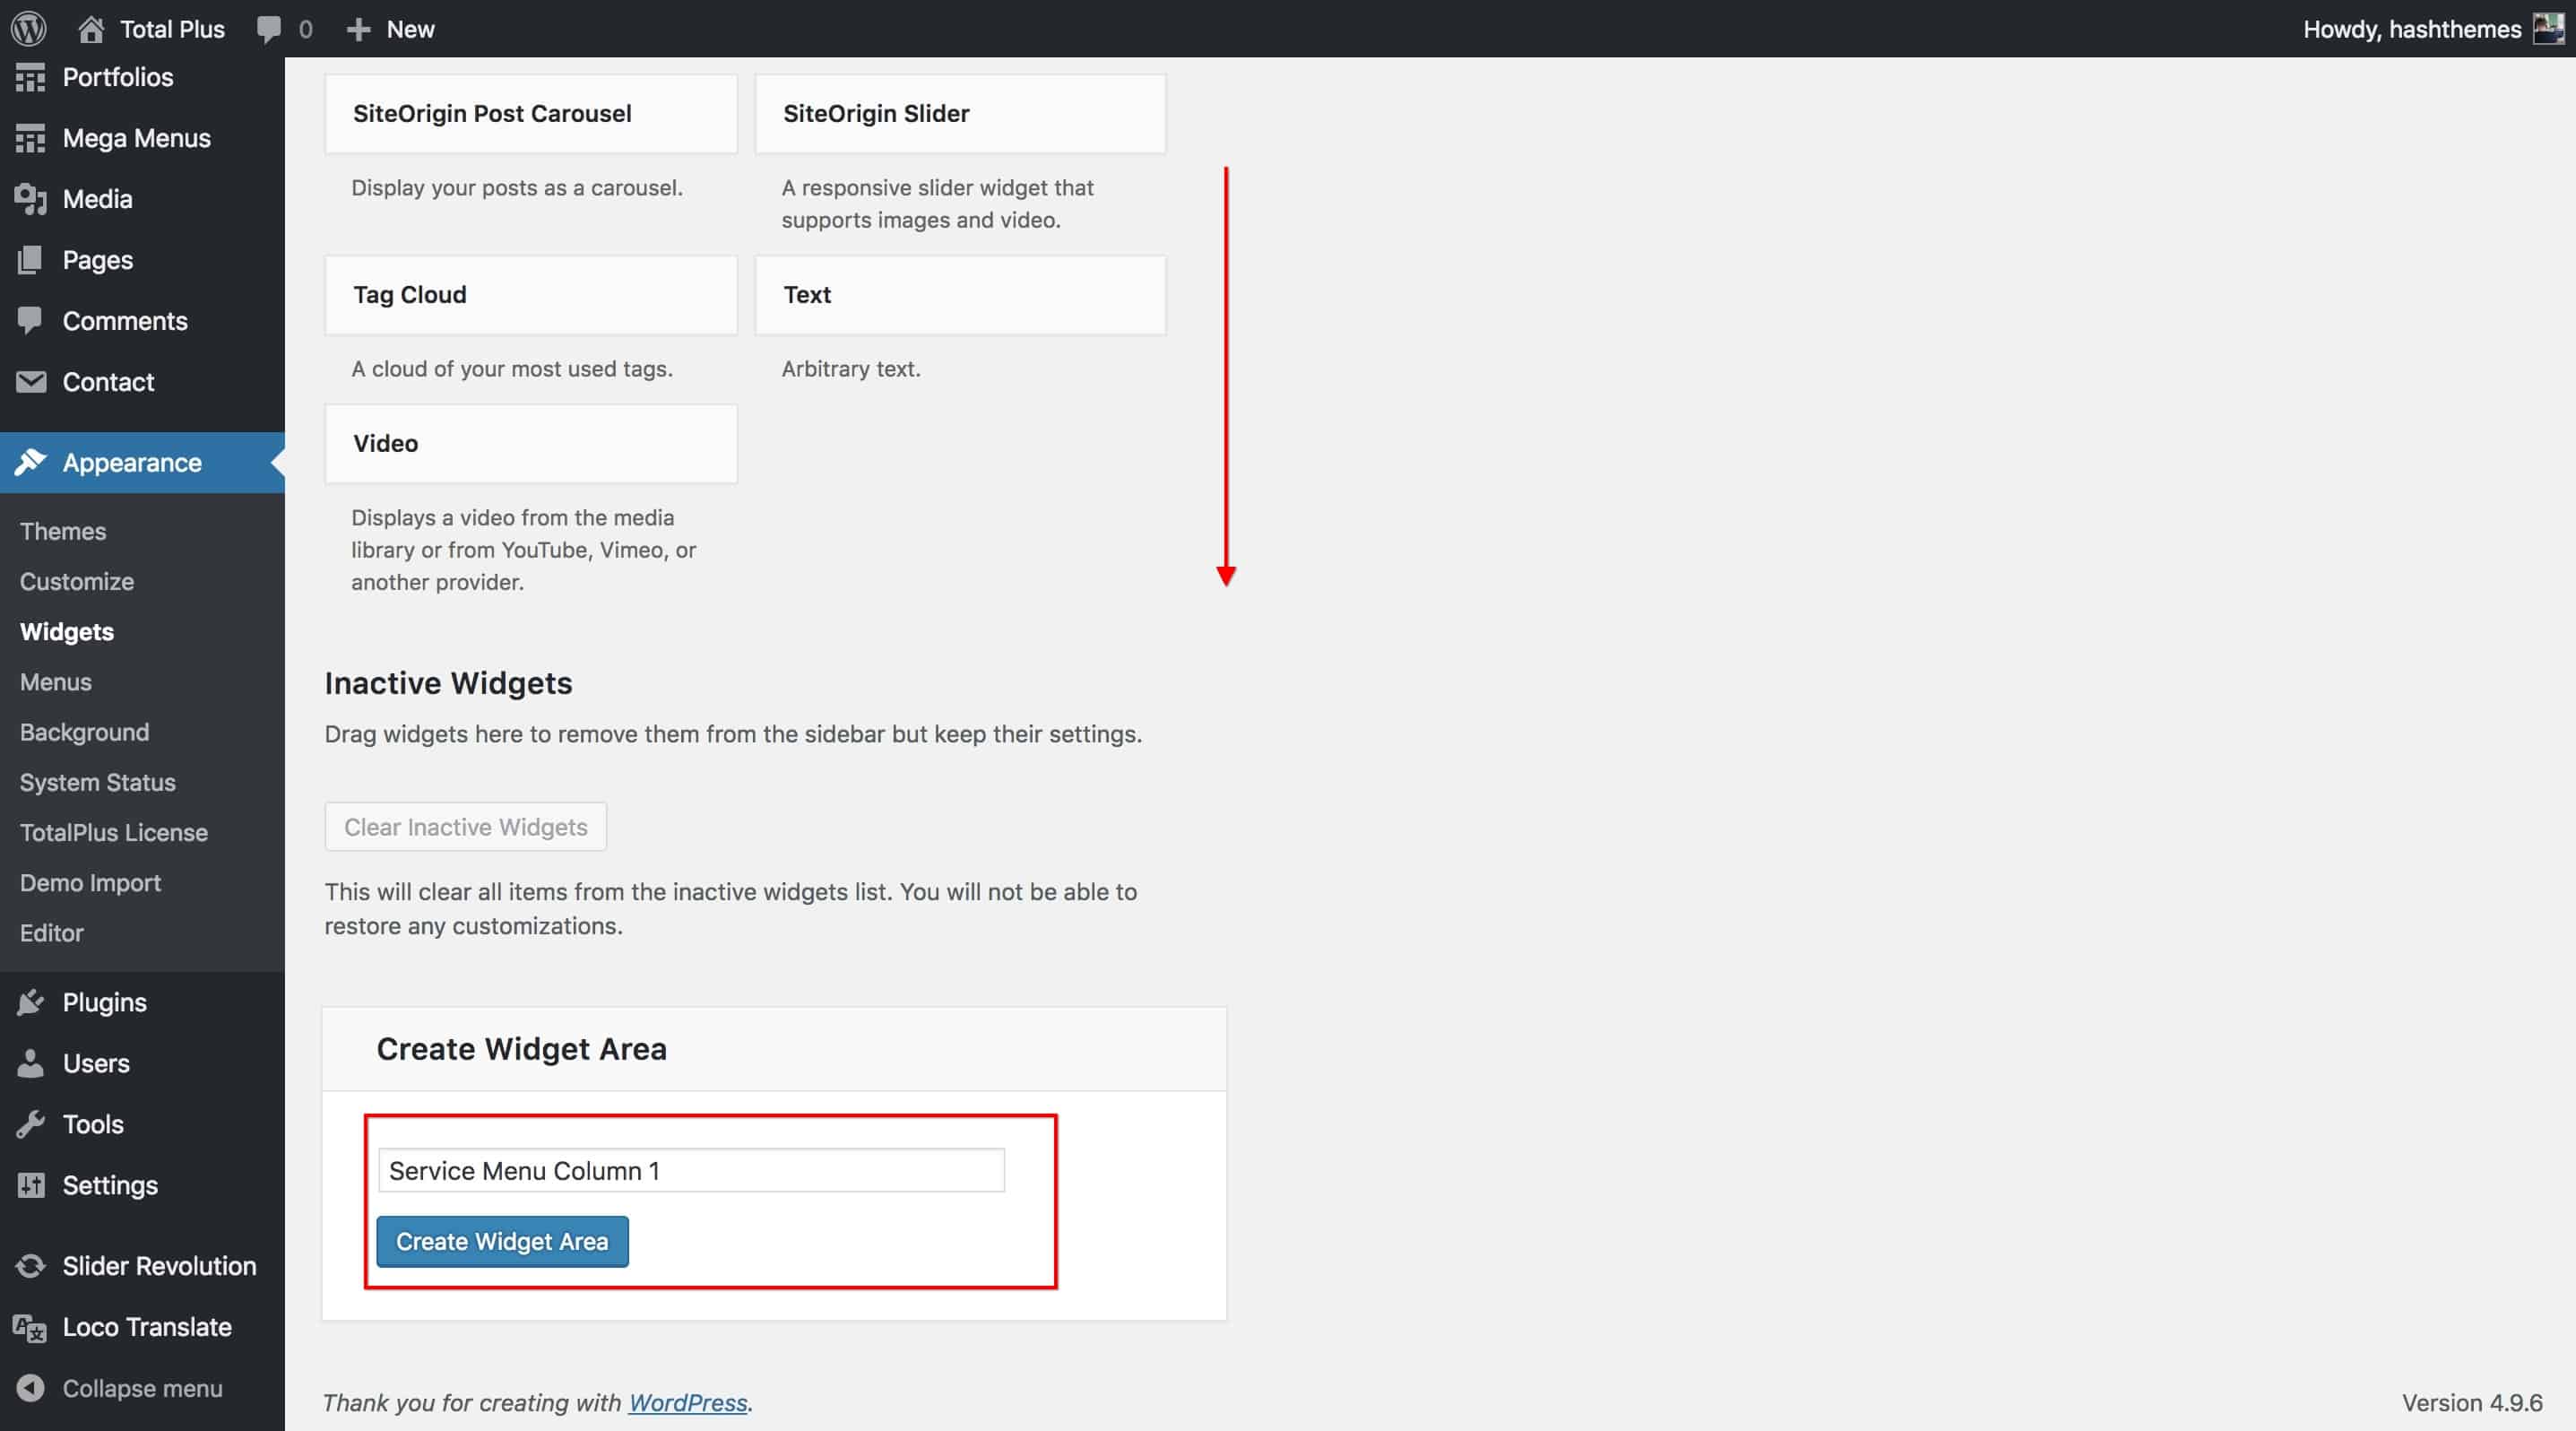
- Enter the name of the widget and click on Create Widget Area button. Create as many widgets as you need.
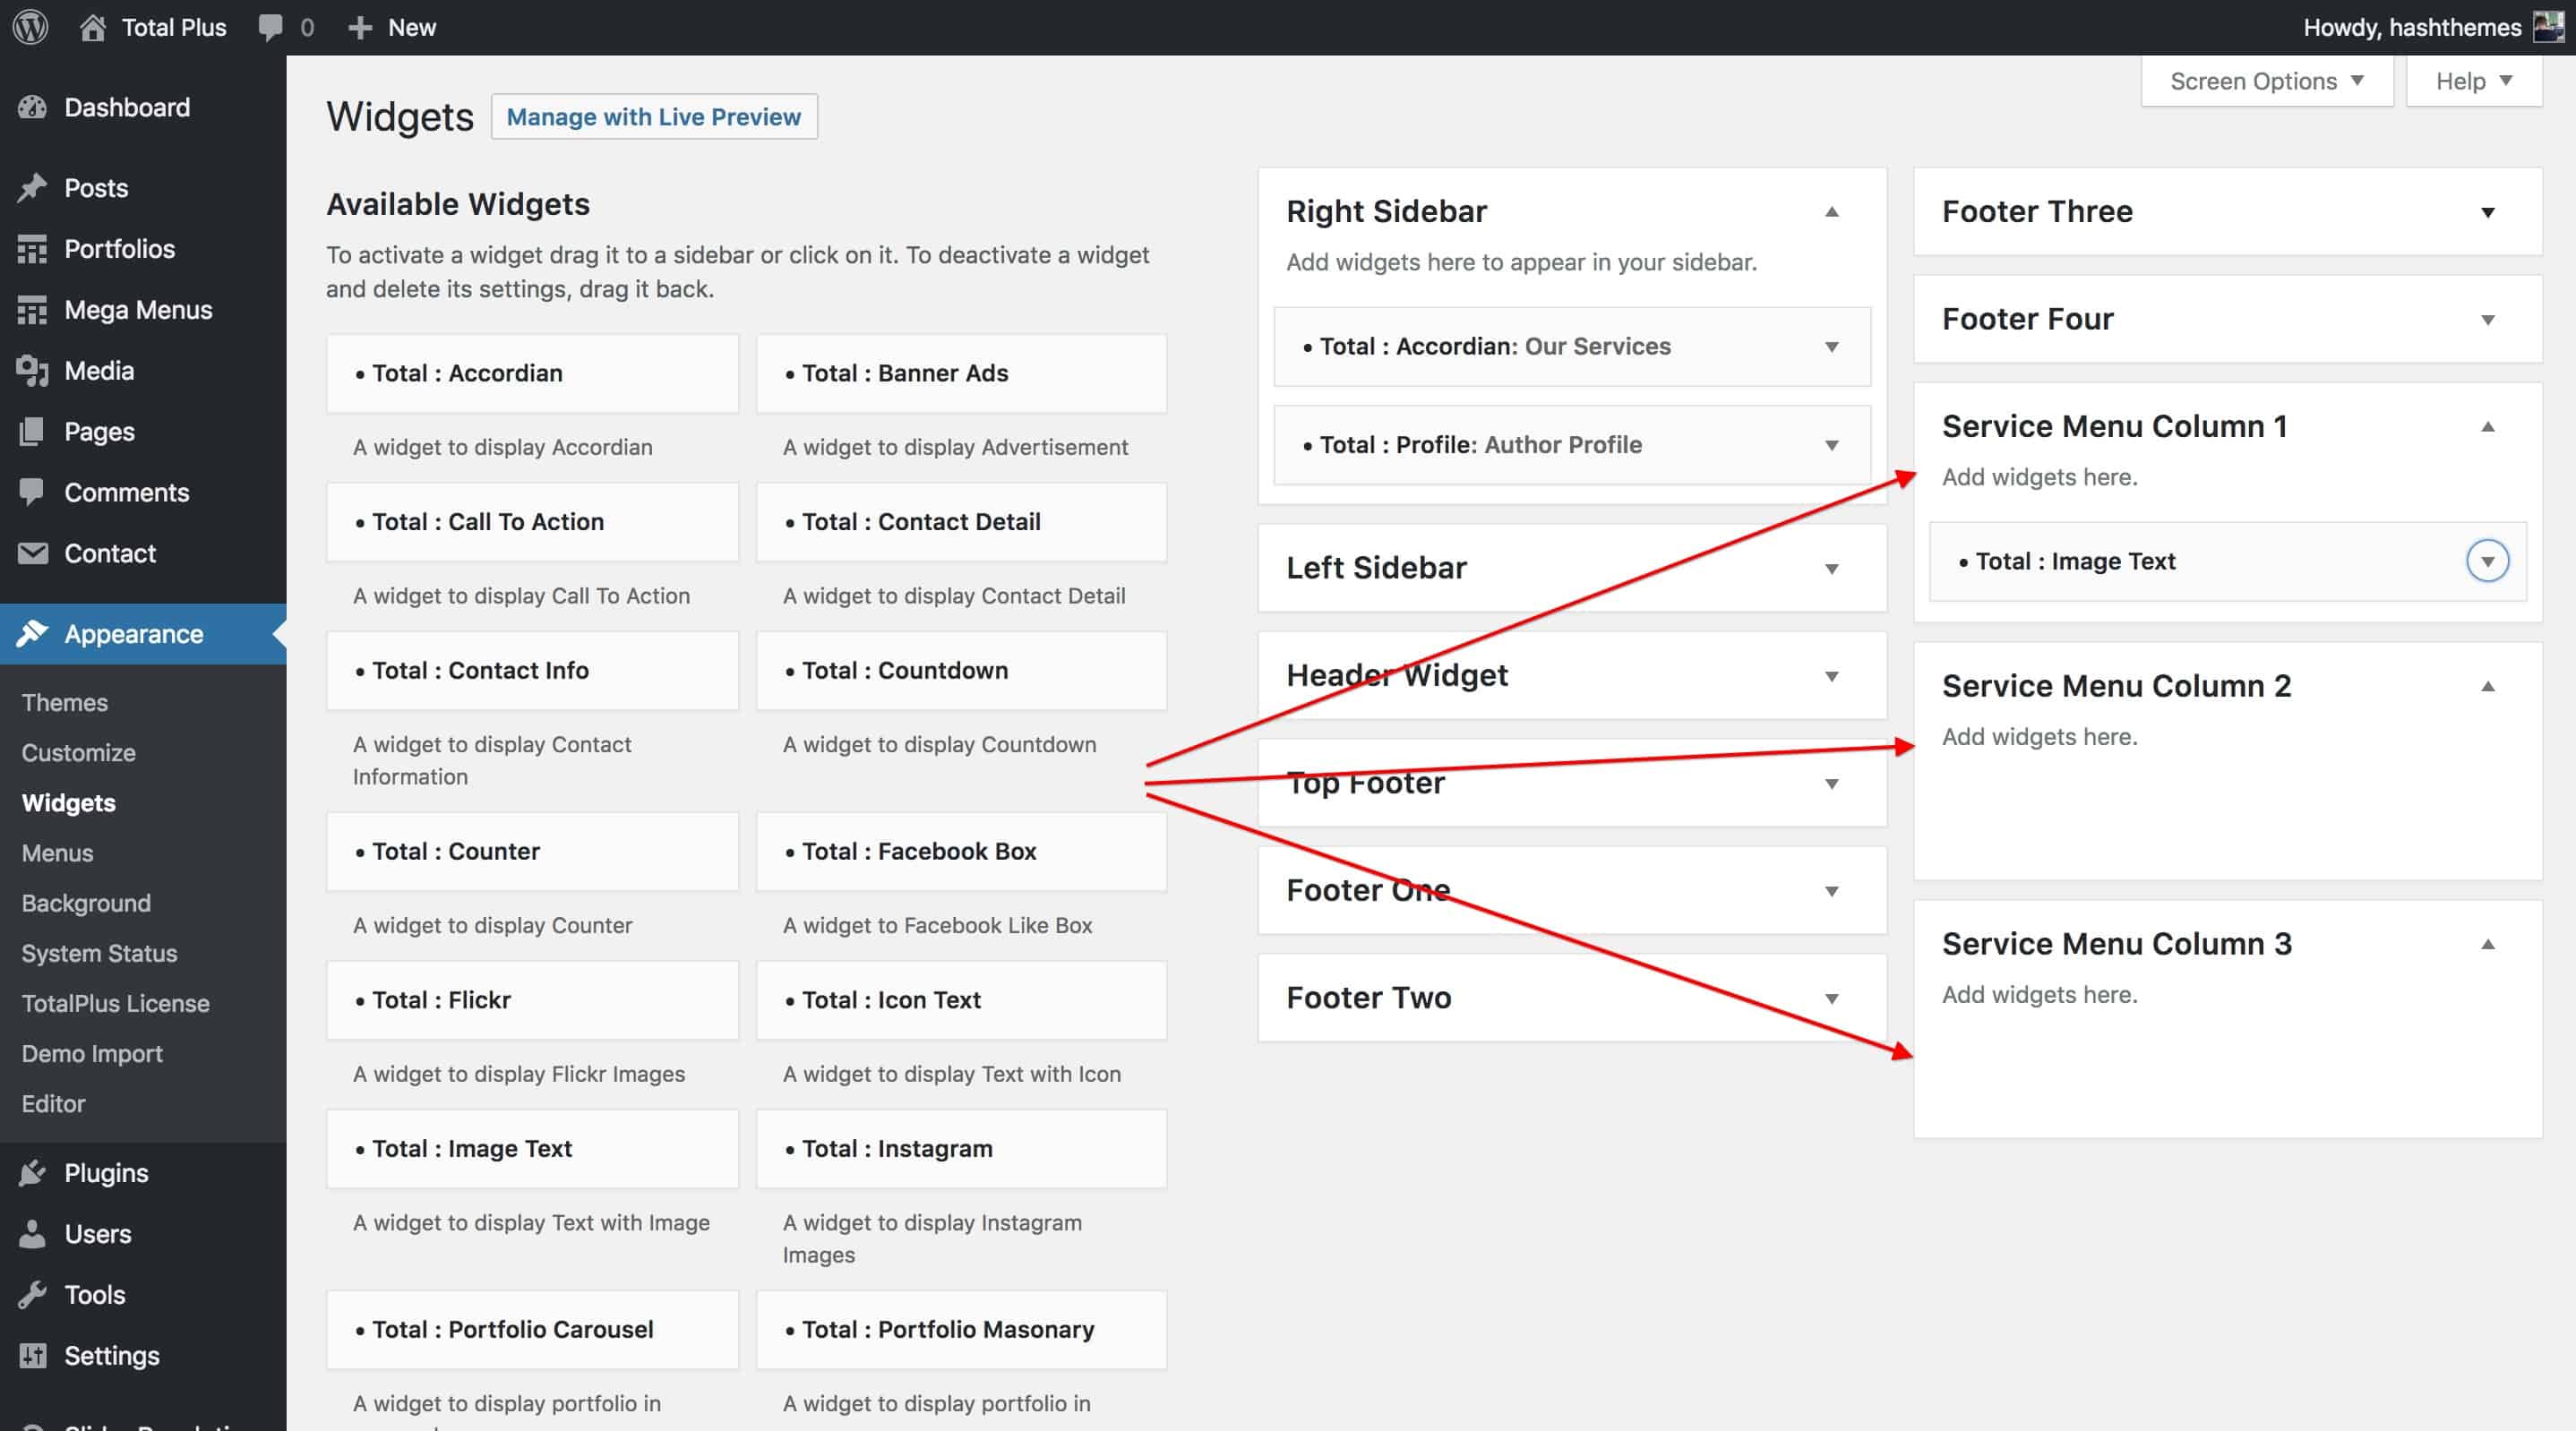
- Once you create the widgets area, it will appear in the right column of the widget page where you can add the widgets from the left column.
- Add the required widget for the menu from the left column as shown in screenshot 3.
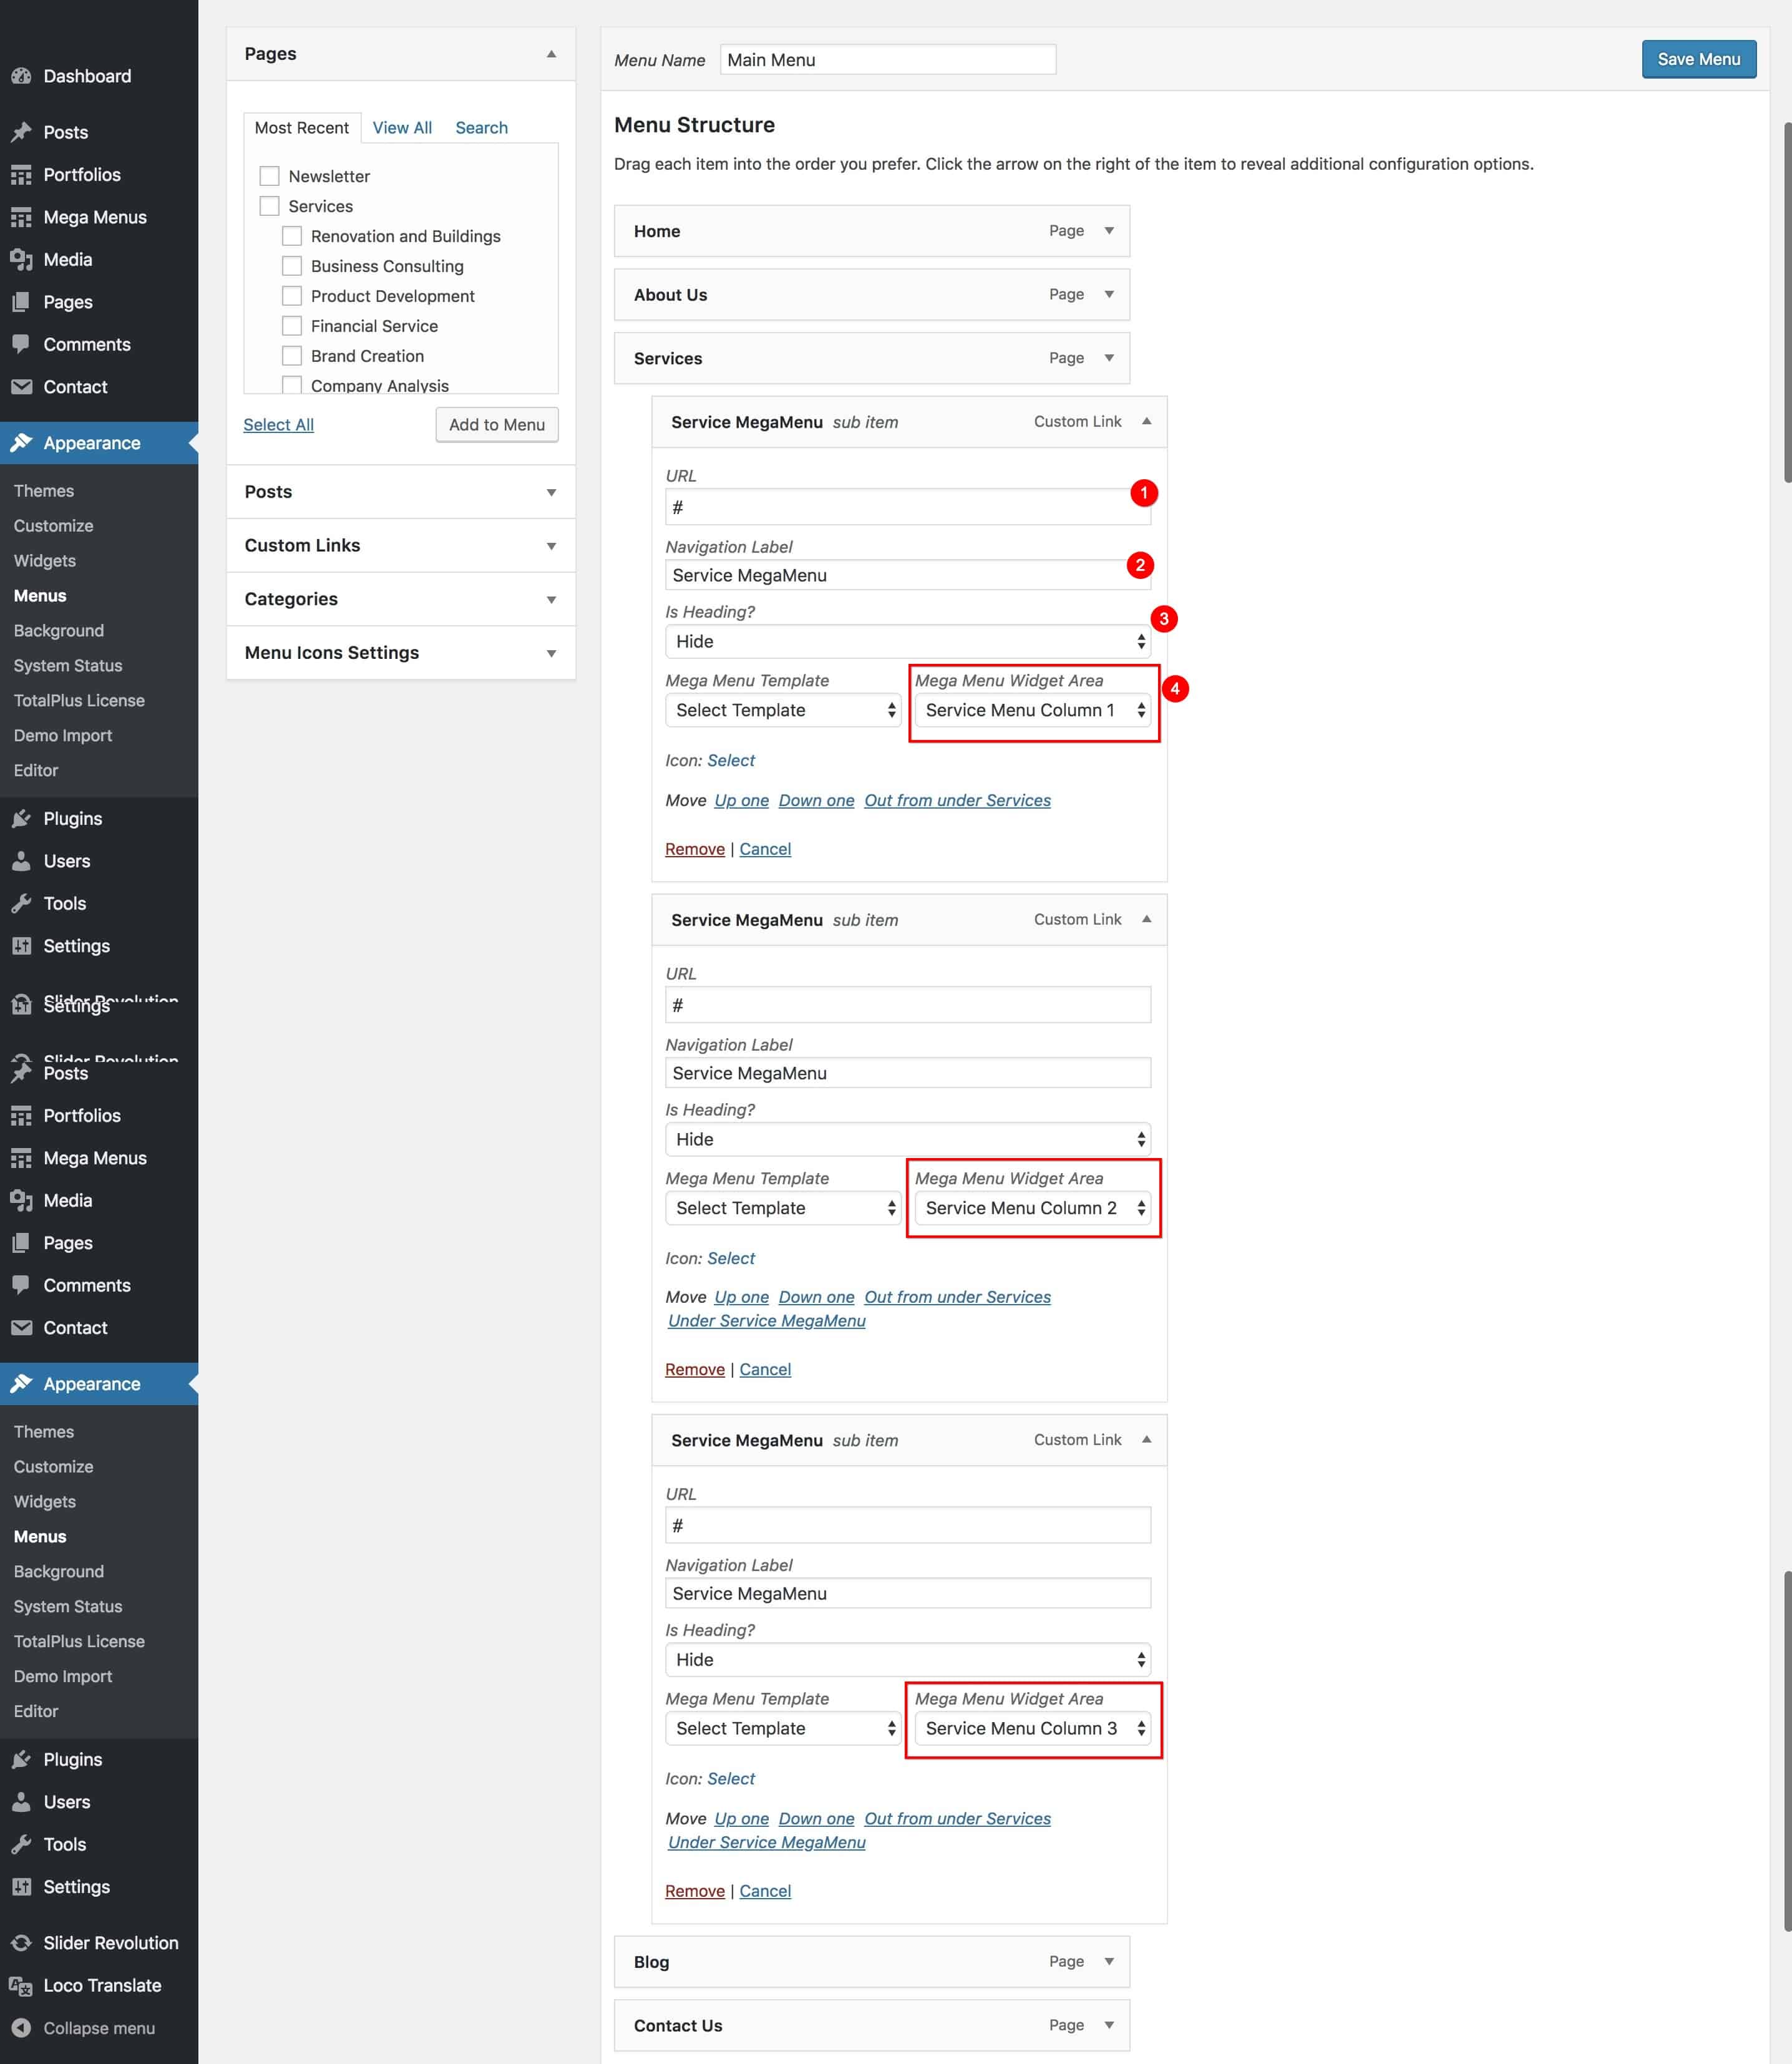
- After you have added the widgets for all the created widget areas, go to Dashboard > Appearance > Menu. Create a menu and add menu items.
- Choose the menu item that you want to show the megamenu and set the MegaMenu – Full Width for the Mega Menu option and Choose column 3 for the Mega Menu Columns as we are going to create a MegaMenu with 3 columns.
- Add the 3 custom links as a submenu of the megamenu and then hide the heading by setting the Is Heading option to Hide. And choose the Widget Area that we created and add the widget for each custom link as shown in screenshot 4.
- The megamenu appears in the front end as shown in screenshot 5.

Important: You need to save the Menu as Primary Menu for the MegaMenu to Work. MegaMenu does not work in other Menu locations.